Anforderungen
- Das peoplefone SOFTPHONE ist nur mit dem Produkt peoplefone HOSTED kompatibel
- Unterstützte Browser: Google Chrome
Softphone Bestellen
- Wählen Sie Softphone aus und klicken Sie auf Auswählen.
- Wählen Sie wieviele Personen (Linien) Sie benötigen.
- Definieren Sie die Laufzeit in Monaten.
- Wenn Sie das Produkt testen möchten, können Sie das 30 Tage kostenlos machen.
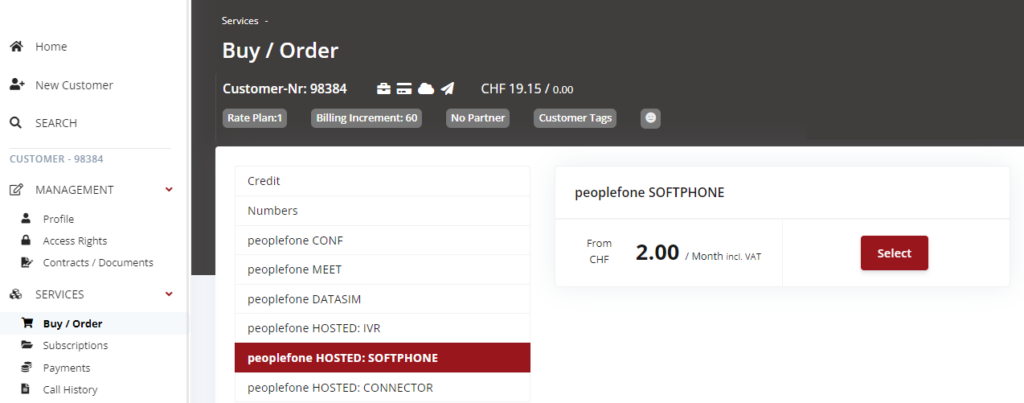
Klicken Sie auf Weiter.

Wählen Sie die gewünschte Zahlungsart aus und klicken Sie auf Zahlen.
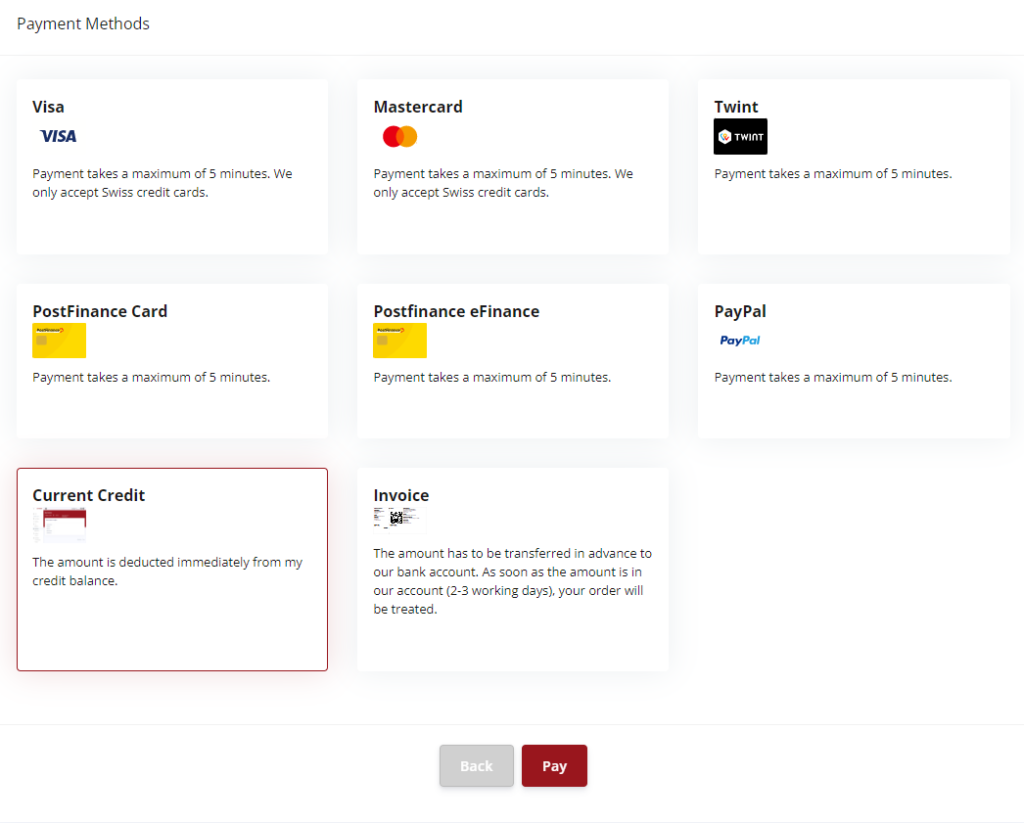

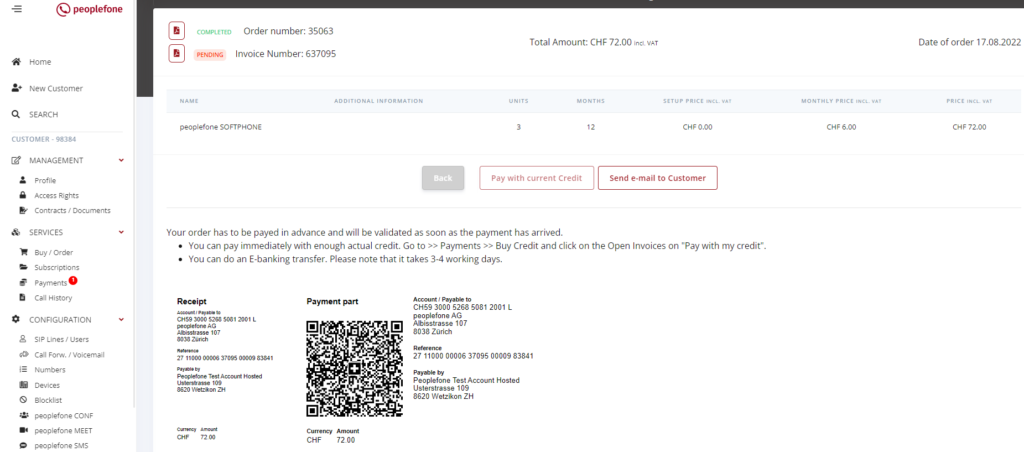
- Sollte das Konto zuwenig Guthaben aufweisen, wird eine Rechnung erstellt
- Bei noch offenen Rechnungen wird Ihnen die bei Zahlungen mit einer Ziffer angezeigt
Softphone Benutzer hinzufügen

Klicken Sie auf Hinzufügen

Wählen Sie den Benutzer aus und hinterlegen die E-Mail-Adresse, klicken Sie auf Hinzufügen

Die angelegten Softphone Benutzer werden Ihnen angezeigt.

Passwort definieren / Benutzer-Aktion
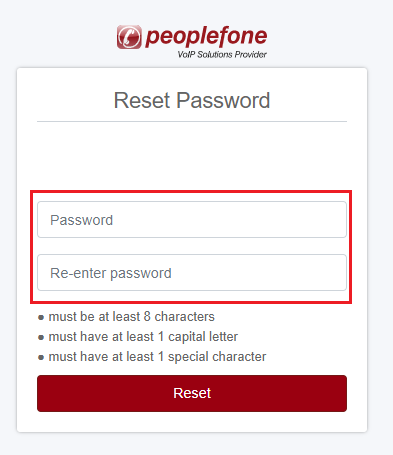
Der Benutzer erhält eine E-Mail und muss ein Passwort für das Login des Softphone neu setzen
Ist die E-Mail bereits schon für das Login verwendet worden, muss keine neues Passwort gesetzt werden, klicken Sie auf den im E-Mail enthaltenen Link.
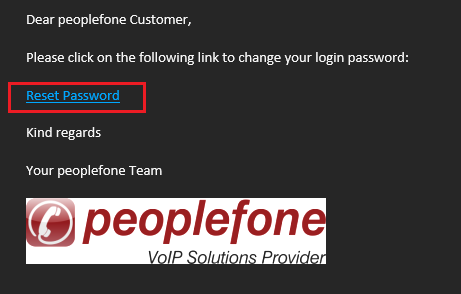
Das Passwort muss zur Verifikation zweimal eingegeben werden, bitte verwenden Sie grosse, kleine und Sonderzeichen, das Passwort muss mindestens 8-Stellig sein.
Anmeldung
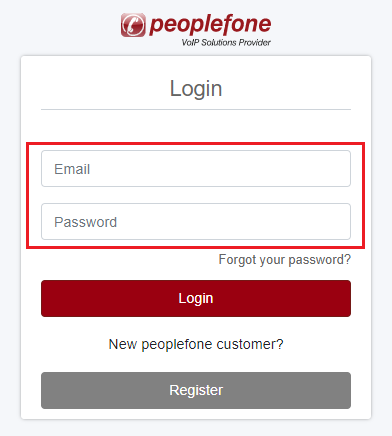
Über den folgenden Link können Sie sich mit peoplefone SOFTPHONE verbinden: https://softphone.peoplefone.com
- Geben Sie Ihre Anmeldedaten ein und klicken Sie auf „Anmelden“ .
- Wenn Sie Ihr Passwort nicht haben, befolgen Sie bitte die hier beschriebenen Anweisungen , um es zurückzusetzen
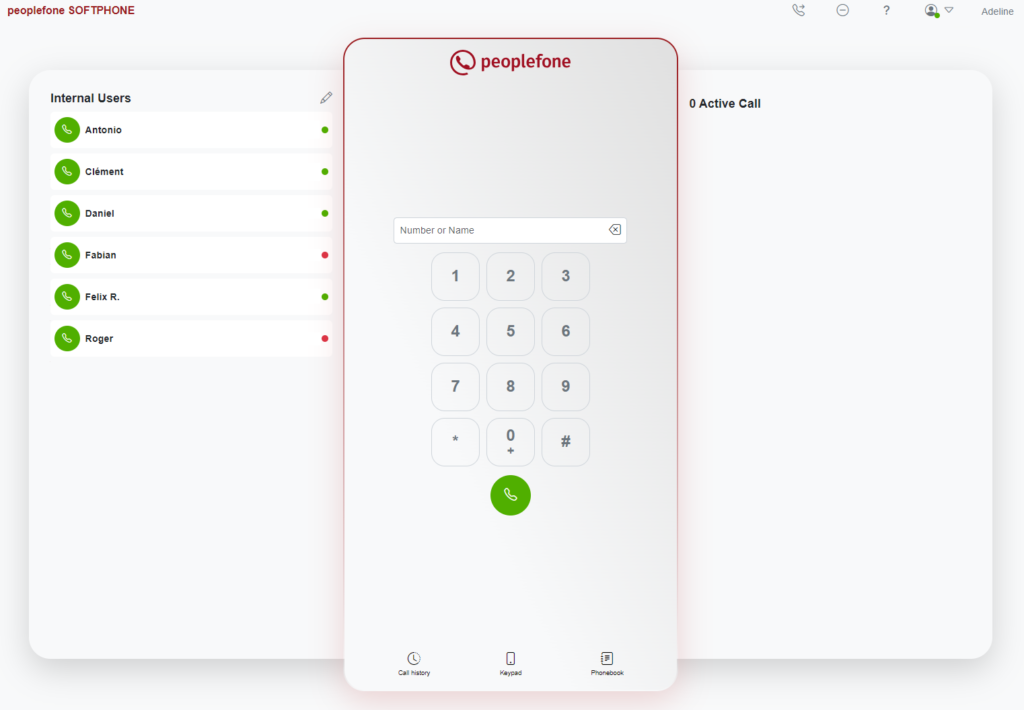
Sobald die Verbindung hergestellt ist, greifen Sie auf die WebGUI des peoplefone SOFTPHONE zu.
Erste Verbindung – Berechtigungen
Wenn Sie sich zum ersten Mal mit Ihrem peoplefone SOFTPHONE verbinden, werden Sie aufgefordert, dem Browser die Verwendung des Mikrofons zu erlauben und dem SOFTPHONE zu erlauben, Ihnen bei eingehenden Anrufen Benachrichtigungen zu senden.
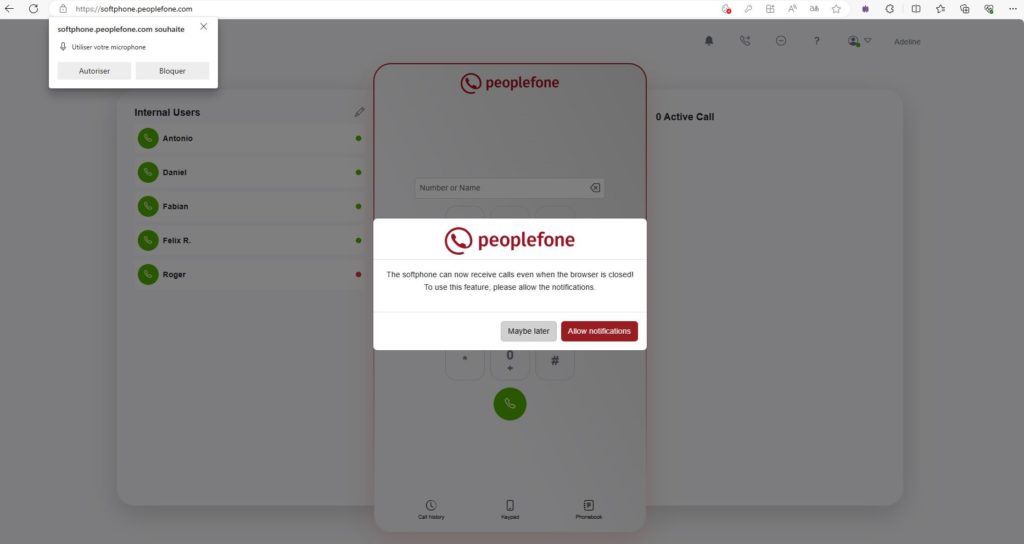
Wenn Sie diese Anfrage nicht erhalten haben, führen Sie die folgenden Schritte aus.
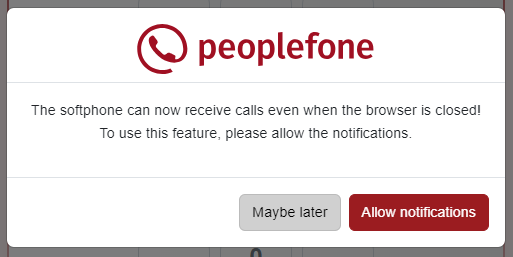
Um Benachrichtigungen zu aktivieren , klicken Sie auf die Glocke in der Menüleiste oben rechts auf Ihrem peoplefone SOFTPHONE.

Klicken Sie auf Benachrichtigungen zulassen .
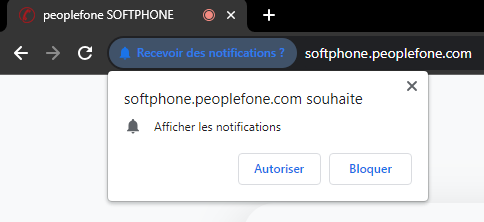
Klicken Sie auf Zulassen .
Schnittstelle
Die peoplefone SOFTPHONE-Schnittstelle ist in drei Teile unterteilt
- die Menüleiste mit Umleitungsverwaltung, Bitte-nicht-stören-Aktivierung/Deaktivierung
und das Benutzermenü – oben rechts - die BLFs interner Benutzer – links
- die Tastatur, Anrufliste und Verzeichnis – in der Mitte
- das Anrufverwaltungspanel – rechts

Benutzermenü
Über das Benutzermenü können Sie Ihre Anmeldedaten (E-Mail, Passwort und Zwei-Faktor-Authentifizierung) ändern, Ihre Audioeinstellungen festlegen, die Konfiguration des peoplefone SOFTPHONE ändern und sich davon abmelden.
Audio Einstellungen
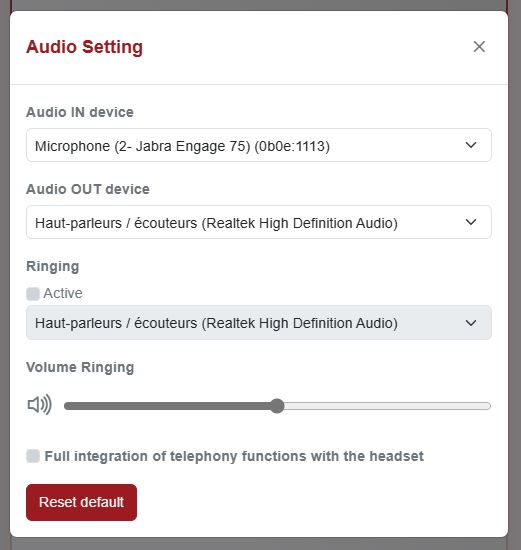
Gehen Sie zu den Audioeinstellungen , indem Sie oben rechts auf der Seite auf Ihr Benutzersymbol klicken.

In den Audioeinstellungen können Sie Folgendes auswählen:
- das Audio-Eingabegerät
- das Ausgabe-Audiogerät
- ein anderes Audiogerät für den Anrufklingelton
- Klingeltonlautstärke
- um die vollständige Integration der Telefoniefunktionen mit dem Headset zu aktivieren
Aufbau
Gehen Sie zur Konfiguration , indem Sie oben rechts auf der Seite auf Ihr Benutzersymbol klicken.

Auf der Konfigurationsseite können Sie:
- Rückfrage (Anklopfen) aktivieren oder deaktivieren – standardmäßig aktiviert
- Ändern Sie die Anzeigereihenfolge Ihres Verzeichnisses
- Protokolle aktivieren (kann vom Support angefordert werden, wenn ein Problem auftritt)
- Ändern Sie die Anzeigesprache

BLF – interne Benutzer
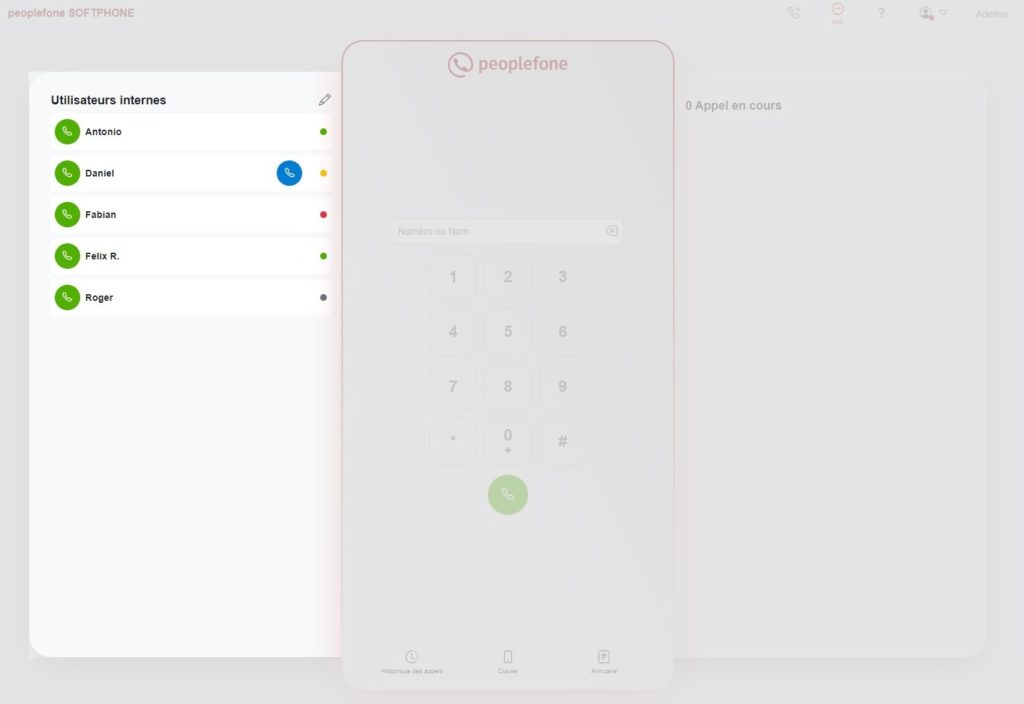
Mit BLFs können Sie den Status eines Benutzers anzeigen und mit ihm interagieren.
In diesem Bereich können Sie auswählen, ob Sie die BLFs anderer Benutzer Ihres peoplefone HOSTED hinzufügen möchten oder nicht.
Klicken Sie dazu auf den Stift und markieren Sie die gewünschten Benutzer.
Tippen Sie auf das grüne Telefon links vom Benutzer, um ihn anzurufen.
Anhand der Punkte auf der rechten Seite des Benutzers können Sie dessen aktuellen Status sehen.
- grün – kostenlos
- rot – am Telefon oder „Bitte nicht stören“.
- gelb – klingeln
Wenn der Benutzer klingelt (gelber Punkt), erscheint direkt daneben ein blaues Telefon. Mit dieser Schaltfläche können Sie Anrufe abfangen (Pickup) durchführen.
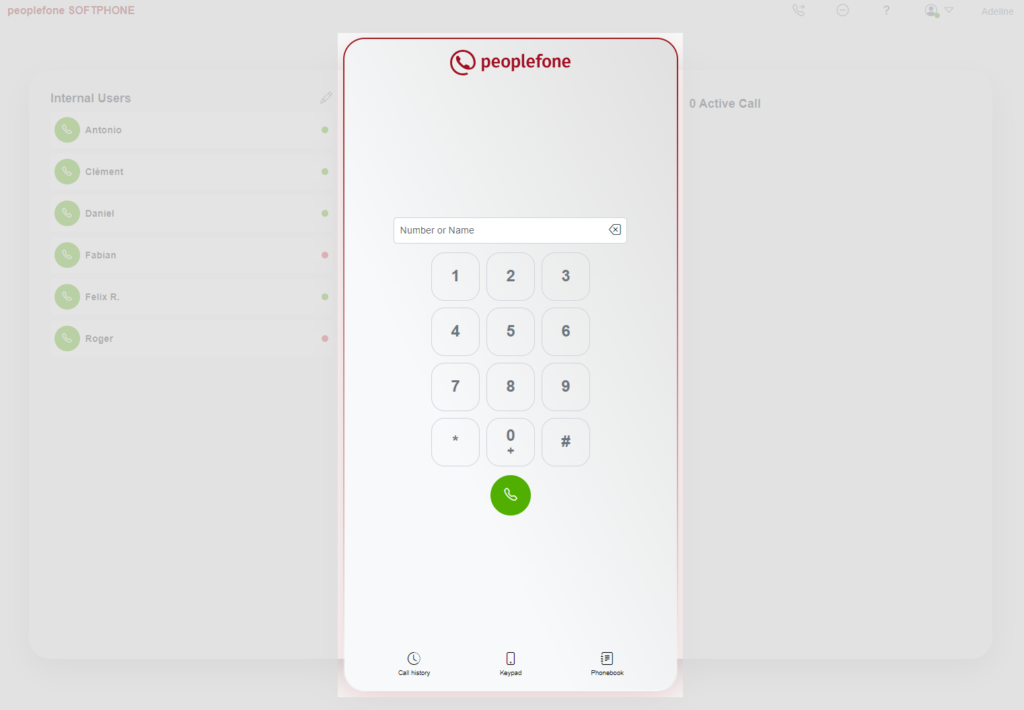
Tastatur
Sie können eine Nummer wie auf einer Telefontastatur direkt eingeben. Sie können eine Rufnummer auch über die dafür vorgesehenen Felder über die Tastatur Ihres Computers wählen.
Wenn Sie mit Ihrer Computertastatur einen Namen oder eine Nummer in das Feld eingeben, wird automatisch eine Suche in Ihrem Verzeichnis durchgeführt.
Anrufsverlauf
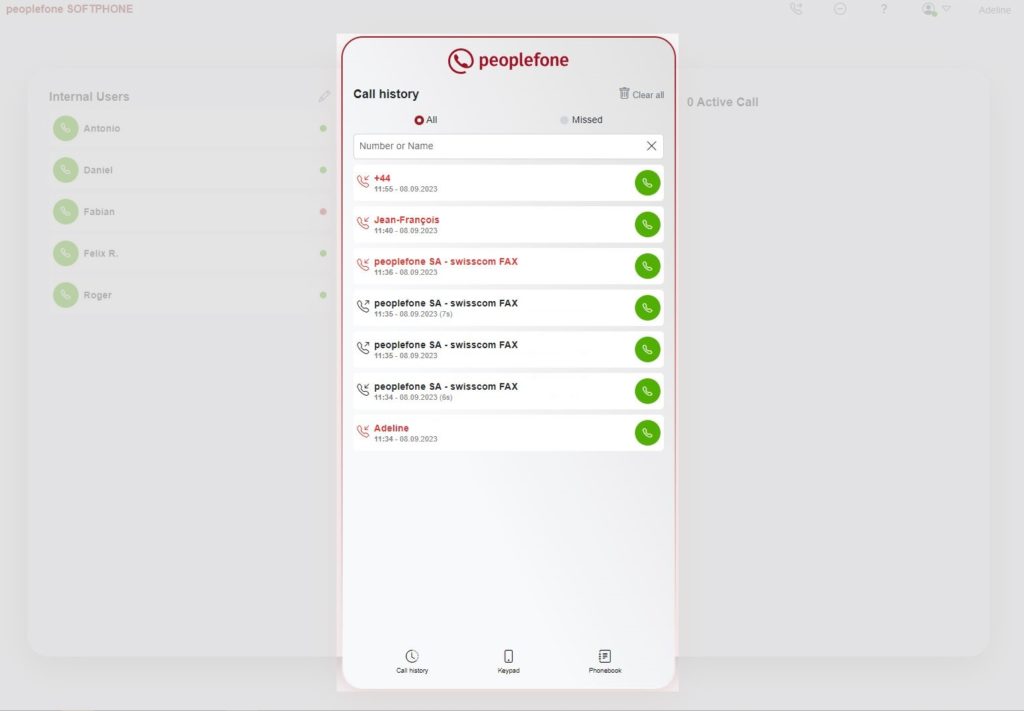
In der Anrufliste sehen Sie, ob intern oder extern eingehende und getätigte Anrufe angenommen werden oder nicht. Datum, Uhrzeit und Dauer des Anrufs werden angezeigt. Angezeigt wird der Name der Person oder des Unternehmens (sofern dieser in Ihrem Verzeichnis eingetragen ist) sowie die Telefonnummer (im Beispiel unten aus Gründen der Vertraulichkeit gelöscht).
Diese Ansicht ermöglicht Ihnen außerdem Folgendes:
- Nur verpasste Anrufe anzeigen
- Anrufliste löschen
- Rufen Sie eine Person direkt aus dem Verlauf zurück, indem Sie die grüne Telefontaste drücken
Telefonbuch
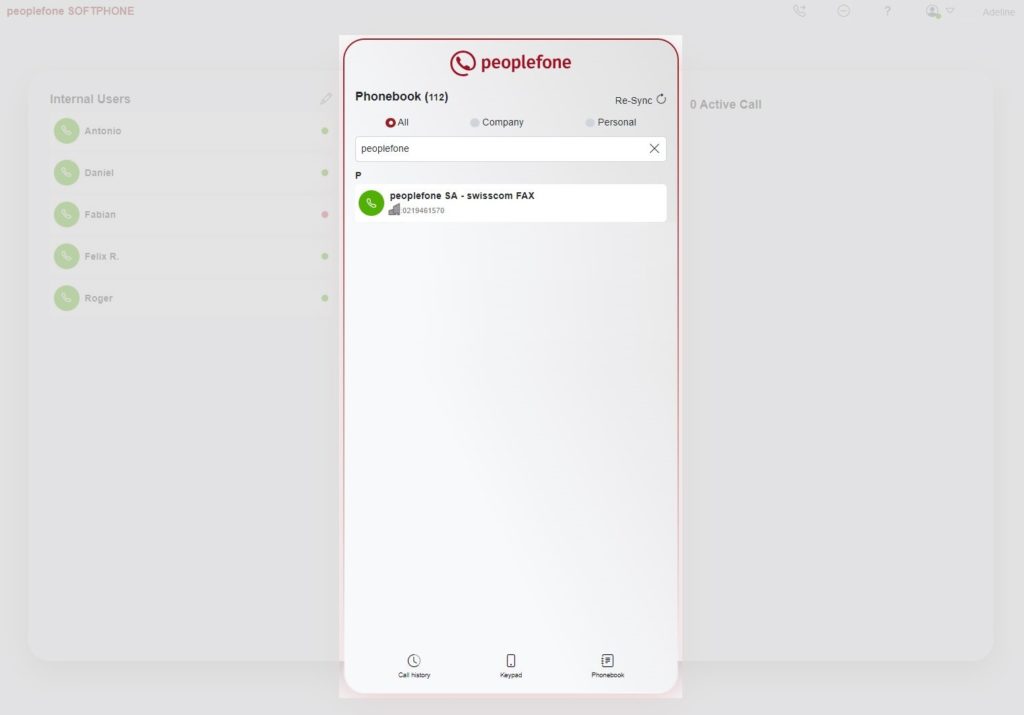
Die Liste der vorhandenen Kontakte finden Sie in Ihrem Firmen- und Privatverzeichnis.
Die Synchronisierung erfolgt automatisch mit den Kontakten Ihres peoplefone HOSTED, die unter Konfiguration – Firmenverzeichnis vorhanden sind . Sie können nach Name oder Nummer suchen.
Anrufverwaltung
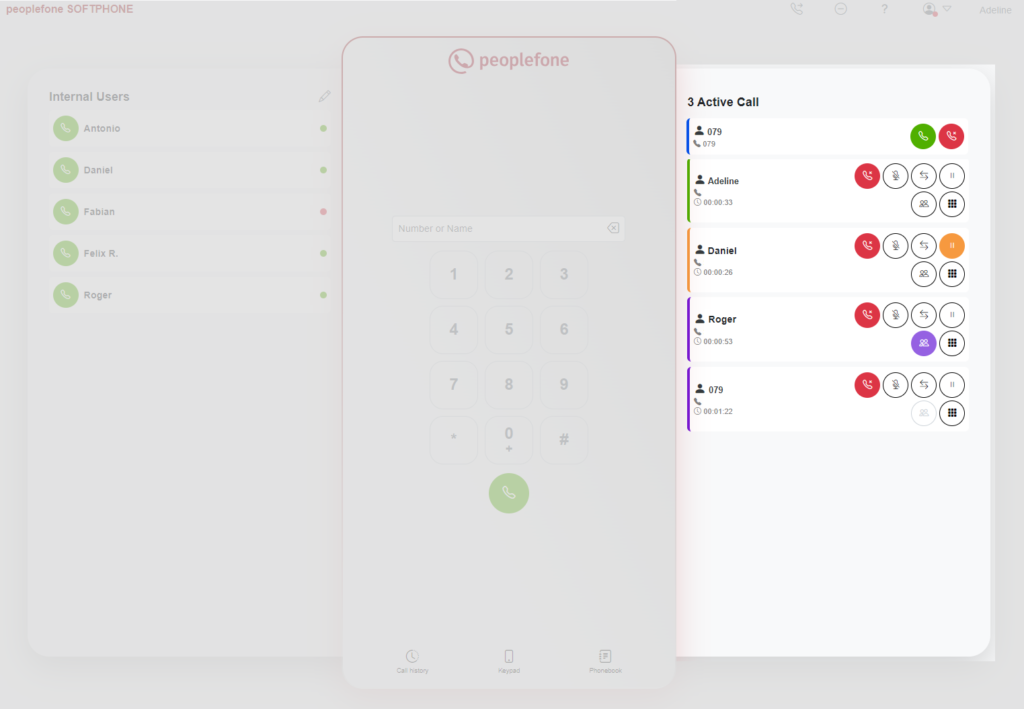
In diesem Bereich sehen Sie den aktuellen Status aller aktiven Anrufe auf Ihrem peoplefone SOFTPHONE.
Zu jedem Anruf finden Sie folgende Informationen:
- der Name (sofern im Verzeichnis verfügbar)
- Telefonnummer
- die Dauer
- der Staat
Jeder Anruf hat einen bestimmten Status, dessen Einzelheiten Sie unten finden:
- blau – der Anruf klingelt
- grün – Anruf wird angenommen
- gelb/orange – Anruf wird gehalten
- Lila – Telefonkonferenz läuft
Funktionen während des Anrufs
Doppelklicken Sie auf einen wartenden Anruf
Ermöglicht Ihnen, den gehaltenen Anruf fortzusetzen und andere automatisch in die Warteschleife zu stellen.
 Schalten Sie das Mikrofon stumm
Ermöglicht Ihnen, das Mikrofon während eines Anrufs stummzuschalten oder die Stummschaltung aufzuheben. Ihr Mikrofon ist stummgeschaltet, aber Sie können Ihren Gesprächspartner weiterhin hören.
 Auf Eis gelegt
Wenn Sie einen verbundenen Anruf haben und einen neuen Anruf starten oder einen eingehenden Anruf entgegennehmen, wird der verbundene Anruf automatisch gehalten.
 Anrufweiterleitung ohne Ansage
Klicken Sie auf diese Schaltfläche, wenn Sie mit jemandem sprechen möchten, bevor Sie einen Anruf an ihn weiterleiten.
Sie können den Anruf über die BLFs auf der linken Seite, Ihren Anrufverlauf, das Verzeichnis und durch Wählen einer Telefonnummer über die Tastatur an jemanden weiterleiten.
 Anrufweiterleitung mit Ansage
Klicken Sie auf diese Schaltfläche, wenn Sie den Anruf direkt an eine Person weiterleiten möchten, ohne mit ihr zu sprechen.
Sie können jemanden über die BLFs auf der linken Seite, Ihren Anrufverlauf, das Verzeichnis und durch Wählen einer Telefonnummer über die Tastatur anrufen.
Der erste Anruf liegt also in der Warteschleife (gelb/orange) und der zweite läuft.
Um die Weiterleitung abzuschließen, klicken Sie auf die blaue Schaltfläche, die beim wartenden Anruf blinkt.
 Konferenz
Wenn Sie mehrere aktive Anrufe haben (in der Warteschleife oder nicht), drücken Sie einfach diese Taste, um eine Konferenz mit der betreffenden Person zu starten. Drücken Sie bei jeder Person, die Sie hinzufügen möchten, die Konferenztaste.
Wenn Sie erneut auf die Schaltfläche „Konferenz“ klicken, wird die Person aus der Konferenz genommen und in die Warteschleife gelegt.
Derzeit unterstützen wir maximal 5 gleichzeitige Anrufe während einer Konferenz.
Kopfhörer
Wir unterstützen die Integration von Jabra- und Poly- Headsets (Plantronics, Polycom) über ein eigenes Integrationsmodul.
Dank dieser Integration können viele Funktionen des Headsets genutzt werden. Zum Beispiel das Annehmen oder Auflegen eines Anrufs über das Headset, das Stummschalten eines Anrufs usw. Wenn das peoplefone SOFTPHONE das Headset erkennt, kann es es automatisch als Hauptaudioquelle konfigurieren.
Alle Headsets können verwendet werden, aber die Anrufverwaltung über das Headset funktioniert derzeit nur mit Jabra- und Poly -Headsets (Plantronics, Polycom).
Da wir nicht alle Geräte getestet haben, empfehlen wir Ihnen, sich beim Hersteller zu erkundigen, ob das von Ihnen gewünschte Gerät vollständig unterstützt wird.
Jabra-Integration
Es ist unbedingt erforderlich, den von Jabra bereitgestellten Bluetooth-Dongle oder die Headset-Dockingstation zu verwenden.
Klicken Sie auf einen der folgenden Links, um Jabra Chrome Host auf Ihren Computer herunterzuladen:
Nachdem Sie die ZIP-Datei heruntergeladen haben, müssen Sie die Installationsdatei (.msi für Windows und .dmg für Mac) extrahieren und auf Ihrem Computer ausführen.
Fahren Sie dann mit der Installation der zweiten Erweiterung fort, die für die ordnungsgemäße Funktion Ihres Jabra-Headsets erforderlich ist, indem Sie die folgenden Anweisungen befolgen.

- Öffnen Sie Google Chrome oder Microsoft Edge
- Suchen Sie nach Jabra Browser Interation
Extension Jabra Browser Integration Extension – Chrome Web Store - Es erscheint ein blauer Balken – klicken Sie auf „Hinzufügen“.
- Achten Sie auf das Popup und erlauben Sie den Zugriff (allow/enable).
- Klicken Sie auf „Hinzufügen“
- Popup-Nachricht zulassen
- Die Erweiterung ist in Chrome oder Edge aktiviert
- Wenn Sie die Erweiterung installiert haben, überprüfen Sie bitte die Audioeinstellungen
Poly-Integration
Es ist unbedingt erforderlich, den von Poly bereitgestellten Bluetooth-Dongle oder die Headset-Dockingstation zu verwenden.
Klicken Sie auf einen der folgenden Links, um den Plantronics HUB für Windows und MAC direkt von der Poly-Website herunterzuladen.
Sobald die Software installiert ist, klicken Sie auf den folgenden Link: https://127.0.0.1:32018/Spokes/DeviceServices/Info
{"Description":"","...":{"Description":"..."},...}
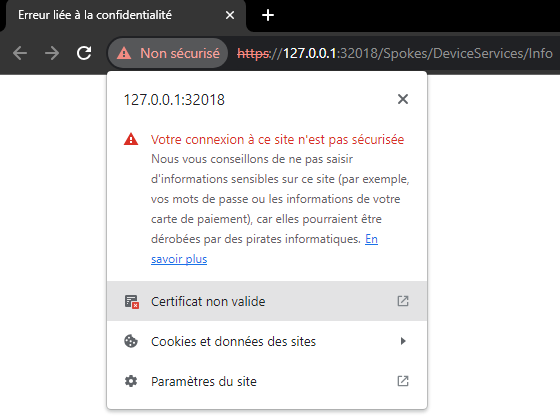
Wenn Sie vom Browser eine Meldung erhalten, dass die Seite nicht geöffnet werden kann oder ein Zertifikatsfehler vorliegt, müssen Sie wie folgt vorgehen.
Klicken Sie auf das Achtungssymbol links neben der Adressleiste und dann auf Ungültiges Zertifikat .
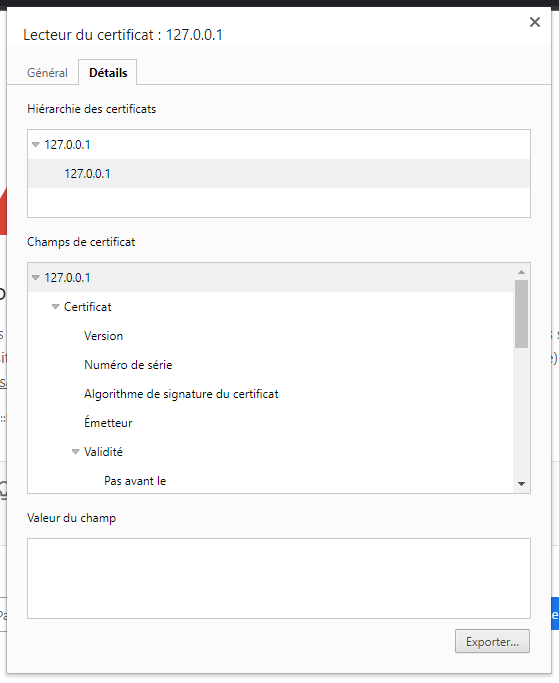
Gehen Sie zur Registerkarte „Details“ und klicken Sie auf „Exportieren“ .
Speichern Sie die Datei 127.0.0.1.crt beispielsweise in Ihren Downloads oder auf Ihrem Desktop.
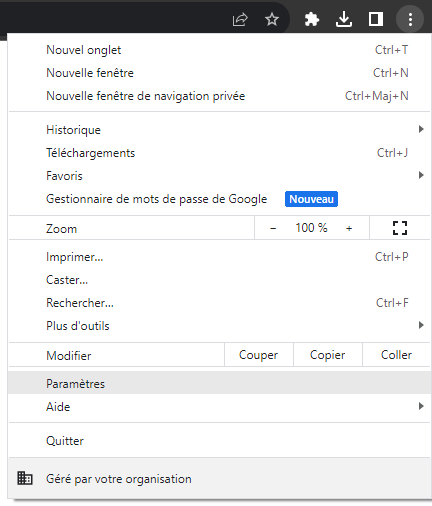
Gehen Sie dann zu Ihren Browsereinstellungen.
Klicken Sie links auf das Menü „Datenschutz und Sicherheit“.
Klicken Sie dann auf Gerätezertifikate verwalten .
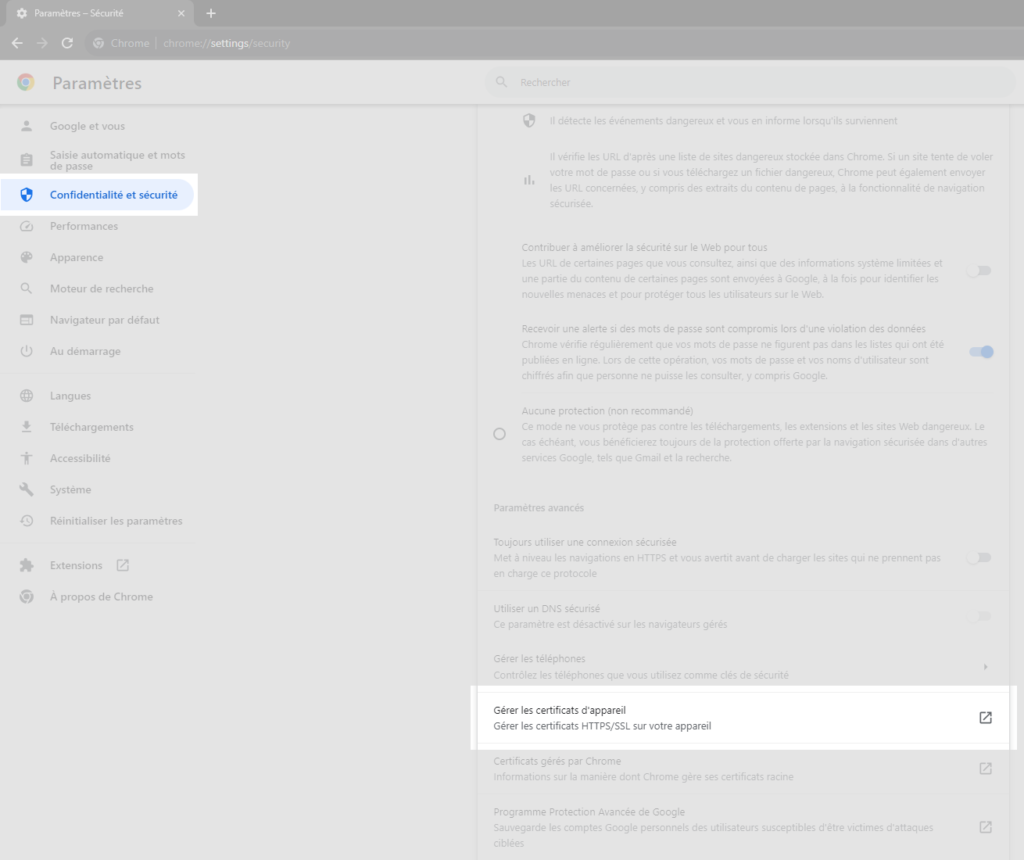
Klicken Sie auf Importieren… und wählen Sie die Datei 127.0.0.1.crt aus, die Sie zuvor gespeichert haben.
Sobald das Zertifikat importiert wurde, kehren Sie zur Seite https://127.0.0.1:32018/Spokes/DeviceServices/Info
zurück . Es sollten ähnliche (nicht identische) Informationen wie unten angezeigt werden.
{"Description":"","...":{"Description":"..."},...}Desktopanwendung
Das peoplefone SOFTPHONE kann auch als Desktop-Anwendung installiert werden.
Dazu müssen Sie zunächst mit der Webversion verbunden sein. Stellen Sie sicher, dass Sie Benachrichtigungen und die Verwendung des Mikrofons zulassen, wenn Sie sich zum ersten Mal anmelden.
Sobald Sie mit dem peoplefone SOFTPHONE verbunden sind, klicken Sie auf das Anwendungssymbol in der Menüleiste oben rechts auf dem Bildschirm.

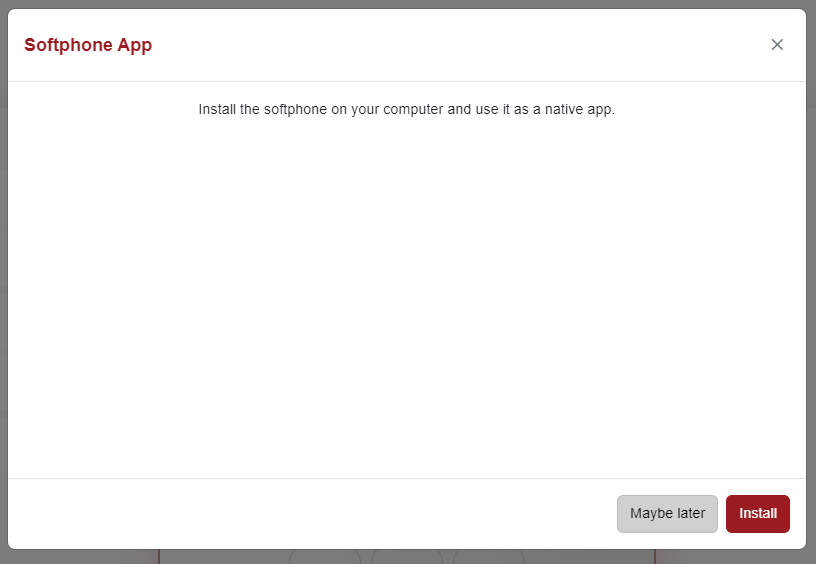
Das folgende Fenster öffnet sich.
Klicken Sie auf die Schaltfläche „Installieren“ .
Der Browser fordert Sie dann zur Bestätigung der Installation der Desktop-Anwendung auf.
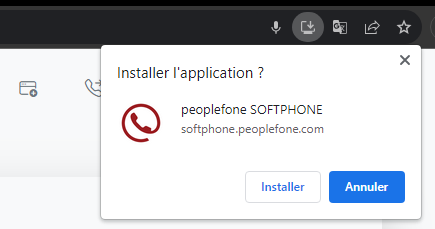
Sobald die Anwendung installiert ist, erfolgt die Nutzung wie bei der Webversion von peoplefone SOFTPHONE.
Achten Sie darauf, das peoplefone SOFTPHONE nicht gleichzeitig über Ihren Webbrowser mit der Desktop-Anwendung auf Ihrem Computer zu verwenden .
Benachrichtigungen
Nachfolgend finden Sie die Schritte zum Aktivieren und Deaktivieren von peoplefone SOFTPHONE-Benachrichtigungen.
Webbrowser
Chrom
Wenn dies Ihre erste Verbindung ist oder Sie die Anfrage zur Benachrichtigungsautorisierung ignoriert haben, lesen Sie bitte die Anweisungen hier.
Um Benachrichtigungen zu aktivieren , klicken Sie einfach auf das Vorhängeschloss links neben der Adressleiste. Auf diese Weise können Sie Site-Informationen und damit deren Berechtigungen anzeigen.
Klicken Sie auf die Schaltfläche rechts neben Benachrichtigungen , um sie zu aktivieren – sie sollte blau sein.
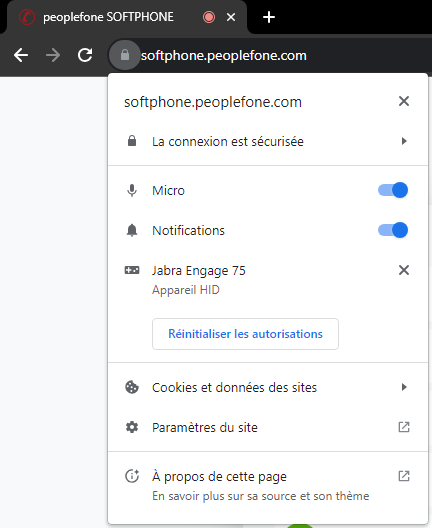
Um Benachrichtigungen zu deaktivieren , klicken Sie einfach auf das Vorhängeschloss links neben der Adressleiste. Auf diese Weise können Sie Site-Informationen und damit deren Berechtigungen anzeigen.
Klicken Sie auf die Schaltfläche rechts neben Benachrichtigungen , um sie zu deaktivieren – sie sollte ausgegraut sein.
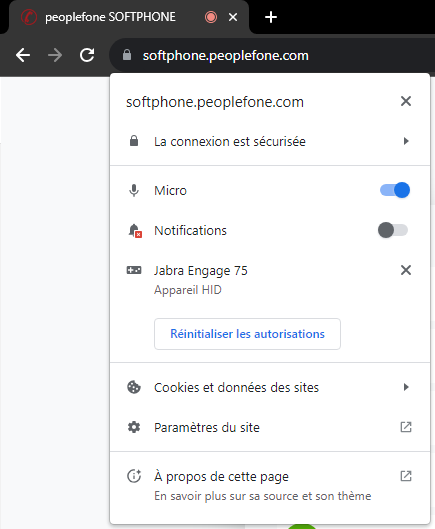
Edge
Wenn dies Ihre erste Verbindung ist oder Sie die Anfrage zur Benachrichtigungsautorisierung ignoriert haben, lesen Sie bitte die Anweisungen hier.
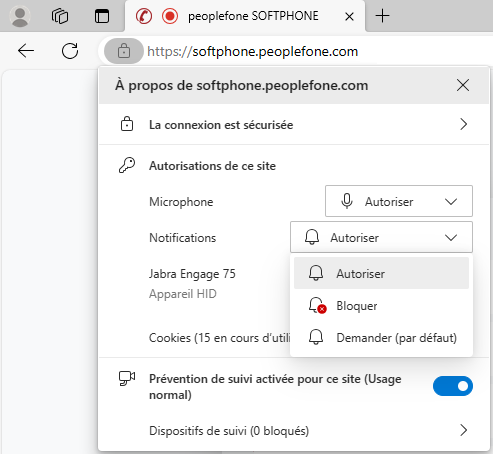
Um Benachrichtigungen zu aktivieren , klicken Sie einfach auf das Vorhängeschloss links neben der Adressleiste. Auf diese Weise können Sie Site-Informationen und damit deren Berechtigungen anzeigen.
Wählen Sie „Zulassen“ aus der Dropdown-Liste „Benachrichtigungen“ aus.
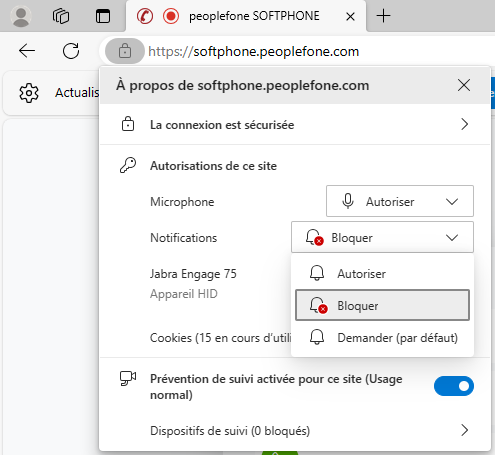
Um Benachrichtigungen zu deaktivieren , klicken Sie einfach auf das Vorhängeschloss links neben der Adressleiste. Auf diese Weise können Sie Site-Informationen und damit deren Berechtigungen anzeigen.
Wählen Sie „Blockieren“ aus der Dropdown-Liste „Benachrichtigungen“ aus.
Desktopanwendung
Windows – von Chrome installiert
Wenn dies Ihre erste Verbindung ist oder Sie die Anfrage zur Benachrichtigungsautorisierung ignoriert haben, lesen Sie bitte die Anweisungen hier .
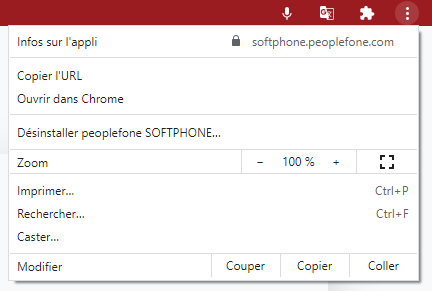
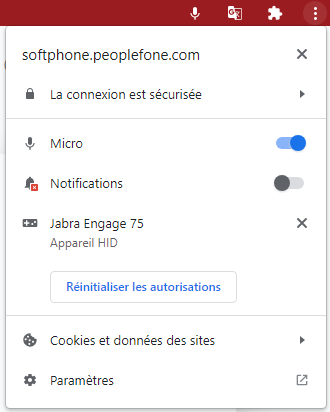
Um Benachrichtigungen zu aktivieren , klicken Sie einfach auf die 3 Punkte in der roten Leiste oben rechts in der Anwendung und klicken Sie auf App-Info
Klicken Sie auf die Schaltfläche rechts neben Benachrichtigungen , um sie zu aktivieren – sie sollte blau sein.
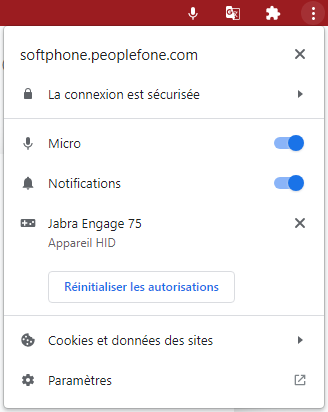
Um Benachrichtigungen zu deaktivieren , klicken Sie einfach auf die 3 Punkte in der roten Leiste oben rechts in der Anwendung und klicken Sie auf App-Info.

Klicken Sie auf die Schaltfläche rechts neben Benachrichtigungen , um sie zu deaktivieren – sie sollte ausgegraut sein.
Windows – von Edge installiert
Wenn dies Ihre erste Verbindung ist oder Sie die Anfrage zur Benachrichtigungsautorisierung ignoriert haben, lesen Sie bitte die Anweisungen hier .
Um Benachrichtigungen zu aktivieren , klicken Sie einfach auf die 3 Punkte in der roten Leiste oben rechts in der Anwendung. Gehen Sie dann zu Datenschutz und Datenschutzeinstellungen verwalten.
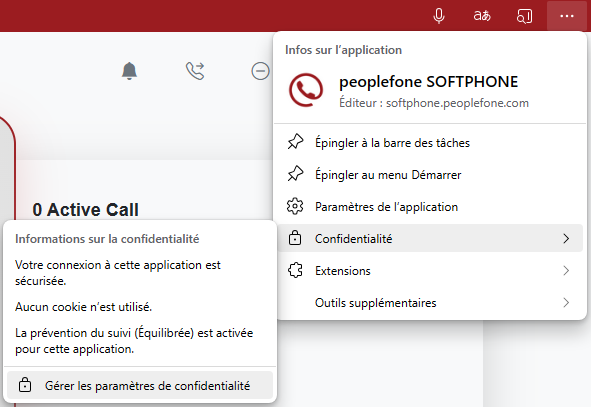
Wählen Sie „Zulassen“ aus der Dropdown-Liste „Benachrichtigungen“ aus.
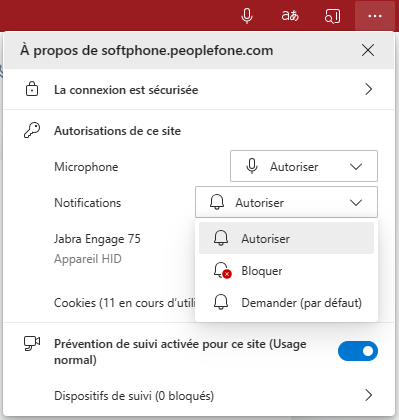
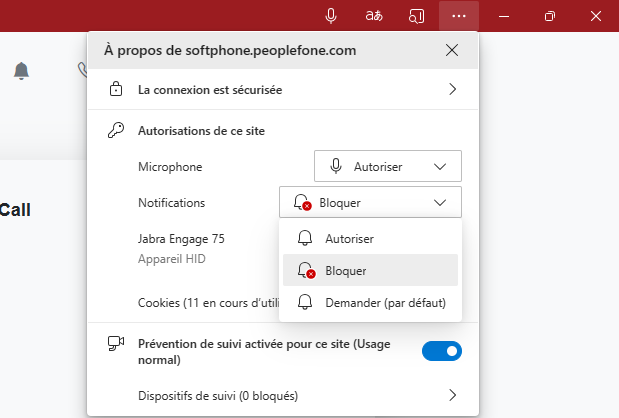
Um Benachrichtigungen zu deaktivieren , klicken Sie einfach auf die 3 Punkte in der roten Leiste oben rechts in der Anwendung. Gehen Sie dann zu Datenschutz und Datenschutzeinstellungen verwalten .

Wählen Sie „Blockieren“ aus der Dropdown-Liste „Benachrichtigungen“ aus.
Mac OS
im Gange
Ändern Sie, wie lange Push-Benachrichtigungen angezeigt werden
Die standardmäßige Anzeigedauer der Push-Benachrichtigung kann je nach Browser, dessen Version, Betriebssystem usw. variieren. Sie ist in der Regel auf 5 Sekunden eingestellt, was je nach Nutzung möglicherweise zu kurz ist.
Sie können diese Dauer in Ihren Computereinstellungen verlängern oder verkürzen.
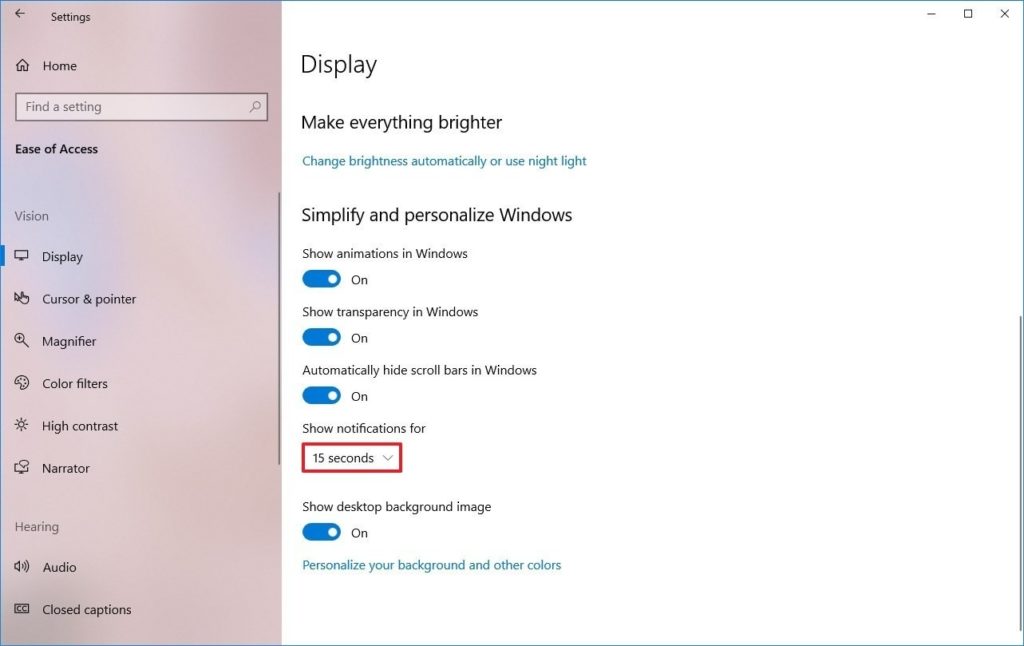
Windows 10
Befolgen Sie die folgenden Punkte, um die Anzeigedauer von Push-Benachrichtigungen zu ändern.
- Klicken Sie auf Ihrem Computer auf die Schaltfläche „Start“ .
- Klicken Sie auf das Zahnrad, um auf die Einstellungen zuzugreifen
- Gehen Sie zu den Benutzerfreundlichkeitsoptionen
- Suchen Sie unter Bildschirm nach der Einstellung Benachrichtigungen anzeigen während.
- Wählen Sie die Dauer, wir empfehlen Ihnen, mindestens 15 Sekunden einzustellen
Windows 7
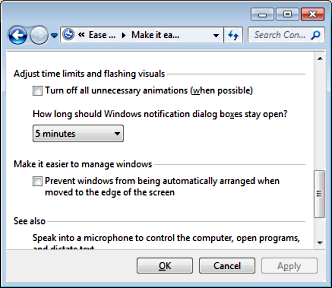
Befolgen Sie die folgenden Punkte, um die Anzeigedauer von Push-Benachrichtigungen zu ändern.
- Klicken Sie auf Ihrem Computer auf die Schaltfläche „Start“ .
- Klicken Sie auf das Zahnrad, um auf die Systemsteuerung zuzugreifen
- Sehen Sie sich alle Elemente der Systemsteuerung an und suchen Sie nach „Einfacher Zugriff“.
- Gehen Sie zu „Erleichtern Sie die Konzentration auf Aufgaben“ und suchen Sie nach der Einstellung „ Zeitlimits und blinkende visuelle Elemente anpassen“.
- Wählen Sie die Dauer aus der Dropdown-Liste aus, wir empfehlen mindestens 15 Sekunden
Mac OS
Befolgen Sie die folgenden Punkte, um die Anzeigedauer von Push-Benachrichtigungen zu ändern.
- Öffnen Sie das Terminal (Finder -> Anwendungen -> Dienstprogramme -> Terminal).
- Geben Sie die folgende Befehlszeile ein und ersetzen Sie den Teil {duration} durch die Zeit in Sekunden. Entfernen Sie für macOS Sierra, El Capitan und früher -int aus dem Befehl
defaults write com.apple.notificationcenterui bannerTime -int {duration}
Wenn Sie die Standarddauer (5 Sekunden) wiederherstellen möchten, verwenden Sie den folgenden Befehl
defaults delete com.apple.notificationcenterui bannerTime
Damit die Änderungen wirksam werden, müssen Sie Ihren Mac neu starten.
Firewall
Wenn Sie eine Firewall konfiguriert haben, die ausgehenden Datenverkehr blockiert, müssen Sie den Port für Signalisierung und Sprache öffnen. Weitere Informationen finden Sie im folgenden Dokument: Erforderliche Firewallregeln.
Bekannte Probleme
- Wenn die SRTP-Option aktiviert ist, werden einige Funktionen nicht unterstützt (Probleme mit Audio und Anrufunterbrechung). Die Problemumgehung besteht darin, SRTP für den Benutzer über das Peoplefone-Portal zu deaktivieren
- Wenn Sie einen Anruf mit Ihrem Headset nicht entgegennehmen können, überprüfen Sie die Integration Ihres Headsets, indem Sie den WIKI-Anweisungen für das Headset folgen
- Verwenden Sie das peoplefone SOFTPHONE nicht gleichzeitig über den Webbrowser mit der Desktop-Anwendung auf Ihrem Computer (Probleme mit der Audio- und Anrufunterbrechung).

