Requirements
- A peoplefone Account (Registration)
- SIP Data
General Information
In this article we will explain how to configure a Panasonic KX-UDS124 with peoplefone Hosted. For the configuration of a mutlicell system, you need access to the webinterface of the two or more devices. First step, enter the server settings, so the device can connect to peoplefone and in a further step, we will put in the credentials for authentication. After that we will explain how to configure a mutlicell system.
peoplefone Connection
Standard Credentials
Username: admin
Password: adminpass
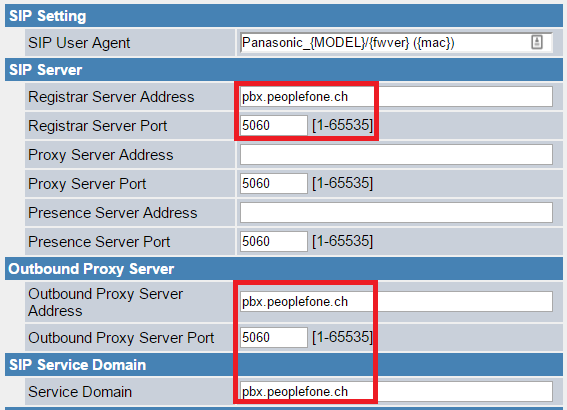
SIP Settings
Webinterface → Panasonic KX-UDS124 → VoIP → SIP Settings
- Type in the registrar server adress
- Type in the server port
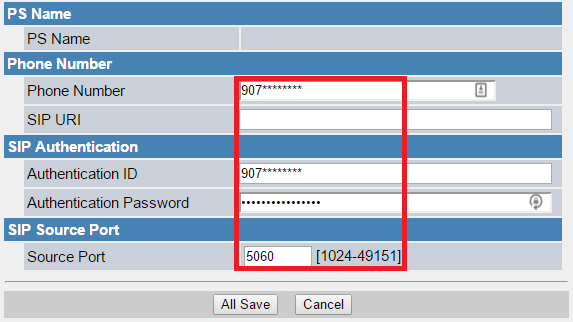
VoIP Settings-PS
Webinterface → Panasonic KX-UDS124 → VoIP → VoIP Settings-PS
- Click on Line# SIP Setting

- For the authentication you will need your SIP information
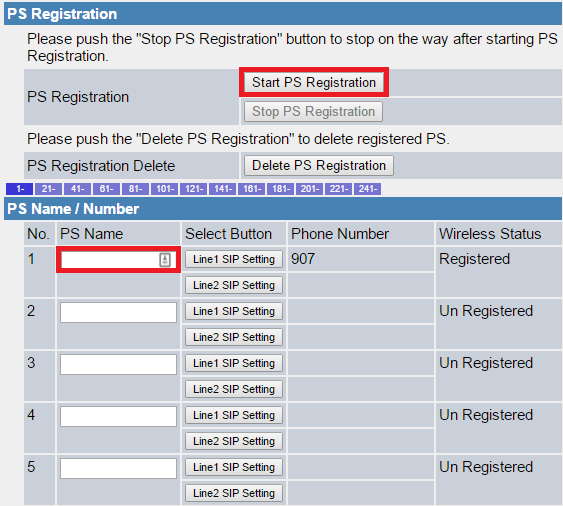
PS Registration
Webinterface → Panasonic KX-UDS124 → System→ PS Registration
- Enter a PS Name
- Click on start PS registration
- Connect your handset to your basestation (MT Registration)
Codecs
Webinterface → Panasonic KX-UDS124 → VoIP → VoIP Settings → Codecs
- Put the codecs into the right order: PCMA, PCMU, G722, G729A, G726-32 is deactivated.

Multicell System
In order to operate a multicell system, please consider two things:
- Same Firmware version on both DECT-stations
- Same time configuration
Configuration «DECT Master»
Network
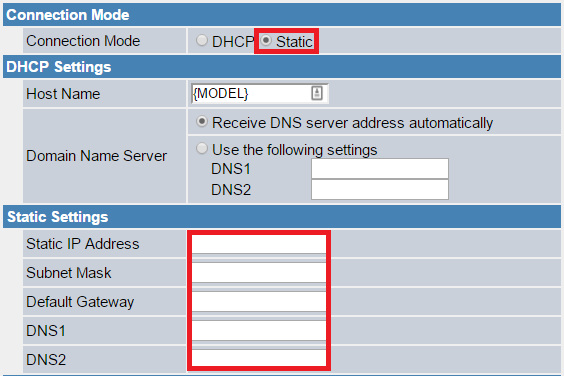
Webinterface → Panasonic KX-UDS124 → Network
- The first SIP-sender must have a static local IP-adress with the following settings:
- Connection Mode: Static
- Static IP Address: IP-adress from the network
- Subnet Mask: Own subnet mask
Time Adjust Settings
Webinterface → Panasonic KX-UDS124 → System → Time Adjust Settings
- Define the automatic time setting and daylight saving time

CS Name
Webinterface → Panasonic KX-UDS124 → System → CS Name
- A name will be assigned to the first zone
- You can use the purpose of the zone as it’s name

Air Settings
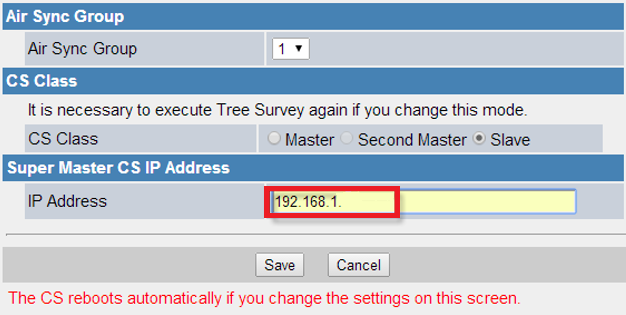
Webinterface → Panasonic KX-UDS124 → System → Air Settings
- Define the super master DECT sender
- The first DECT sender is a super master, which serves as a central access point. This setting have to be applied.

- CS Class: Master
- Super Master IP-Adress: Own IP-adress
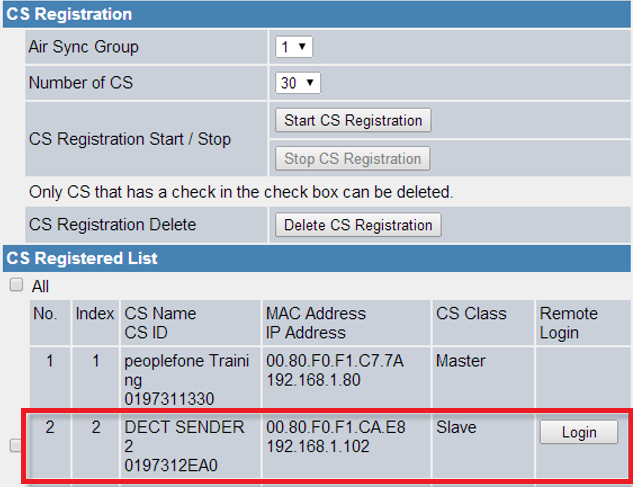
CS Management
Webinterface → Panasonic KX-UDS124 → System → CS Management
- Start the registration of further DECT senders in that zone
- Add another DECT sender, start the CS registration on the master sender
Configuration «DECT Slave»
Air Settings
Webinterface → Panasonic KX-UDS124 → System → Air Settings
- Configure the new DECT sender
The new sender will be integrated into the network as a DHCP-device. It can also have a static IP, but doesn’t have to. Under “System” “CS Name” you can give the sender a name.
On “Air Settings” the following settings have to be set:
- CS Class: Slave
- IP Adress: IP-adress according to the network configuration of the master
CS Management
Webinterface → Panasonic KX-UDS124 → System → CS Management
- Now the DECT sender will be shown in the CS management.
- Registering of a DECT Handset
- The DECT handsets will be activated over the PS registration.