Introduction
peoplefone HOSTED is a virtual PBX that replaces all traditional phone systems and phone lines. Everything is configured online and you only need a VoIP phone or a peoplefone SOFTPHONE on your PC. No additional server, hardware or software is needed. peoplefone HOSTED is a proprietary development of our peoplefone engineers and configurable on the peoplefone customer portal. The installation of this virtual telephone system requires a basic knowledge in telephony. Therefore we recommend the support of an experienced peoplefone Installation Partner for an efficient and smooth configuration.
This manual explains specifically only the peoplefone HOSTED functions. Topics about the customer account can be found in the peoplefone Customer Account section. If you need step by step instructions on how to set up a phone system, we recommend you to contact the peoplefone Case Study entry.
Menu Structure


Basic Configuration
The peoplefone HOSTED works with internal IDs, which you should plan in advance according to a concept. This should be defined at the beginning and should not be adjusted anymore. So define how many digits the internal ID’s must have. 2, 3 or 4 digits. It must be avoided that the number of digits are mixed.
Number of digits of the internal IDs
In this example, we say that it should be a two-digit ID:
- Groups (ID 10 – 19)
- Time Routing (ab ID 20 – 29)
- Manual Routing (ID 30 – 39)


Notice:
If it is nevertheless necessary to change the number of digits, then without exceptions, each individual ID must be manually changed to the desired number of digits. Therefore, avoid mixing the number of digits.
SIP Line / User
If you click on SIP Lines / Users in the menu, the system will show you all your lines and users

Add User
- Go to SIP Lines / Users in the menu
- Click +Add to create a new user

Delete User
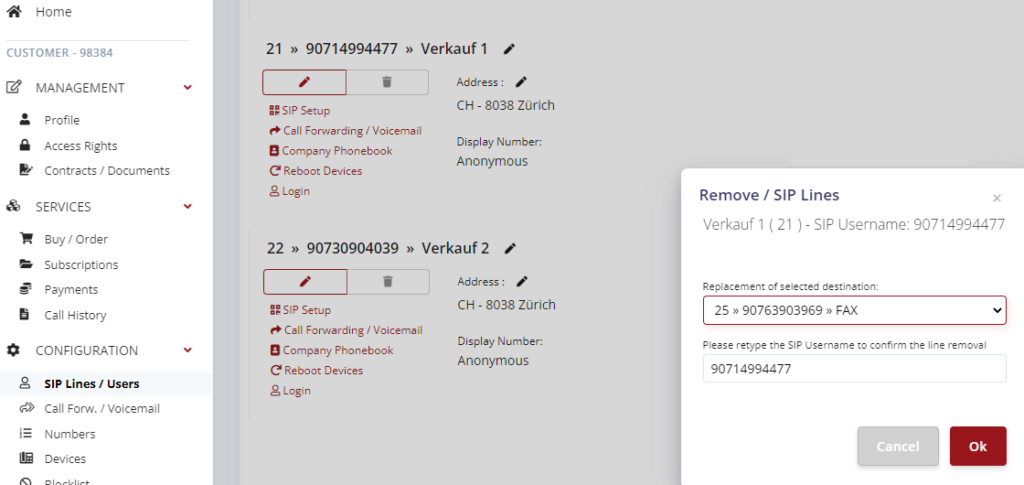
You can also delete a SIP line and user.
- Click on the trash can and then select which line should replace the line you want to delete. For security reasons, the SIP Username must be entered
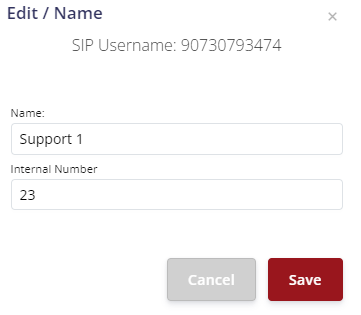
User names and internal speed dial
The name of the SIP line or the user can be changed here. The internal speed dial number is automatically assigned by the system. This can be adopted or adapted depending on the concept.
- Click on the pen tool

- Give the line a name
- Assign the internal speed dial number according to your concept
ATTENTION:
Internal numbers like (e.g. for CH: 112, 117, 118, 144), are not allowed, because they could be national or international emergency numbers! peoplefone recommends to start number ranges for three-digit internal extensions always from 2xx. The background for this is that international emergency numbers usually have three digits and start with 1xx.
Edit User

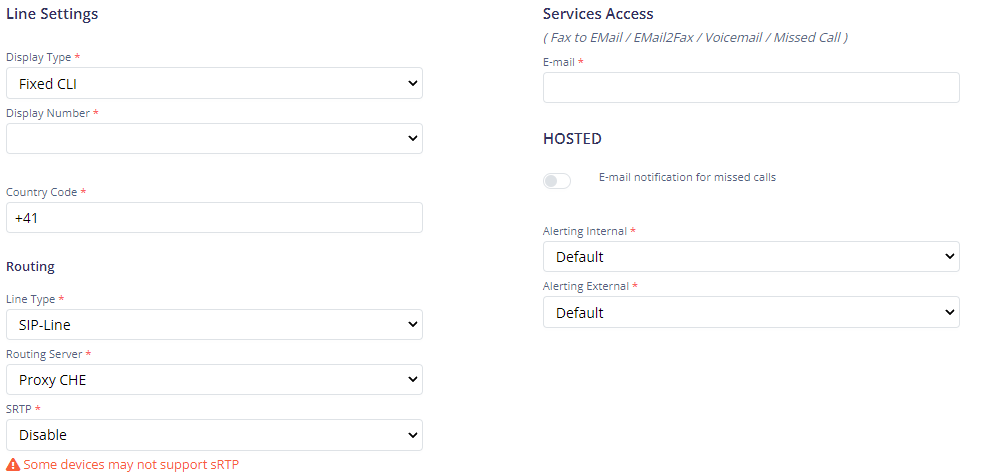
When you click the pencil, you have various options which can be set on the SIP Line / User. For example: Displayed Phone Numbers», email address for notifications and missed calls, routing server, TLS / SRTP and so on.
Forwarding / Voicemail
- Click Forward +Add

If you want to enable a voicemail box, then you need to store a forwarding role at the user level. As an example, if you enable immediate forwarding, calls that bounce to this user will be forwarded directly to the voicemail box.
Green or red icon means active or not active. You can also activate or deactivate the role by clicking on the icon. You can edit the role by clicking on the pen tool and to delete it click on the recycle bin.

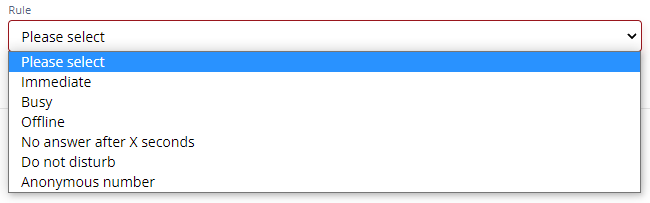
Forwarding / Fallback
With a fallback you can set up a failsafe of the telephone system. If for any reason the internet fails at the customer and the system or the phone cannot register at peoplefone anymore, then after the re-register time (recommended 180 seconds) the status on the SIP line is set to offline. This is also the trigger that the forwardings stored in the system (if offline), start to pull. You have the possibility to forward single numbers to different destinations or even whole blocks.
Max. 300 forwardings can be defined per SIP line. peoplefone recommends to set up fallback forwardings according to a concept and to keep the setup as simple and transparent as possible.
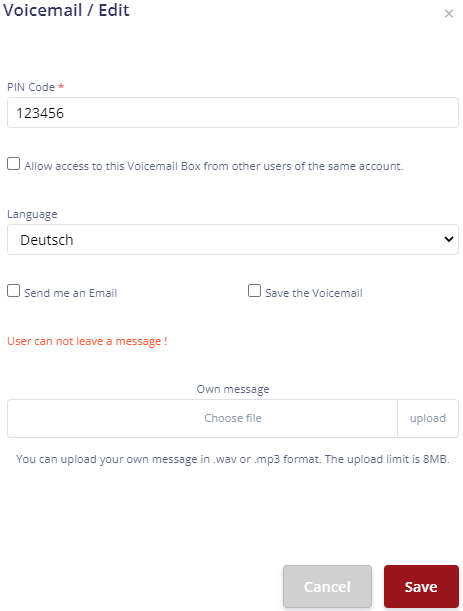
Edit Voicemail
Once you have activated a forwarding role, you can make further configurations via Pen tool.

- PIN code (currently not used)
- If you want to allow other subscribers in the telephony group to access the voicemail box, then the check mark must be set
- You can define the language of the voicemail box
- If a message is recorded, then you can have an e-mail sent to you
- If you save the message, then up to max. 20 messages are saved in the system, which can also be retrieved online
- If no check mark is set at all, the caller cannot leave a message
- Sie können auch eine eigene Voicemailbox-Ansage hochladen, erlaubt ist ein das File-Format .mp3 und .wav
Note: The voicemail box can be managed on a provisioned device and also the peoplefone APP via the key combination *1. For this, the messages must be saved in the system at peoplefone – Delivery mode: Send an Email and save the voicemail.
- Please do not choose a simple pin code, it should be complex.
Numbers

In the numbers section, you as the end customer can assign an entire block of phone numbers to a line or individual numbers to different lines. After assigning the phone number, incoming calls are routed to the corresponding SIP line.
- Use the pen tool to assign individual phone numbers
- Use the chain icon to assign an entire block of phone numbers
- The other symbols shown here are used internally

Assign Numbers to the SIP Line
Here you can see that each number can be assigned individually to a SIP line.

Emergency Calls (ex.144, 118, 117 etc.)
ATTENTION: Emergency numbers can only be guaranteed within the respective country.
CH – Konto → Emergency Call Schweiz
DE – Konto → Emergency Call Deutschland
AT – Konto → Emergency Call Österreich
FR – Konto → Emergency Call Frankreich
What do you need to do?
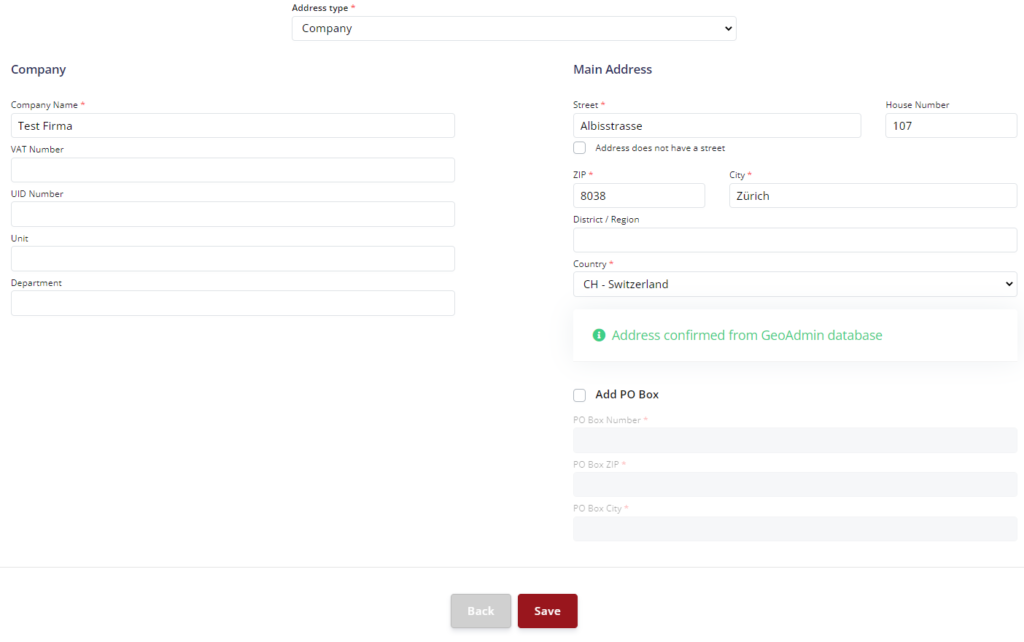
- Create an address for the respective location
- Store the corresponding stored address on the SIP line
- In the telephone number assignment, enter the address you have entered.
Store Addresses
In your customer account under Profile you can store contacts and addresses. The address defines the physical location of the telephone system or the telephone device. The contact defines the associated person, so that in the event of an emergency call, the emergency call center knows who placed the call.
In order to forward emergency calls to the correct emergency call center, a verified address must be stored in the system for the respective location. The addresses are verified in Switzerland using the Swiss Road Directories (CH Post). Please make sure that you have a verified address in the system.
- Click +Add
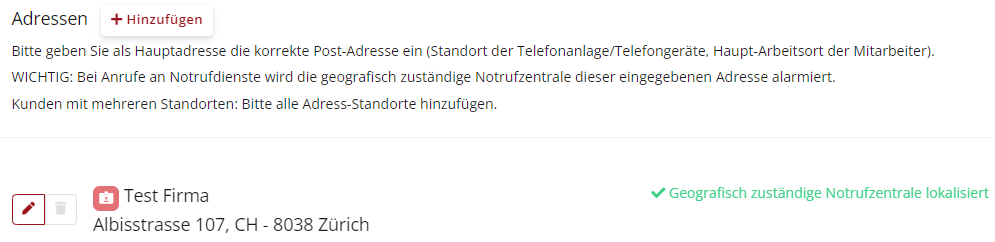
- Fill in the fields and save the stored information
Emergency routing / Which emergency call center is informed?
The address stored on the SIP line is there so that peoplefone can send the emergency call to the correct emergency call center. For this reason, please check carefully if the correct address is stored.
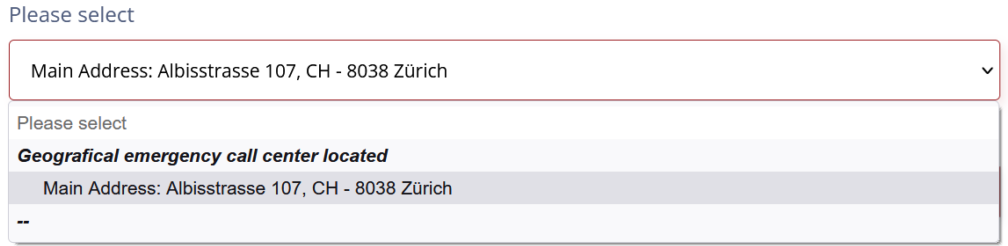
- Click on the pen tool and select the address
- Choose the right address and save this info
Displayanzeige bei der Notrufzentrale
The address that is stored with the telephone number assignment is the one that is shown on the display of the emergency call center. peoplefone synchronizes this information several times a week.
- Enter the address that should be displayed at the emergency call center (appears on the display at the emergency call center)

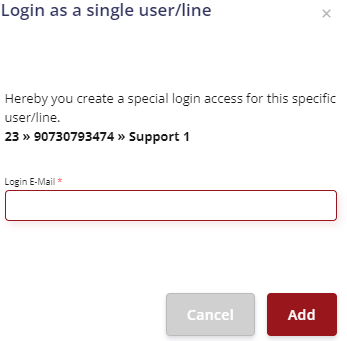
Create User Login
In order to be able to register as a user on the SIP line, you must enter your e-mail.
- Click Login

- Enter your e-mail address
Login with user login
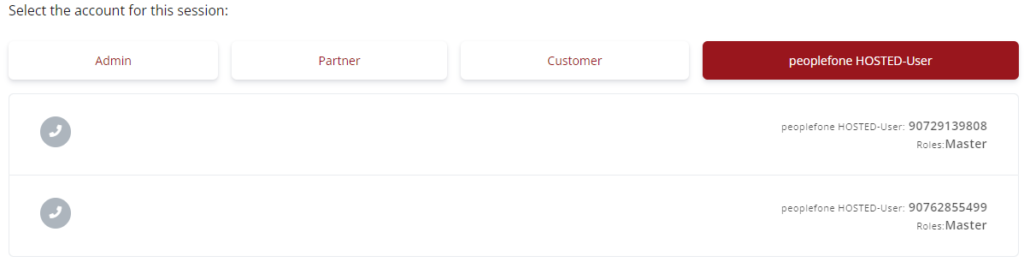
You can then register via portal.peoplefone.ch
- Sign in with your credentials
- In the peoplefone HOSTED user tab, select the desired account
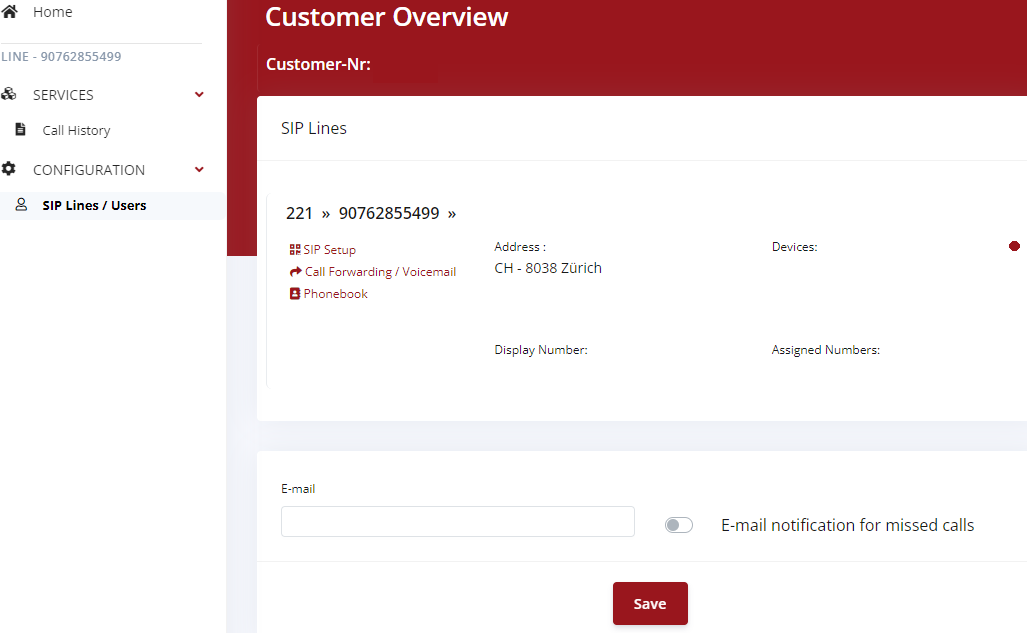
SIP setup, voicemail forwarding, personal phonebook
Registered as a user on the SIP line, you then have this view. You can manage your personal telephone book, switch on the voice mailbox or configure forwarding. The call overview shows you the course of the calls.
Distribution Groups
Create
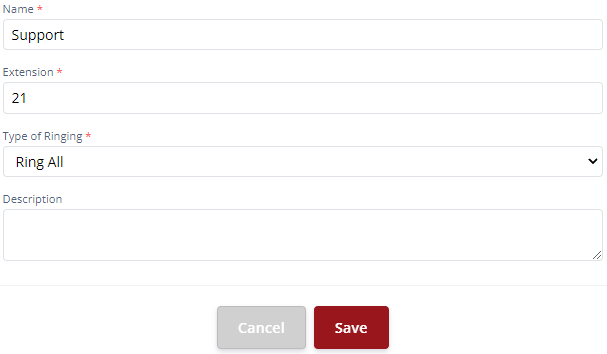
- Click on Distribution Groups in the menu and on +Add

- Give the group a name
- If necessary, change the suggested ID
- Choos:
- Everyone rings at the same time
- One after the other
You have two possible ring call types (all ring at the same time, one after the other)
One after the other
You can use the One by One function if you want the destinations to be Called one after the other.
- You can call up to 10 destinations in succession
- If the destinations are not available, an overflow can be defined
- You can also specify whether or not an unanswered call should be displayed
- By specifying the number of seconds, you tell the system how long you want it to be at that particular destination
Everyone rings at the same time
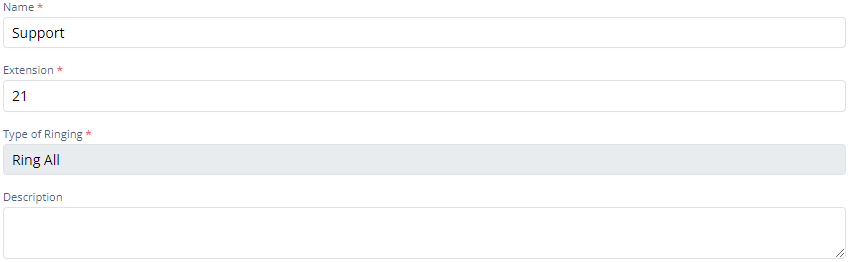
You can give the group a name and the extension. The ring type cannot be changed afterwards
You can upload your own dial tone for the group, .wav and .mp3 files up to a maximum of 16MB are allowed

Depending on the manufacturer and the phone, you will be provided with different ring tones, which you can select here

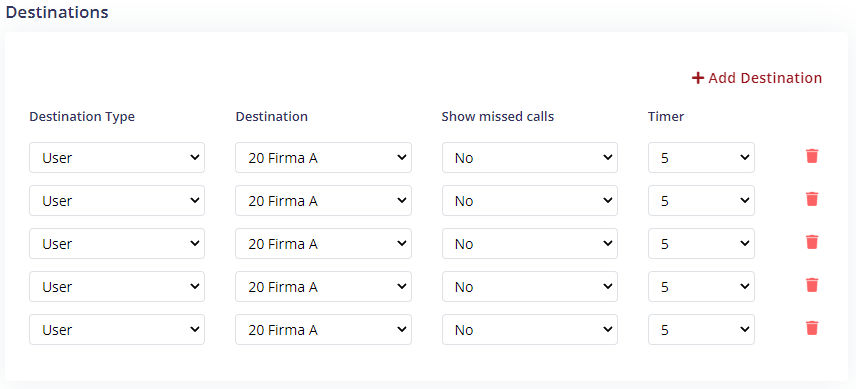
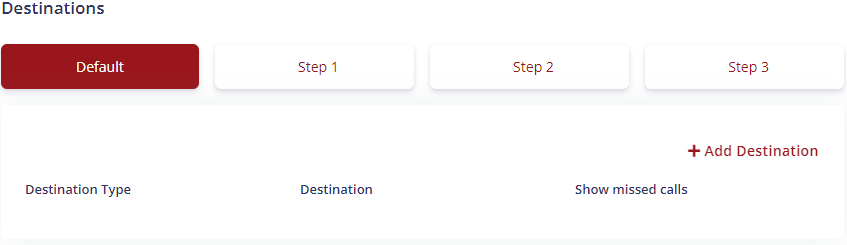
Here you can define the actual group members, just click on +Add target. There are four levels available to you. If no one answers in the standard level, the further steps will ring after X seconds
Please note:
- The advanced group is only displayed if you selected Ring Call All when creating the group
- In the standard level you can add up to 10 entries as destinations
- You can specify in how many seconds the next step should be executed (5-65 seconds)
- You have the option of specifying whether missed calls should be displayed or not
Additional options
Billed SIP Line means under which user calls are billed is listed in the call overview.
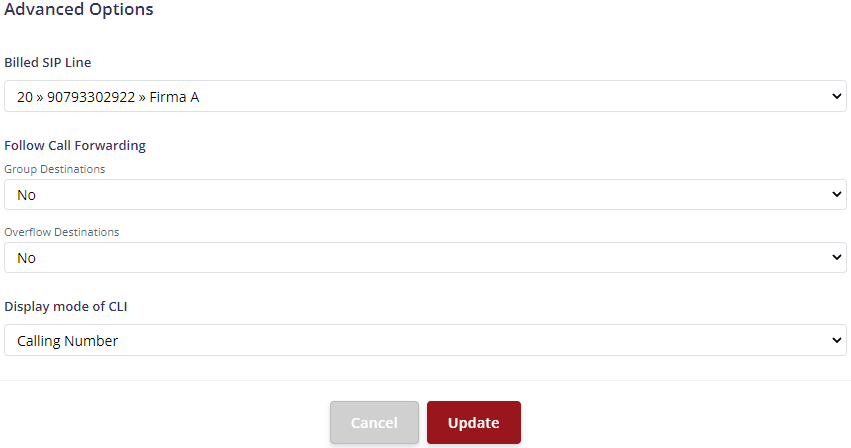
Follow forwarding
Group targets
- Yes means that if a target/participant has a redirect, it will be followed. Starting from the first user, then moving on to the second, etc.
- No means that even if a destination/participant has a redirect, it must not be followed
Overflow Destinations
- Yes means that if a forwarding is stored on the destination, it can be followed. For example, when you control a user who has an immediate forwarding to your voicemail.
- No means that if a target/participant has a redirect, it must not be followed
Display mode for CLI
- Caller Number – Only the A number is displayed on the telephone for an incoming call
- Name + Caller Number – When a call comes in, the name and A number are displayed on the phone
Devices

As a rule, all VoIP-enabled devices can be configured with peoplefone, but support and functionality are only guaranteed for provisioned devices. Auto configuration / provisioning is only available to peoplefone HOSTED customers.
Provisioning / Auto Configuration
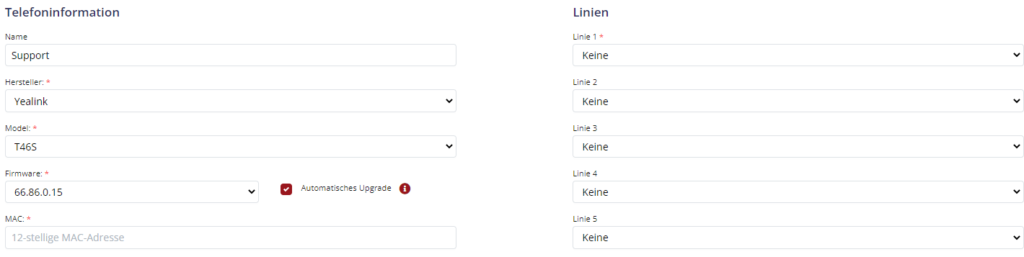
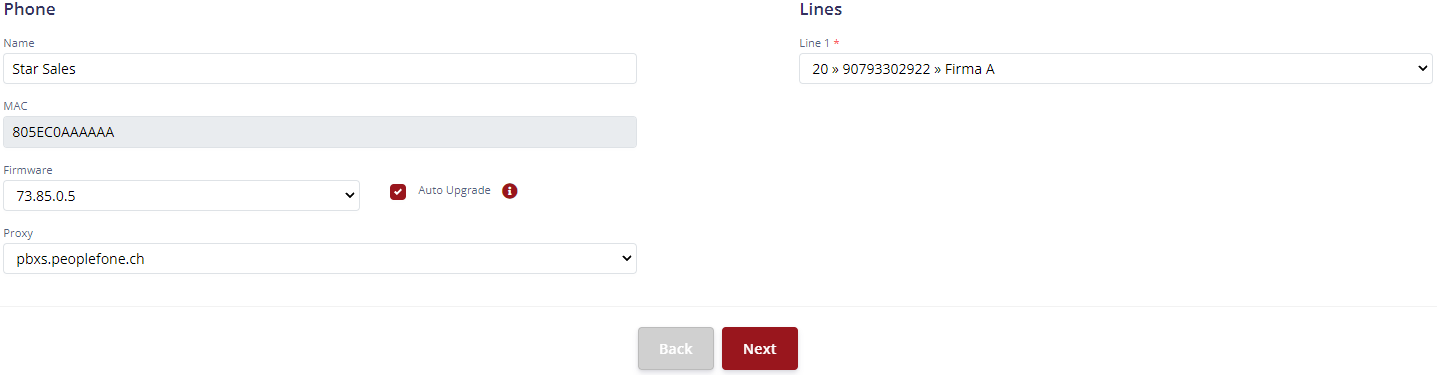
- To store a new device in a peoplefone HOSTED account, click +Add and enter the requested information and save the configuration.

In the auto configuration, you can store one of our recommended devices with the MAC address in the system in just a few steps. The SIP line/user is stored for the lines. You can also store multiple identities for company A, company B, etc. On the phone you can change the identity with the left and right key.
After the device has been created in the peoplefone HOSTED account and the IP address has been added, we recommend resetting the device to the factory settings (factory reset).
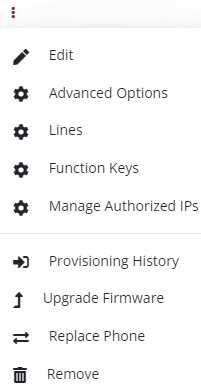
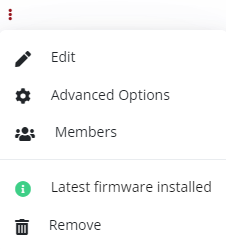
- Click on the three dots for more device parameters to edit
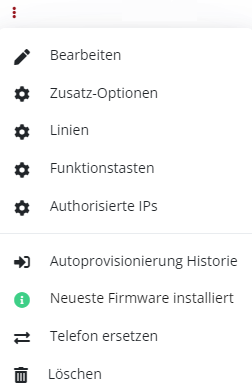
Edit
The device created in the system can also be edited
Advanced Options
You have many additional possibilities to configure your device according to your wishes
Turn Off Call Waiting
On Yealink devices, call-waiting is switched on or off on the line. This is required when call waiting is to be switched off or on.
Note: If call-waiting is switched on, then the caller does not get a busy signal. You must turn off call-waiting so that the second caller gets a busy signal back.

Line Settings
- Click on the three dots

- Click on the gear icon

You can also make various settings on the line if necessary. As an example, TLS can be activated so that the connection from the phone to peoplefone is encrypted. More information here.
Function Keys / BLF
- Click Function Keys
- In this area you can store the key assignments, for example select a user.

| BLF(BusyLineField) | You can use the BLF (Busy Line Field) button to see whether an internal subscriber is free or busy. You can transfer a call to this user, call the subscriber using this button or pick up a call from this user (call pickup) |
| Linie | Line is mainly used for swapping multiple calls |
| Speed Dial | Speed Dial is used for a call, e.g. to a mobile (external) |
| Transfer to | This function is rarely used as the function is covered by the BLF key |
| Forward to (nur Yealink) | This function de/activates immediate forwarding to the target number |
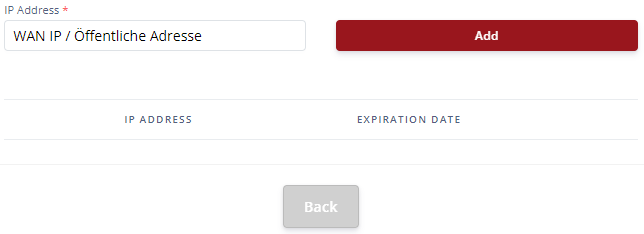
Add WAN IP / Network Authentication
For provisioning/auto configuration, the WAN IP (public IP) of the customer network must be stored for authentication. No static IP address is required for authentication.
In the device overview, click on the three dots for the respective device and select Authorized IPs. The public address of the respective network is displayed. If you are in the customer network, click on Add. If not, paste the public address of the customer’s network.
- Click Authorized IPs
- Your WAN IP is displayed in the field, click on +Add to allow the auto configuration to be fetched
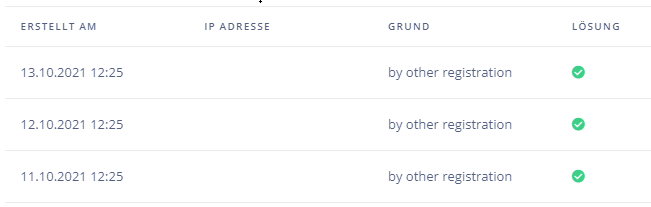
Auto provisioning history
The auto-provisioning history shows whether the device was able to obtain the auto-configuration or not.
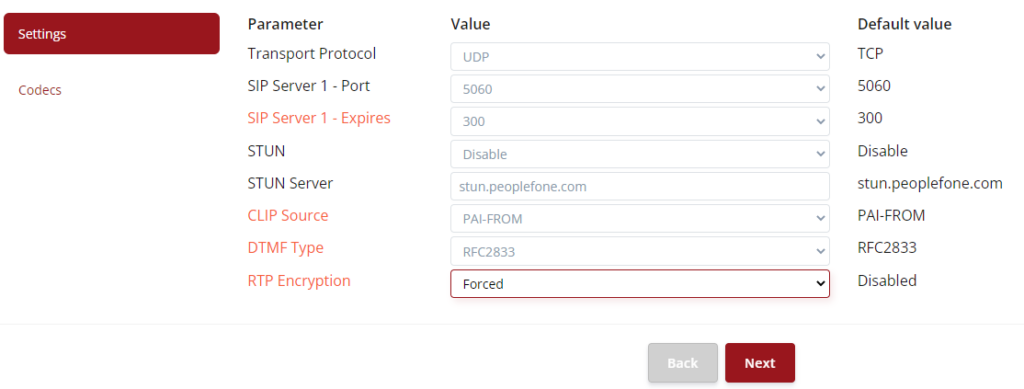
Encryption TLS & SRTP
TLS
By activating the TLS protocol, you can encrypt the SIP stream. With auto-configured devices, the protocol must be adjusted in the provisioning. Note that after changing the configuration, the device must be restarted or reset to factory settings.
- Click the three dots on the phone
- Click on the gear

- Change the transport protocol to TLS and save
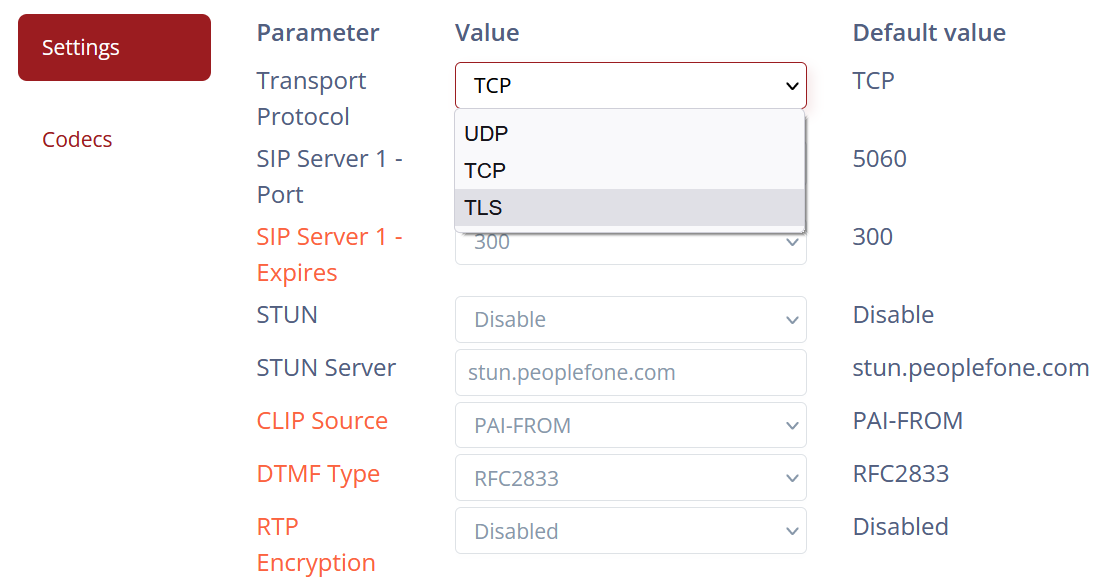
SRTP

- In the provisioning you have the option to also force/activate the RTP Encryption
If you have activated SRTP on the device, please write an e-mail to [email protected] with the note for activation of SIP SRTP.
NOTE: In order for the settings made to take effect on the device, a restart or factory reset must be carried out.
User manual
| Brand | Type | German | French | English |
|---|---|---|---|---|
| Mitel | 6869i | Link | Link | Link |
| Mitel | 6867i | Link | Link | Link |
| Mitel | 6865i | Link | Link | Link |
| Mitel | 6863i | Link | Link | Link |
| Mitel | 6757i | Link | Link | Link |
| SNOM | D765 | Link | Link | Link |
| SNOM | D745 | Link | Link | Link |
| SNOM | D715 | Link | Link | Link |
| SNOM | D375 | Link | Link | Link |
| SNOM | D345 | Link | Link | Link |
| SNOM | D315 | Link | Link | Link |
| SNOM | 870 | Link | Link | Link |
| SNOM | 821 | Link | Link | Link |
| SNOM | 760 | Link | Link | Link |
| SNOM | 725 | Link | Link | Link |
| SNOM | 710 | Link | Link | Link |
| SNOM | 370 | Link | Link | Link |
| SNOM | 320 | Link | Link | Link |
| SNOM | 300 | Link | Link | Link |
| Yealink | T48S | Link | Link | Link |
| Yealink | T46S | Link | Link | Link |
| Yealink | T42S | Link | Link | Link |
Supported Devices
A list of all supported and auto-configurable devices for the peoplefone HOSTED product can be found here: Download PDF
Device Password
If no entry is visible after provisioning, the provisioning URL (server URL) must be stored directly via the phone’s Web GUI. You can find the URL to be stored in the list of supported devices.
When provisioning a device from peoplefone, the password is overwritten for security reasons. According to the manufacturer, the username remains the same. The password is the SIP password of the first identity stored in the provisioning. There are exceptions with Mitel devices, the password is generated by peoplefone and displayed when the device is added.
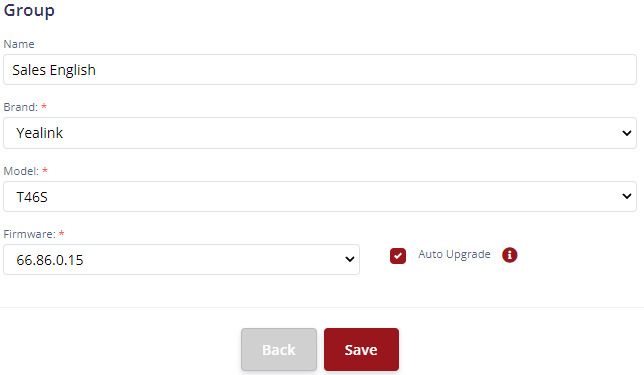
Device Groups
Add

- Click +Add
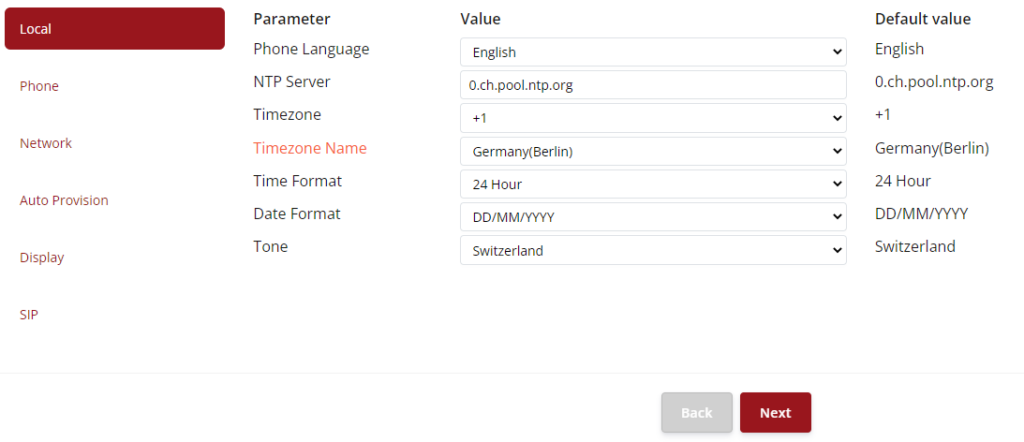
Device groups allow you to store different device configurations. As an example, you have different phone languages for your sales departments (DE, EN, FR), you can create the three groups and define the settings for each individual group
- Enter the necessary information
Note: Auto Upgrade is still inactive. As soon as the function is available, the firmware provided by peoplefone will be automatically installed on the device.
Edit
- Click Edit
Additional Options
- Click Additional Options
- In this report, you can personalize your devices according to your needs.
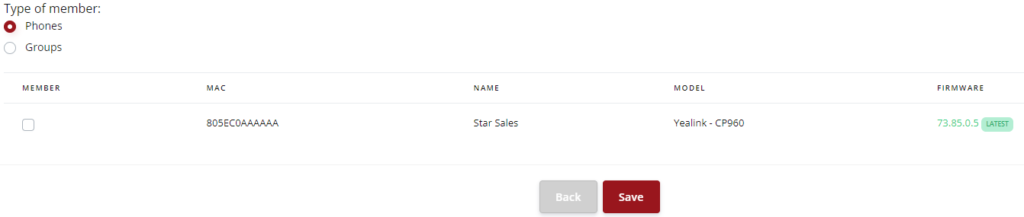
Members

- Click Members
Bei allen Mitgliedern werden dann die oben definierten Settings übernommen.
Install Latest Firmware

You will receive this message if the latest firmware provided by peoplefone has been selected in the system.
Note: Auto Upgrade is still inactive. As soon as the function is available, the firmware provided by peoplefone will be automatically installed on the device.
Remove

- Click Delete to delete a group
Time Routing

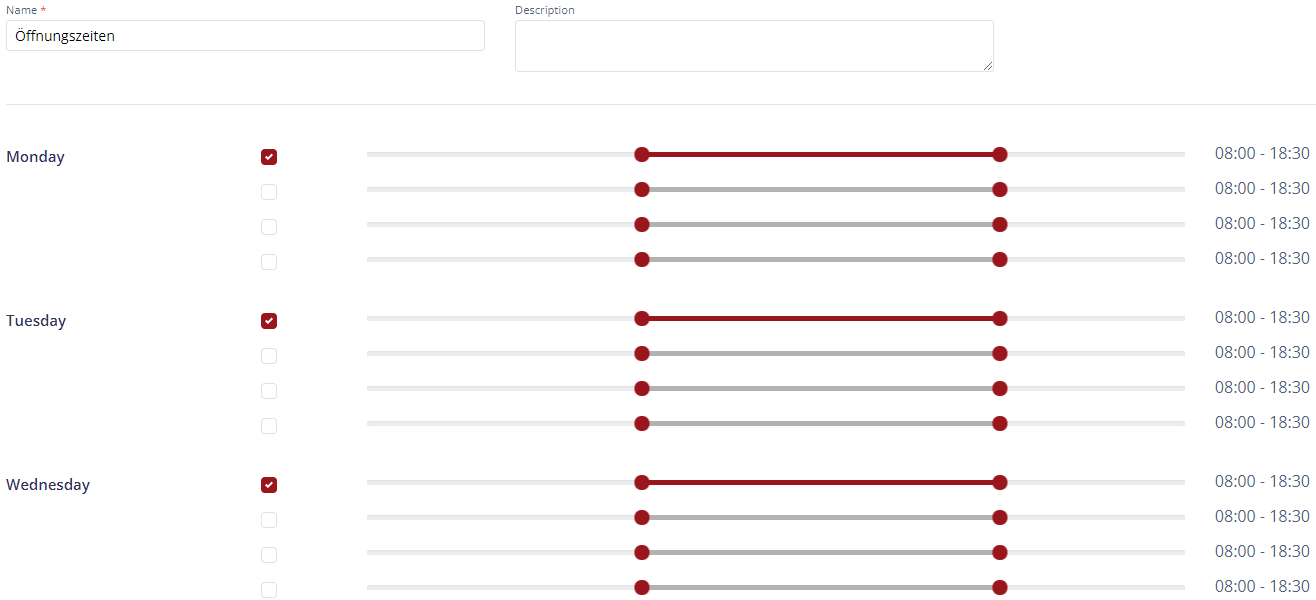
The time-dependent routing is divided into three different areas. Time ranges, time routings and time exceptions. This configuration is also referred to as day/night switching.
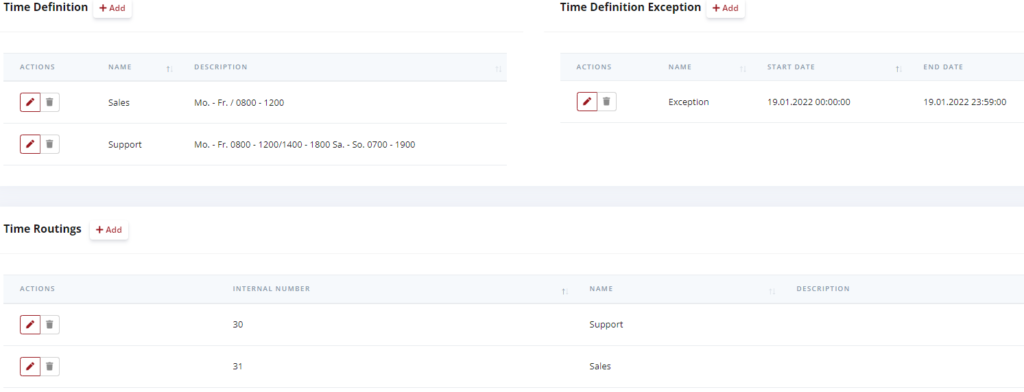
Time Range


Here you store the time range of the opening hours of your company. The system automatically recognizes whether we are inside or outside of working hours. The red area is within working hours (opening hours), the gray area is outside of working hours.
Routing

- Give the schedule a name and a description. Depending on the situation, the extension can be left as it is or adjusted according to the plan.
Within schedule

- Here you can define the destination where the calls should be routed within the schedule.
Outside of Schedule

- Where should the call be routed if we are off schedule?

Set Time Exceptions

- Here you can define exceptions.

Zusatz Optionen


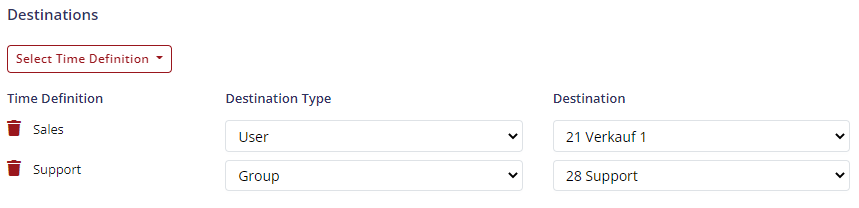
Assign Number to Time Routing
In order for time routing to work and take effect, the object (the query) must be placed in the call flow. This means that the telephone number is assigned directly to time routing, for example.
However, it is absolutely necessary, the time routing can of course also be placed further back in the call flow.

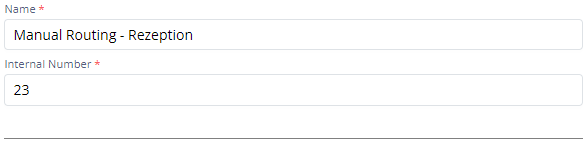
Manual Routing

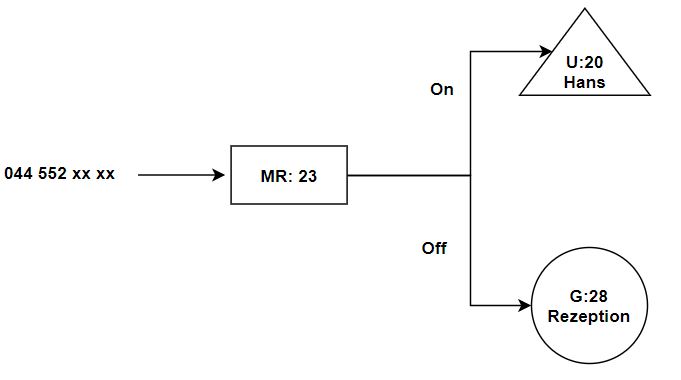
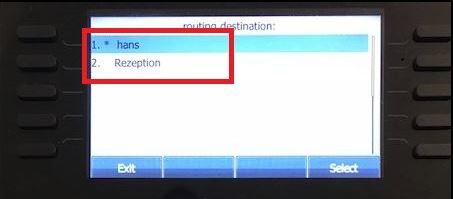
This configuration causes the call to be routed to the user John when manual routing is active. If manual routing is switched off, the call goes to the reception group.
Add Manual Routing

- Click +Add
- Give the manual routing a name and, if necessary, the internal number
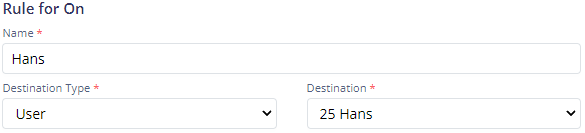
Status Switched On

- Give the status On a name and define where the call should be routed to when the status is on.
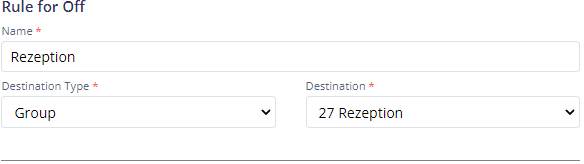
Status Switched Off

- Give the status Off a name and define where the call should be routed to when the status is off.
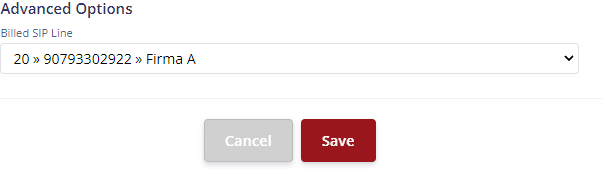
Advanced Optionen

- Define the Billed SIP Line, this is then listed in the call history.
Overview

In the overview you can edit, delete, activate and deactivate manual routing.

Place Object Manual Routing in the Call Flow

The manual routing object must be placed in the call flow. In this example, the incoming call is routed directly to manual routing. Here the status (On / Off) is checked and the call is routed accordingly

Phone Function Key
The phone’s Function Keys can be assigned manual routing. If the button is pressed then the reel will be activated or deactivated.
Manual Routing Advanced
If you set up Manual Routing Advanced, you have the option of activating or deactivating the required role in a selection list on the end devices. This function is only available for Yealink devices.
Selection list on a Yealink device
Function Keys Manual Routing Advanced

Switch Manual Routing On/Off via Call
Manual routing can also be switched on or off using a control command. You can activate or deactivate manual routing with the control command *7 and the ID of the routing.
Beispiel = *723
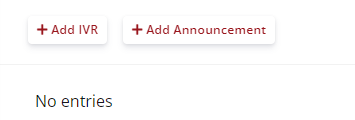
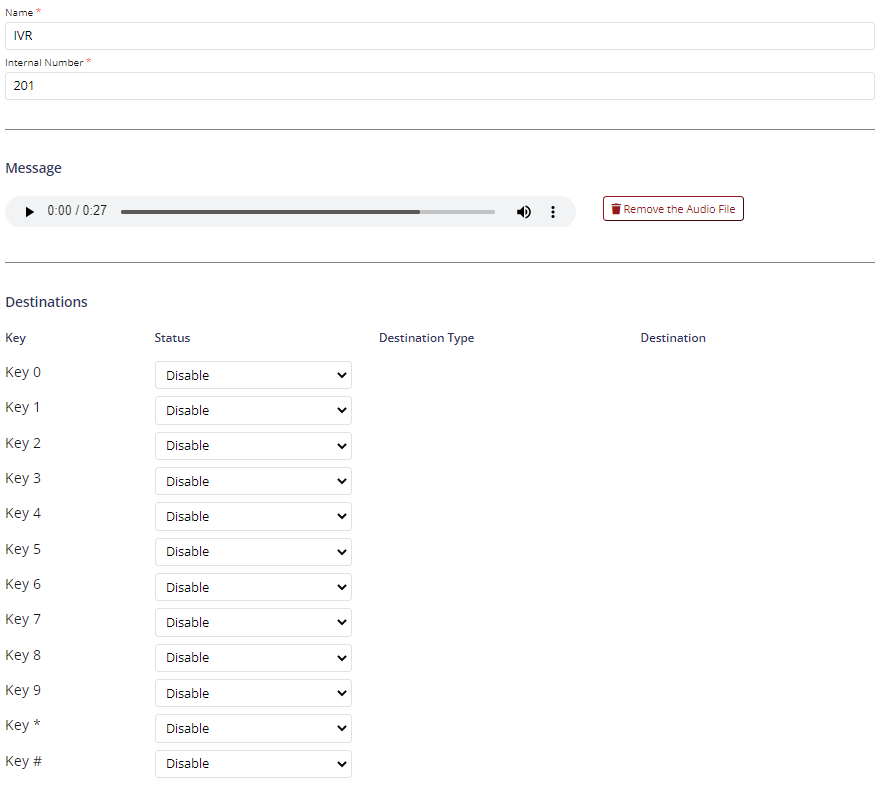
IVR / Announcement
With these instructions you can activate an interactive voice dialog system IVR in your peoplefone HOSTED account. When you call a company’s main number, you are often prompted to choose the language you want. Once the selection has been made, you will be connected directly to the correct department. A file of maximum 8MB can be uploaded.
CAUTION: IVR nodes should never be used in groups as this can cause problems.

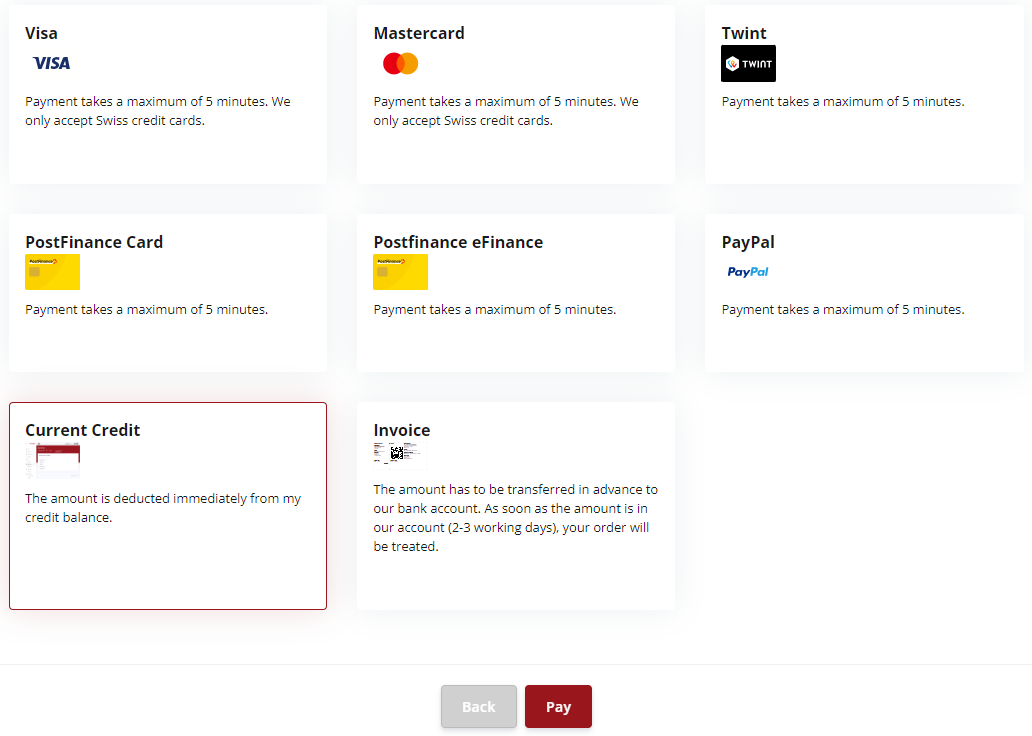
IVR Node / Purchase Process

- Select Nodes
- Duration in months
- Add to Cart
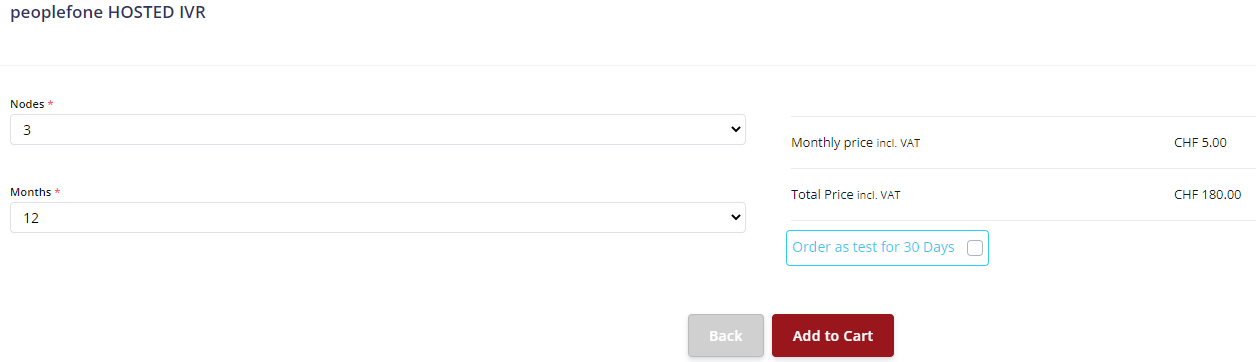
- Click Next
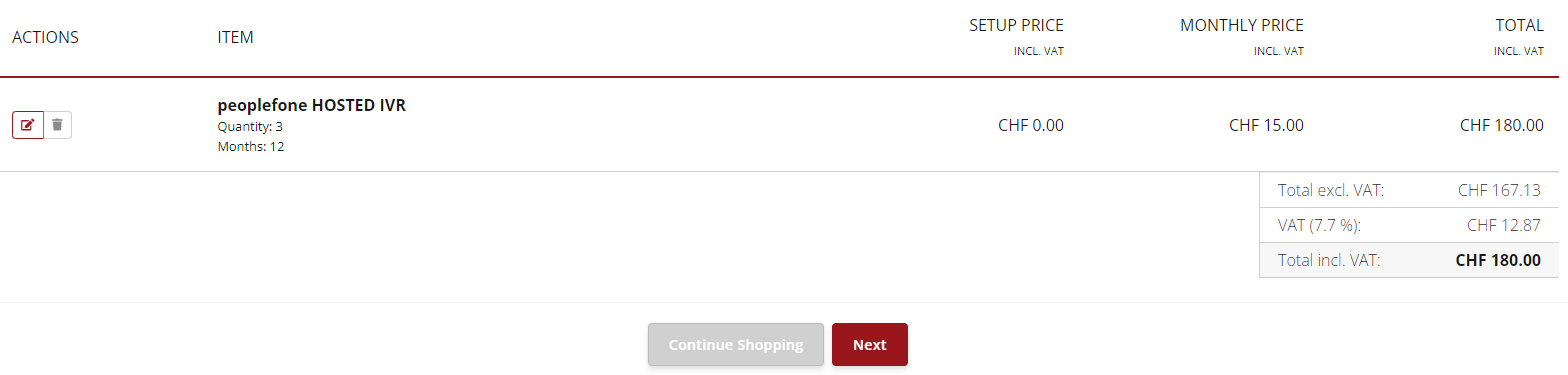
- Select payment method and click on pay
Add / Configuration

Depending on what you would like to set up, an IVR (dialog system) or an announcement, click on the button, in this example we are creating an IVR.
- Give the IVR a name
- Upload an .mp3 or .wav file with the IVR text
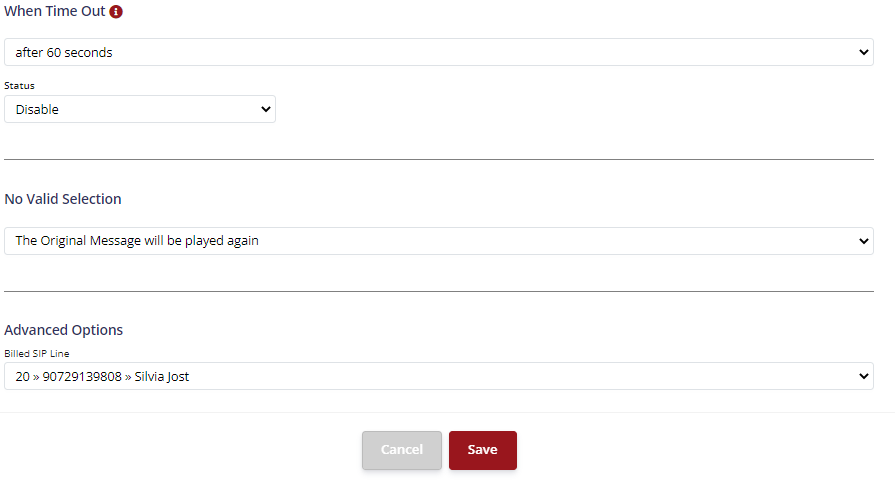
- Billed SIP Line has no influence on telephony, but on what should be displayed on the bill, resp. on the call history
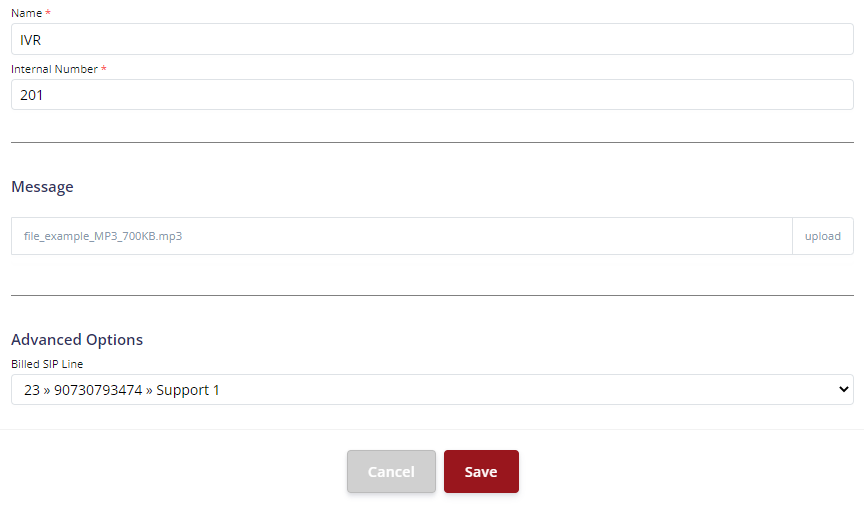
- Make your settings
- When you are finished with the settings, click Save
- After successfully saving, you will be shown an overview with all stored IVR systems

IVR – Define Routing
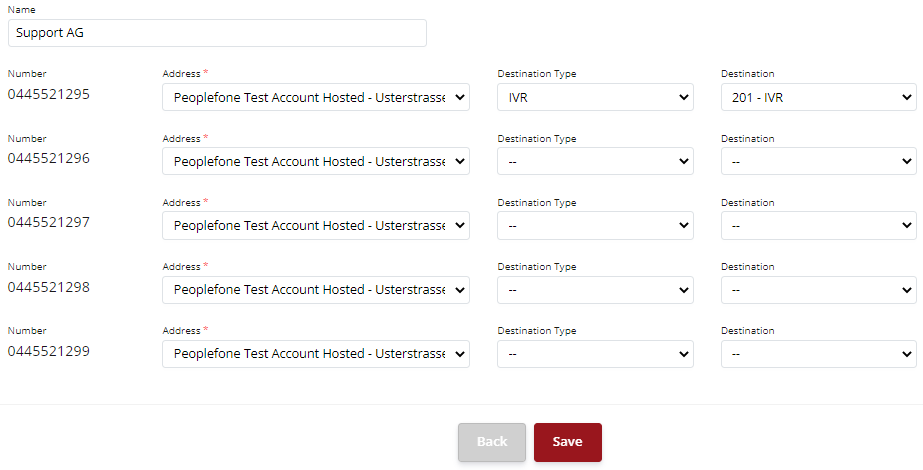
Go to Numbers and edit the desired block where you want to make the phone number assignment. If you click on the pencil tool, you can assign individual phone numbers. If you use the chain, you assign the whole number block to an object.

Calls from outside are always received on the target number. You can define where the call should be given when assigning the number. In this example, the call is placed directly on the IVR, where the stored settings then come into play.
Company Phonebook
General Information
There are basically two different phone books that you can use. An LDAP company phone book is available to customers who use the peoplefone HOSTED.
Customers who use the O365 for their contact management can synchronize the contacts and access them on the phones based on XML.

Functions
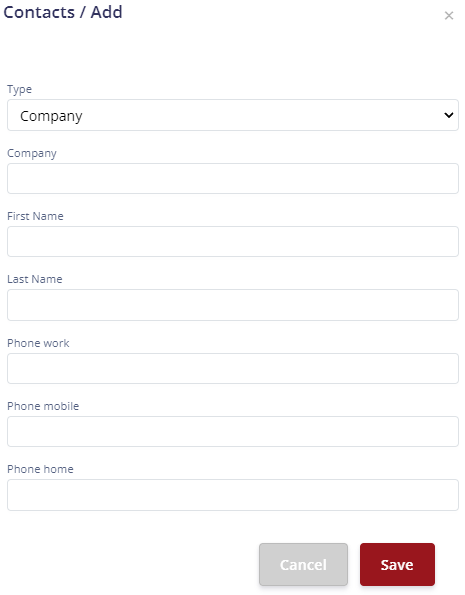
If you want to add a few or individual contacts in peoplefone HOSTED
+ Add
If you want to delete all contacts
- Delete all contacts
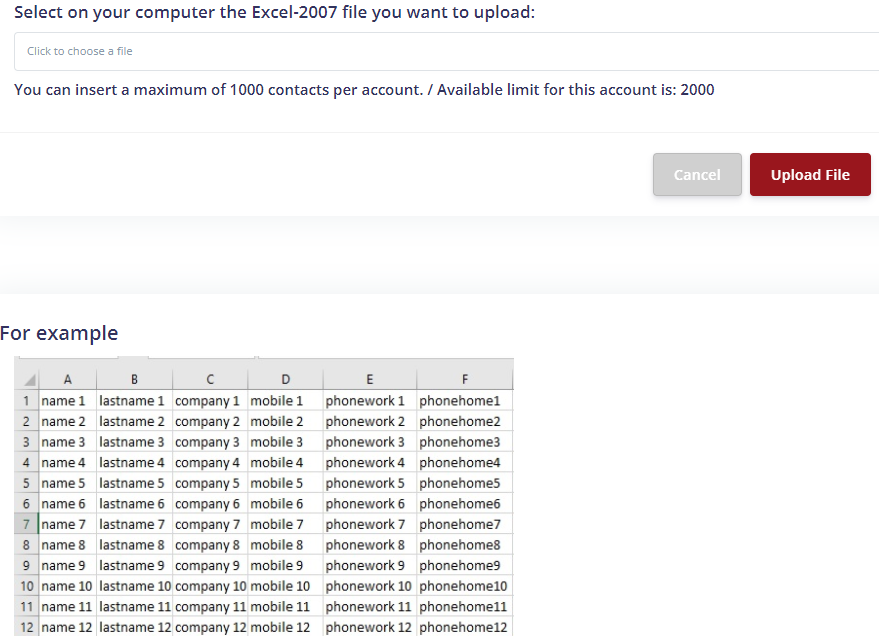
If you want to import contacts from an Excel
- Import Contacts
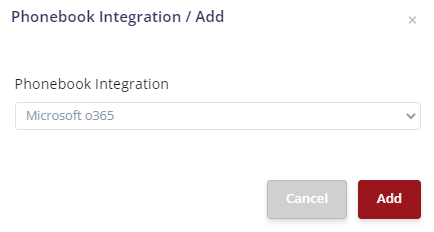
Would you like to sync O365 contacts?
- +Add integration
Active/inactive status of the company phone book
- LDAP Directory
peoplefone HOSTED LDAP
The LDAP company phone book is made available to our peoplefone customers with provisioned telephone devices. To use your phone book, you need to make sure it is enabled under Configuration – Company Phone Book – LDAP. After activation, the device must be restarted.
ATTENTION: A maximum of 2000 contacts can be imported into the peoplefone HOSTED company phone book.
Contacts individually + Add
- Enter all the requested information
Delete all Company Phonebook Contacts
If you choose this option, all entries in the peoplefone company phone book will be deleted.
Import Contacts from Excel
You have the option of importing your contacts using an Excel file .xlsx. Please manage your Excel according to the sheet in our example.
LDAP Company Directory Active / Inactive
Here you can see the status, green means active, red means inactive.

LDAP for manual configuration
LDAP Server: ldaps://ldaps.peoplefone.com
LDAP Username: cn=idUSERID_uSIPACCOUNT,ou=users,dc=peoplefone,dc=com
LDAP Password: SIPPASSWORD
LDAP Root: ou=accountUSERID,ou=account,o=ch,dc=peoplefone,dc=com
Microsoft 365
General information
You can import a maximum of 2000 contacts. The synchronization is performed every 10 minutes.
O365 Integration
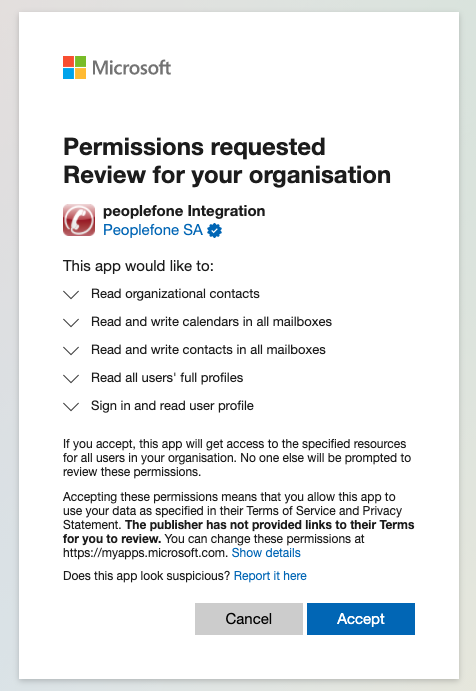
Under Configuration → Corporate Phone Book → Add Integration, click «+Add» and select Microsoft O365. The integration can only be done by an administrator from the tenant of O365, you need their login data.
It takes a few minutes for the sync status to update. The Active Integration indicator must be green and a date must be specified. Your corporate directory is now synced.
- You must now accept the following request to sync the Outlook contacts.
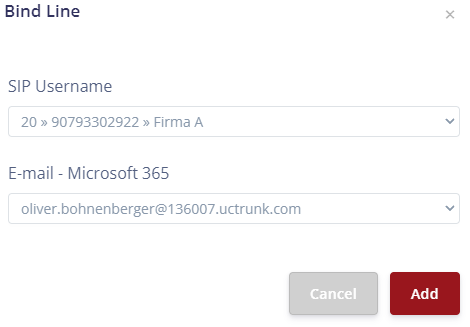
Linie verbinden
- Click +Add

- Select the SIP line and the email account to be synchronized
Music On Hold
If a customer is put (On hold), you can have your own music or announcement played. Please note the SUISA guidelines. The file formats .wav and .mp3 are supported.

Other Settings
Attention: The number of digits of the internal IDs should not be mixed, decide depending on the conception whether it should be 2, 3, or 4 digits. If you have to change the number anyway, please correct it for all objects, otherwise problems may occur.
- Select how many digits the internal obect IDs should have
- If you want to check for incoming calls, the caller is in tel.search.ch, please activate the option
