General information
In this guide, we will show you the steps you need to take to set up a 3CX system from scratch. We will show you the basic configuration and the minimum security settings you need to make on the system. For security reasons, we recommend that you run the system securely behind a firewall, for more information click on Firewall Configuration.
Requirements
Informationen zu den Anforderungen für eine 3CX, finden Sie hier: Specifications for 3CX
Installation from Boot Media
Boot the downloaded image of 3CX on your virtual instance or server.
Basic installation
After installation, you can configure the system via the web interface. To do this, enter the IP address and port already specified in the configuration in the browser. As an example this could be: https://10.10.100:5015
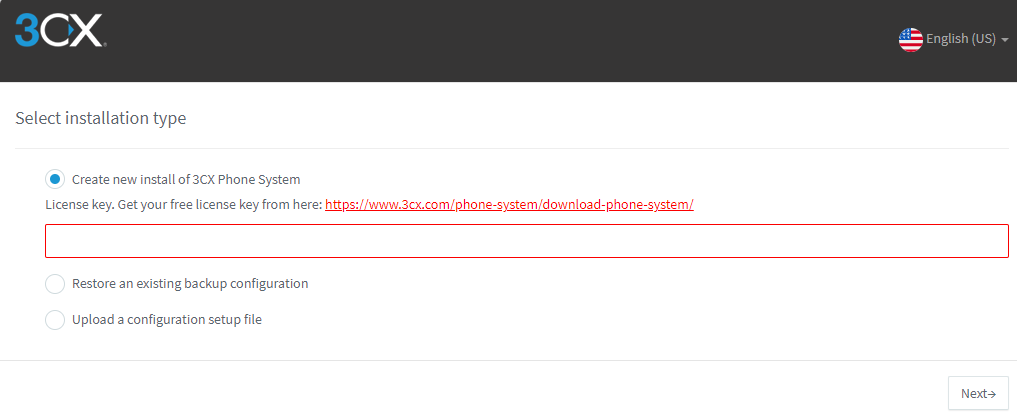
License key
If you already have a license key, you can enter it here. If you need a 3CX license, you can also purchase it from peoplefone, contact our partner management.
- Enter the license key here and click Next
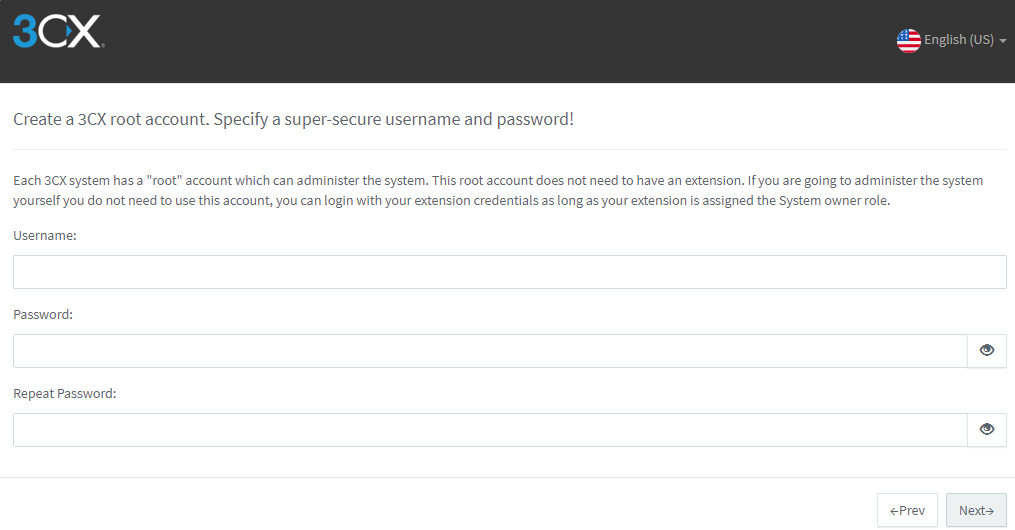
Admin account
The first thing the 3CX system wants is an admin user, ATTENTION, please always use a long and complex password. Never use simple default passwords. As complex passwords are tedious to remember and manage, and to enter them in each of the different systems, we recommend using a password manager.
- Enter the username and password, the password must be entered repeatedly for verification. Then click Next
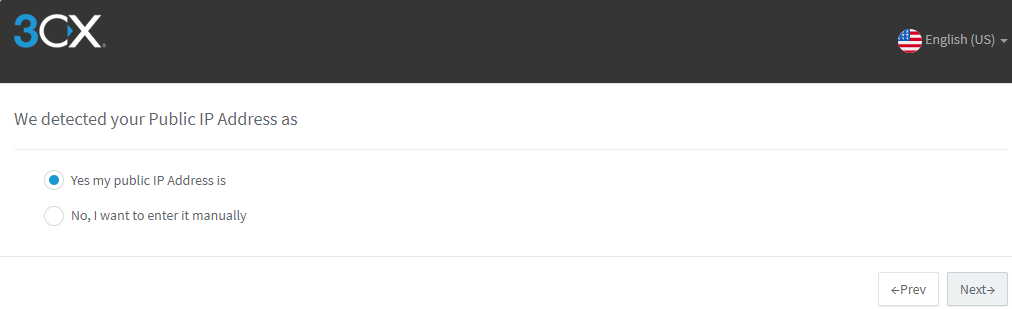
IP-Adresse
Here you will see your public IP address.
- Should you wish to use this public IP address, then click on continue
- If you want to manually adjust the IP address to be used, click the option to change it and then click next
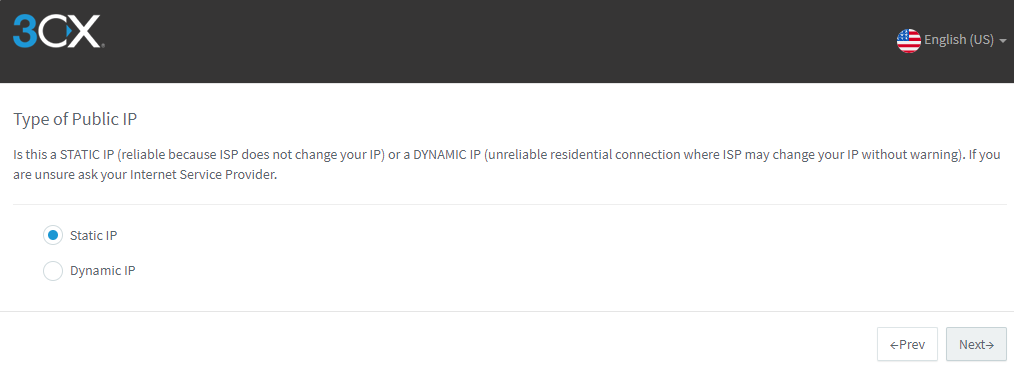
Static IP-Address
Here you can define whether you have a static or a dynamic IP address for your system. For a telephone system we always recommend to use a static IP address.
- Enter here whether you use a static or a dynamic address for the plant
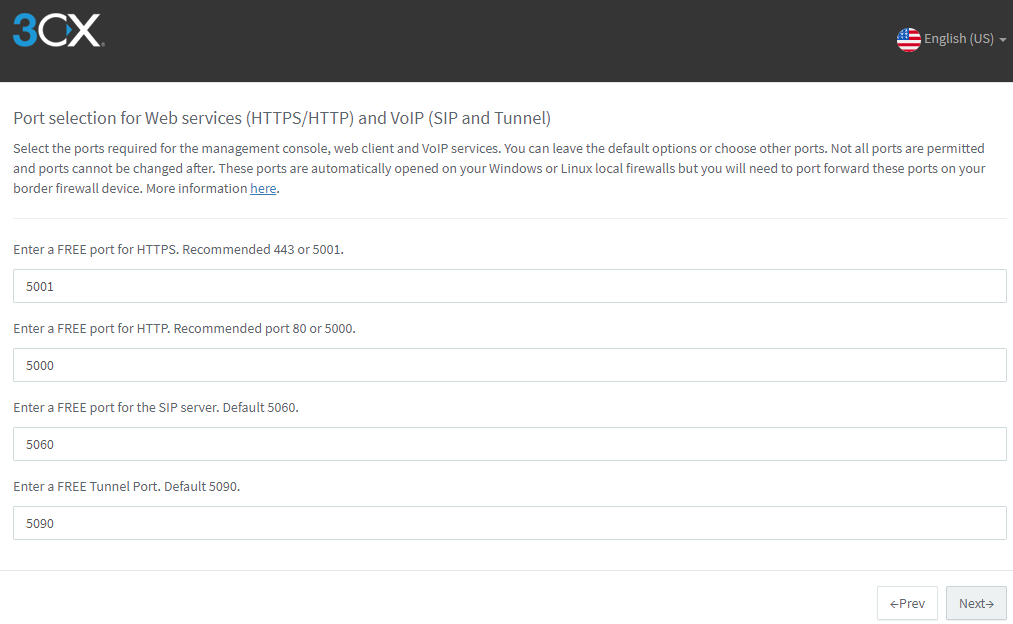
Kommunikations-Ports
If you wish, you can change the default ports, but then you must forward them accordingly on the firewall. We recommend that you leave the default ports, but of course you can make adjustments.
- Click Next
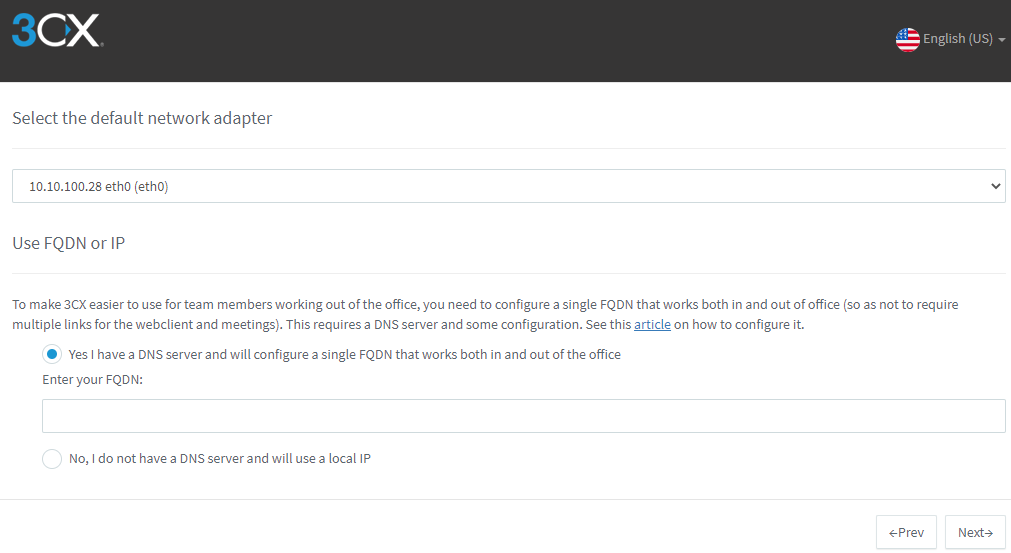
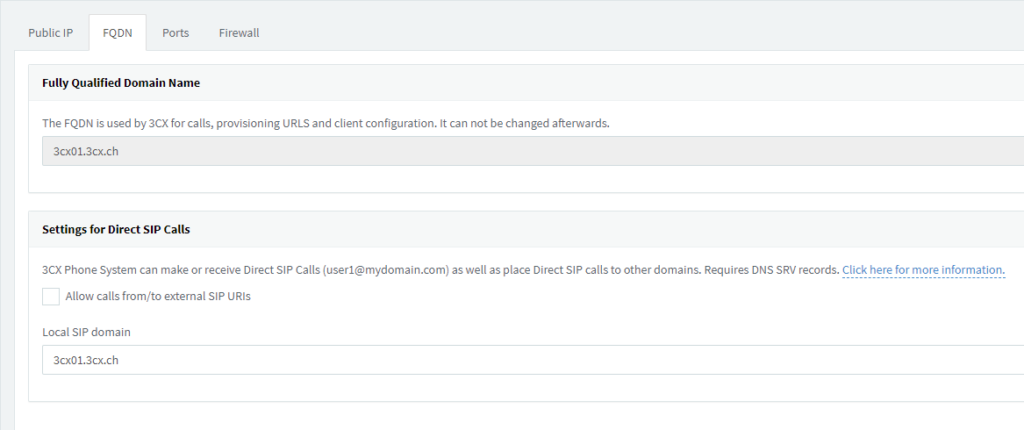
FQDN
If you manage a DNS, then you can insert a FQDN here.
- If you have a DNS, you can enter the name (FQDN) here.
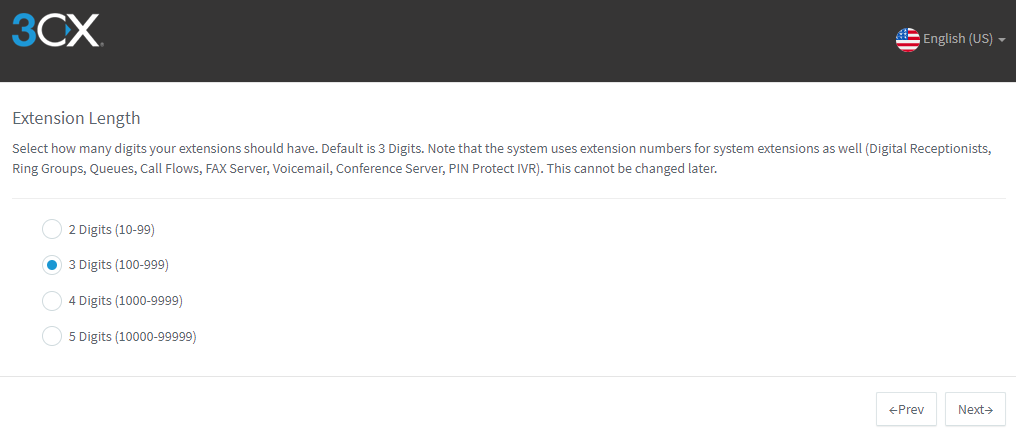
Length of internal speed dials
ACHTUNG: Diese Konfiguration kann nachträglich nicht mehr geändert werden!
Here you define what length the internal speed dials must have. Here it is important to have a good planning, because this adjustment can not be adjusted afterwards. That’s why it’s recommended to have a conceptual approach (users, groups, time routings, etc.), so that in the end you know exactly how many objects you need.
- Legen Sie fest, mit wie vielen Ziffern Sie Ihr System einrichten möchten
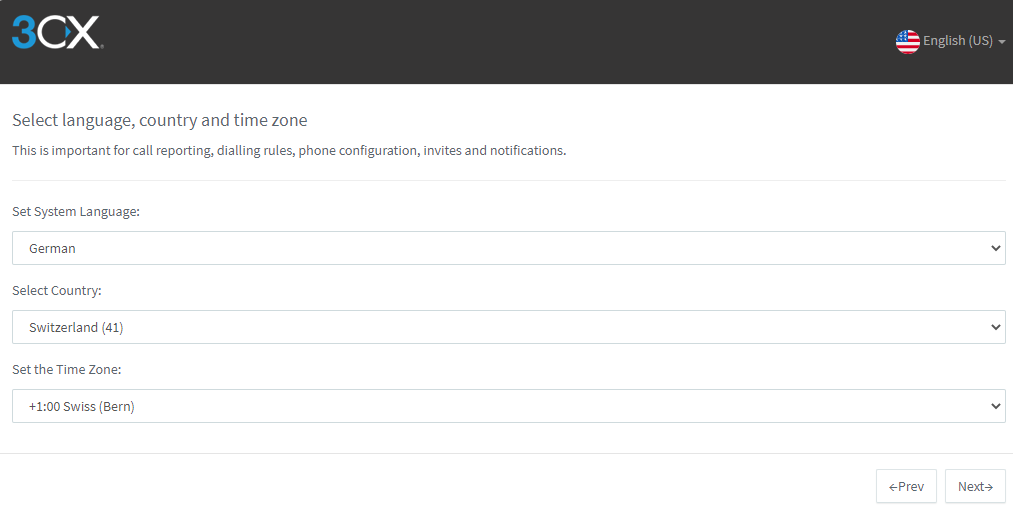
System language, country, time zone
- Select the desired system language, country code and time zone.
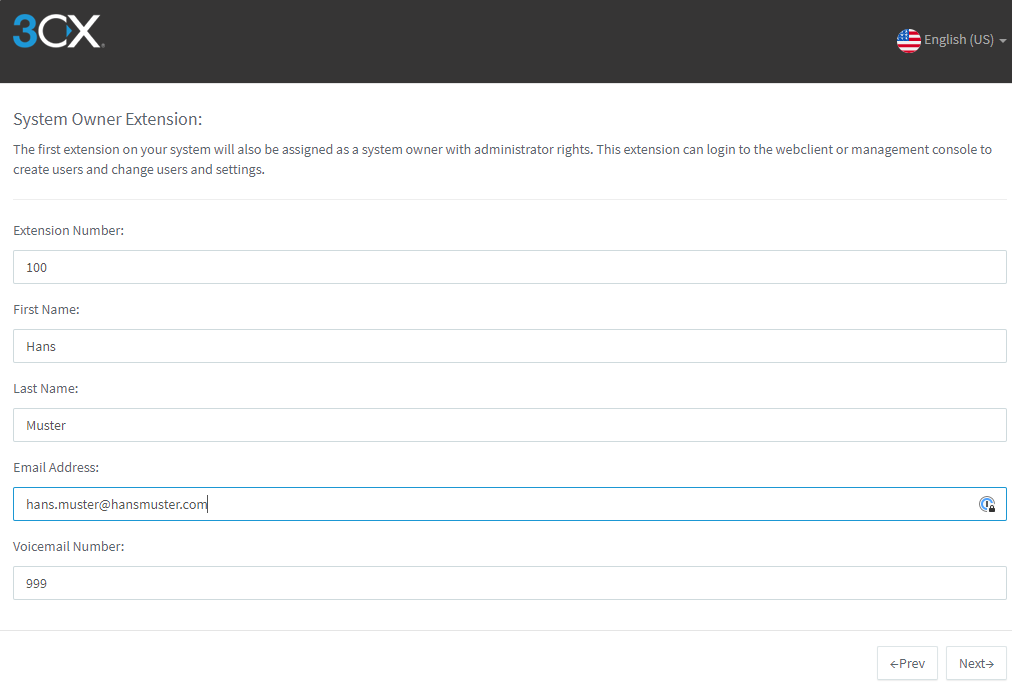
System holder
The system requires a first user which must be deposited, it should be entered the system owner. This user receives administrator rights.
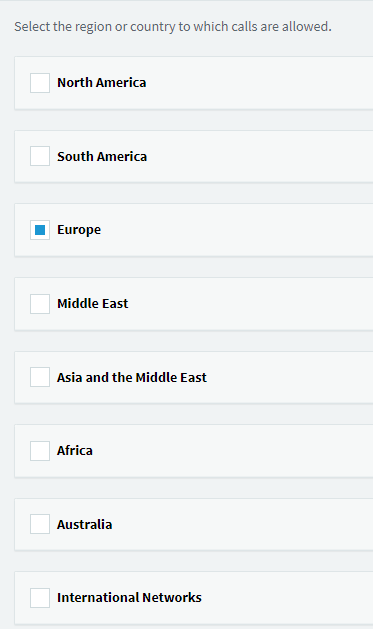
Allowed countries
Here you can define exactly which destinations you need to call. For security reasons, only open and make available those destinations that you really need, the rest should not be opened. All others should not be able to be contacted from the system.
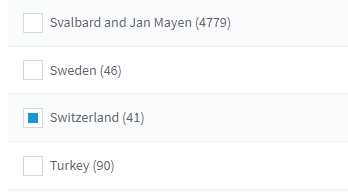
- Switzerland was automatically made reachable by the previously entered country code
- If you need to share more destinations, then select those
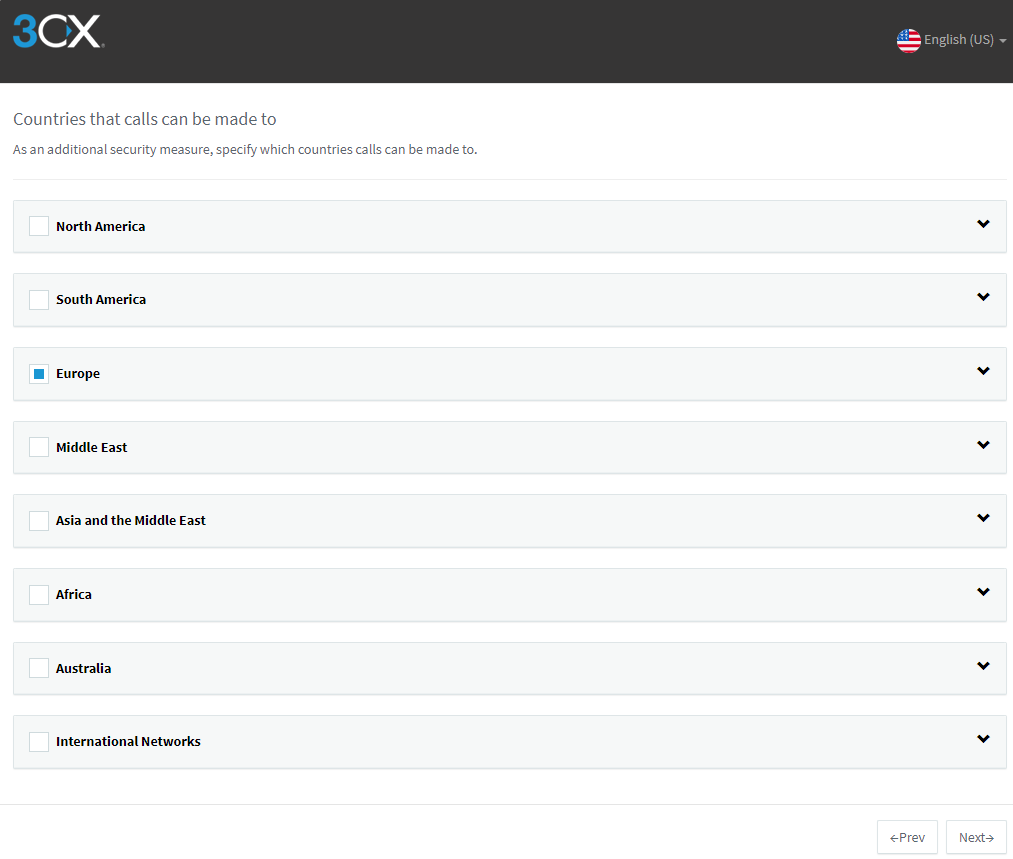
Here you can see that Switzerland has been selected automatically.
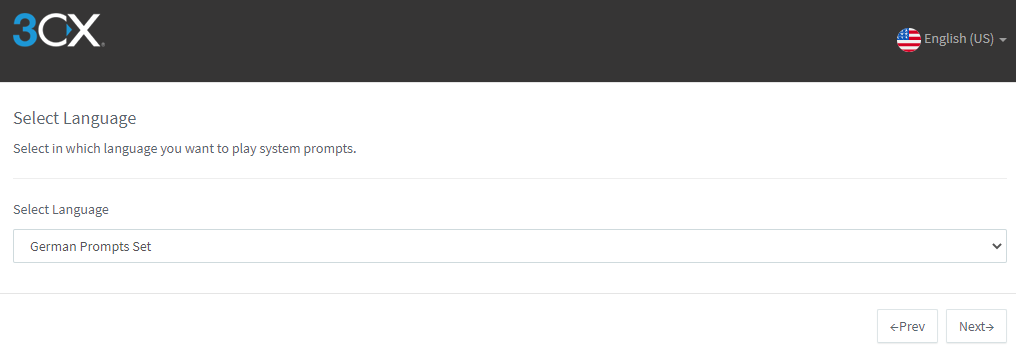
Language set
Here you set the language of the system announcements.
- Set the language of the system announcements and click Next
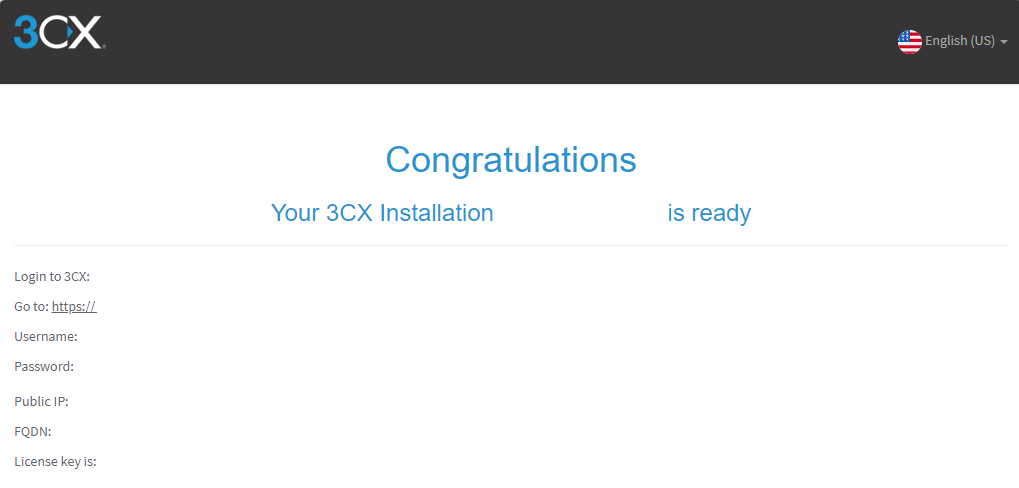
Congratulations and graduation page
At the end of the basic installation, you will receive this screen with important information about your system. Please make a print screen of it and store it in a safe place. In this example, we have deleted the data, of course.
Basic configuration
Now you can access and manage your installation via your FQDN or IP address.
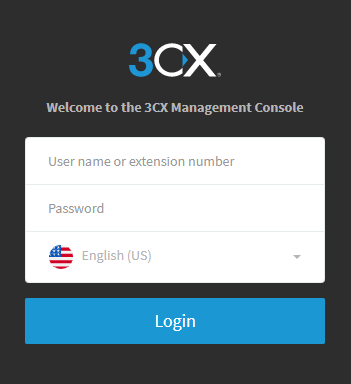
Login
After the basic configuration of your system, you will receive the login screen via the IP address or the FQDN.
- Enter the previously stored login credentials of your admin user
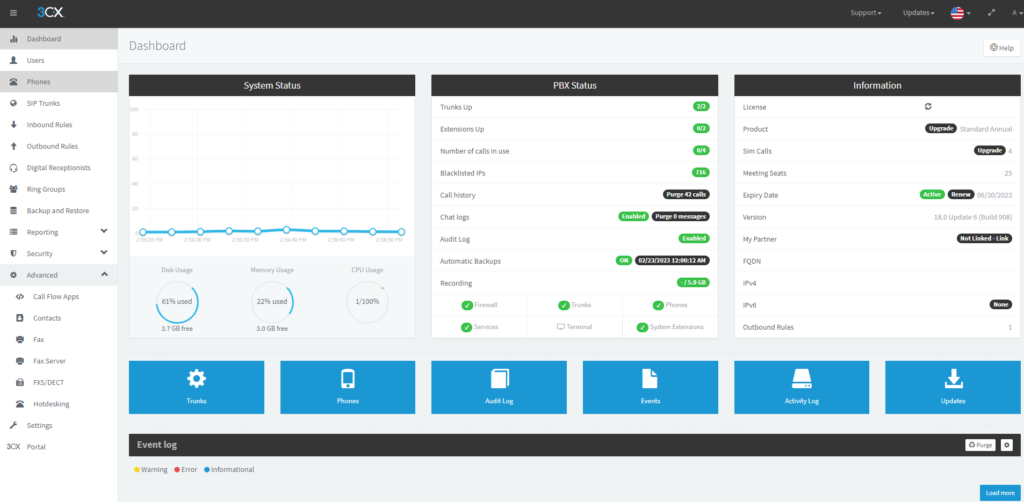
Dashboard
After successful login you will be redirected to the overview page (dashboard) of your installation.
Default settings
Now we turn to the standard settings of the plant, which should be made on every plant. These are the necessary configurations for the system to run safely and stably.
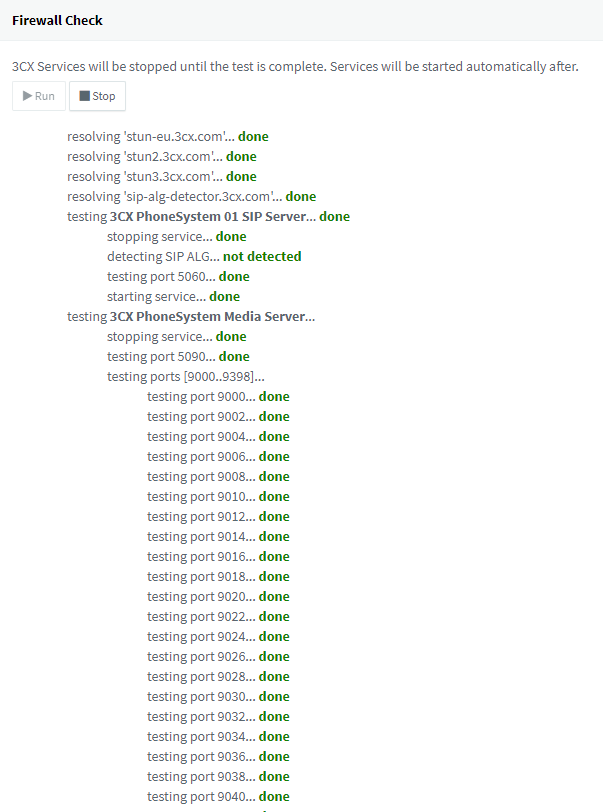
Firewall-Check
In order for the system to communicate properly, it must of course be able to communicate through some ports. The simplest configuration would be that your firewall blocks everything from the outside and allows everything from the inside to the outside. We recommend that you start up the system with this configuration, and if necessary, make further restrictions afterwards. More information about firewall settings can be found here: Firewall
- Klicken Sie im Dashboard auf Firewall
- Click Run to run the 3CX Firewall Checker, all ports must be green for good communication.
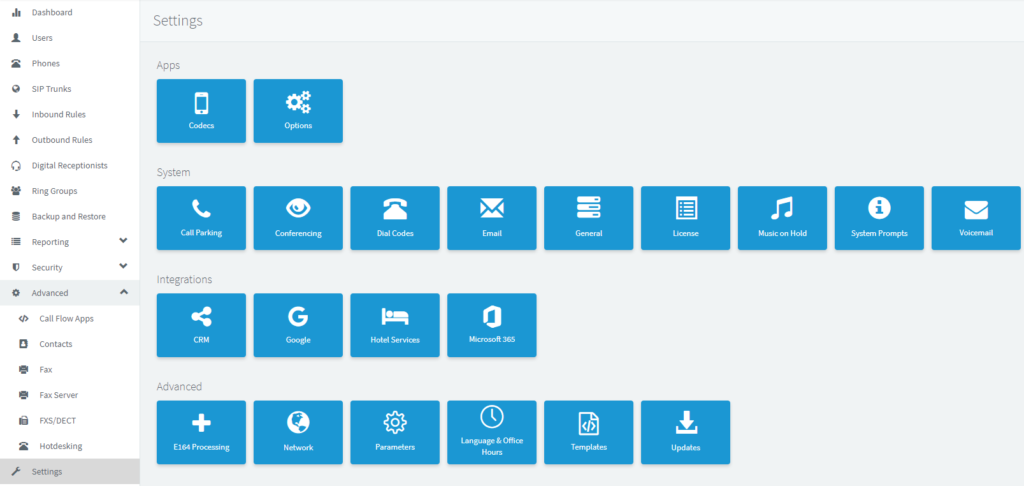
Menu Settings
Since many settings are made via the Settings menu item, here is an overview of all adjustable areas.
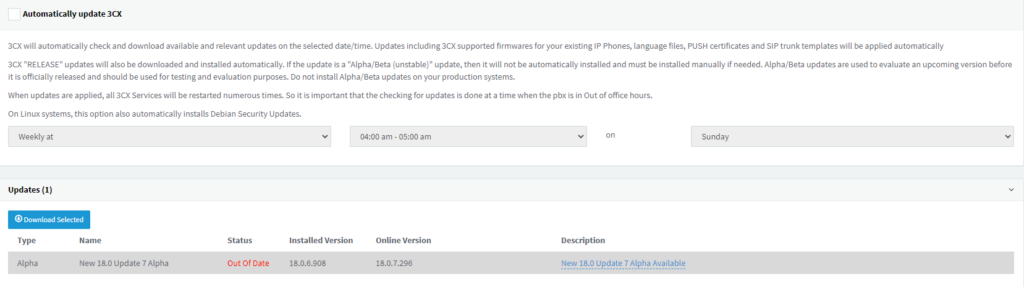
Updates
Here we recommend not to use the automated update function and to execute it manually. However, the system must be regularly checked for updates and updated.
- Select an update to install and install it.
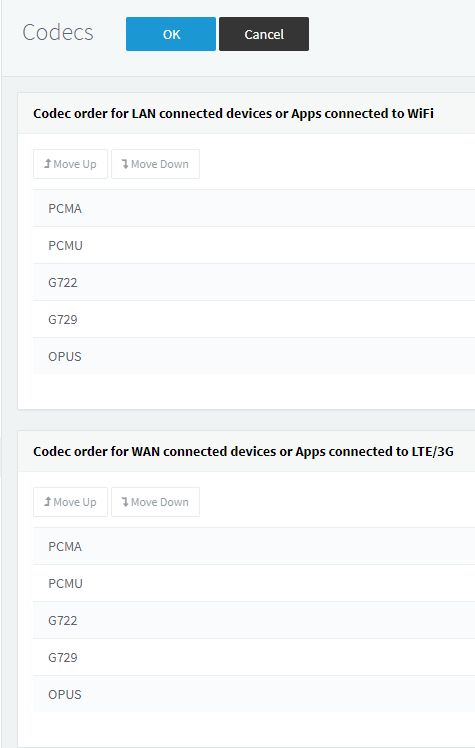
Codecs
peoplefone supports the codecs (G.711a, G.711u, G.722, G.729a), for more information, click here on Codecs. The codecs should probably be set up in exactly this order on the system.
Under Settings – Codecs, put the codecs in both places in the correct order
- G.711a (auch bekannt als “a-law” or “PCMA”)
- G.711u (auch bekannt als “u-law” or “PCMU”)
- G.722
- G.729a
- Put the codecs in the order listed below
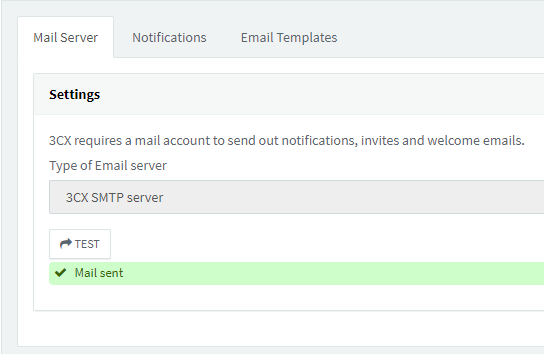
E-Mail-Addresses & Notifications
To ensure that you are also notified of any malfunctions and other information, you must check the Mail Server Settings. Further notifications, when an e-mail is sent, can be found in the Notifications. The e-mail template can also be customized. For example, if an IP is blocked, the system will automatically trigger a notification.
- Click Test to check if the installation sends a notification
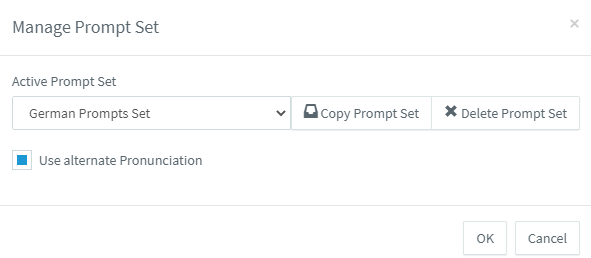
Systemansagen
The 3CX system has its own system announcements for its functions. You can choose in which language you want to have them.
- If necessary, the announcements can be downloaded and updated
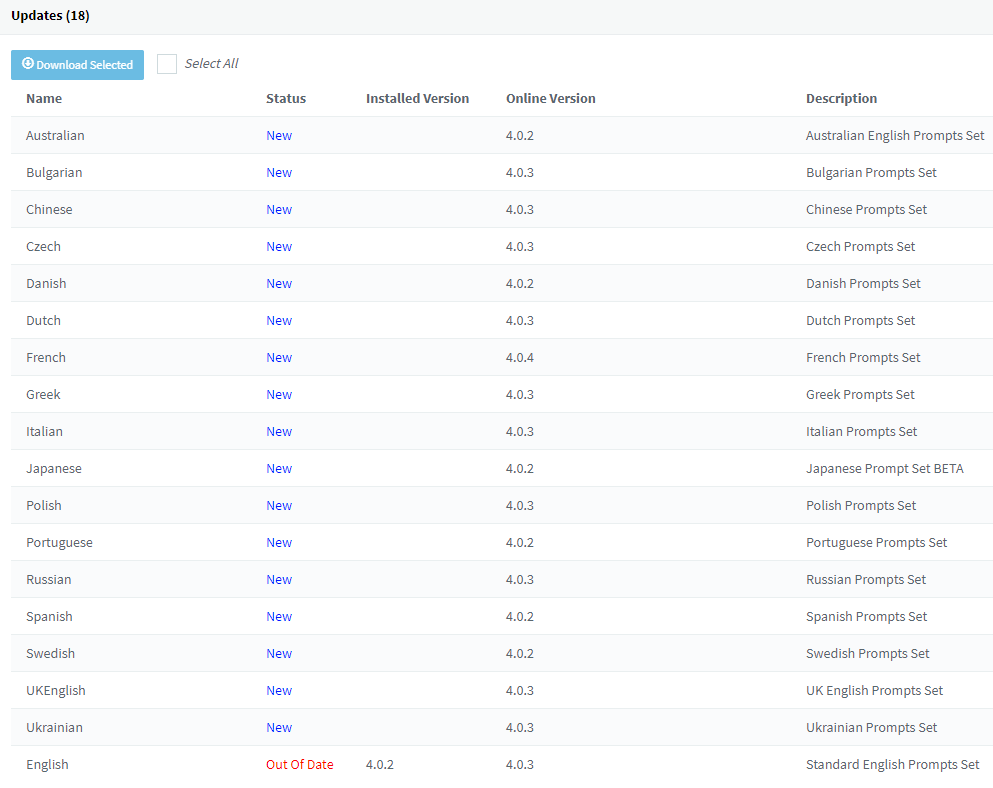
- Click the desired prompt set and then click OK
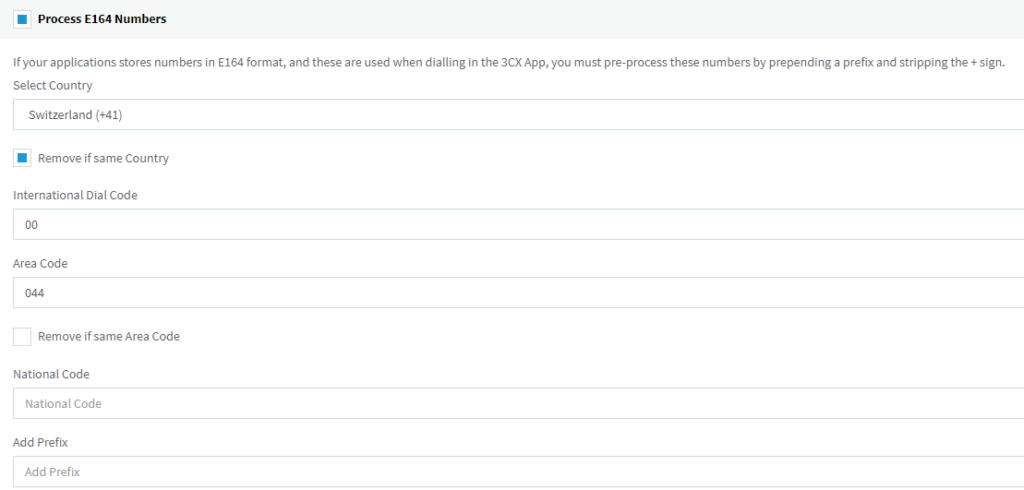
International telephone number standard E164
Since we as VoIP providers have to comply with BAKOM legislation, therefore, we have to make sure that outgoing calls are signaled in the international format E164. This means that every equipment owner must check that they have made the correct settings on the equipment.
- In order to comply with the international telephone number standard, please make these settings
Netzwerk Settings
No settings need to be made here after installation.
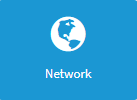
- Here you can see some information regarding network, but you can leave it like this
- You can also leave the settings here
- The ports are not changeable, but you can leave them as they are

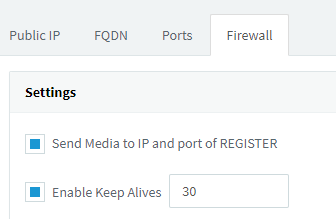
- Here please, if it is not active, activate Keep-Alives. With this option data packets are sent every now and then that the firewall keeps the ports open. If the firewall has no more traffic, the session timeout will close the ports and the system is no longer accessible from outside
Security
In this short video we show you the minimum security settings on a 3CX. Of course, further restrictions can be made. Of course, this information applies not only to 3CX systems, but to all popular PBXs.
Safety measures – Basic
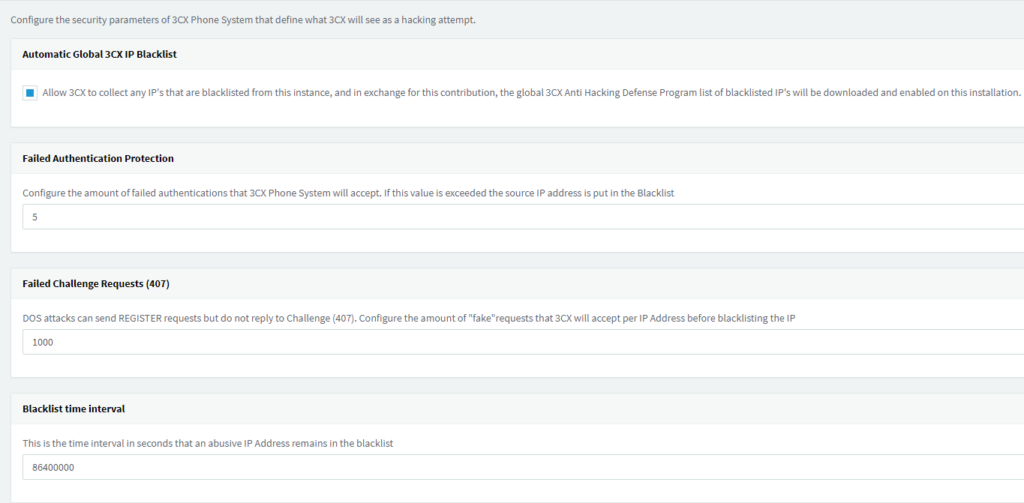
Attack protection
The default settings are OK, but there are two things we would change and make the system a little sharper.
- Protection in case of failed authentication, switch here to 5
- Storage duration in lock list, at the end you can append more zeros (5-6) without any problem to extend the lock duration so that the attacker can abort the exercise in case of a brute force attack.
Approved countries
- Open only areas where you really call, everything else should be blocked
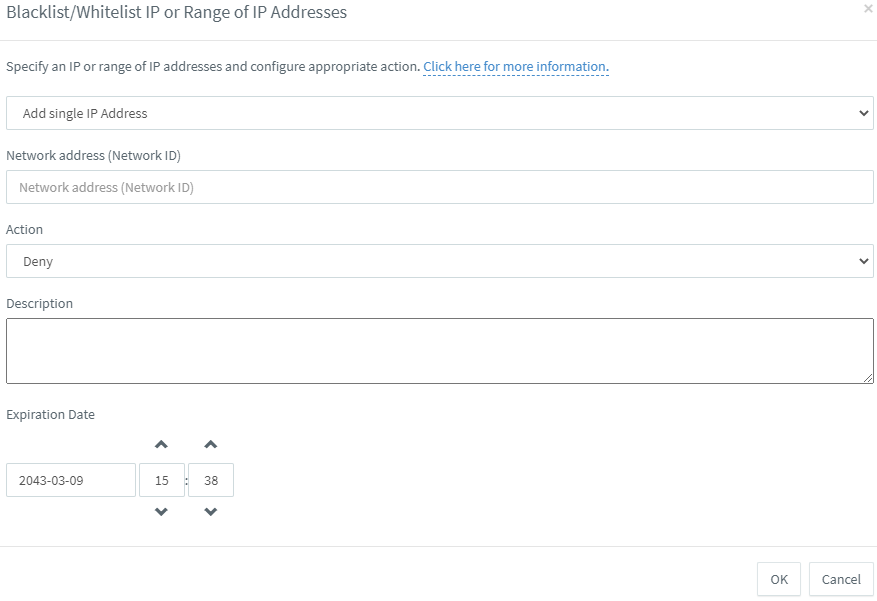
IP Blocking List
If the IP address of an attacker is blocked, it will be listed here automatically. Of course, you can also block IP yourself if necessary. Whole areas etc. can also be blocked.
- Click Add / Add to add another role
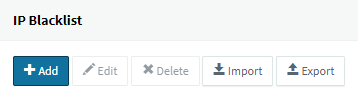
- If you want to block an IP address, add it as a Single IP address and select the Block action
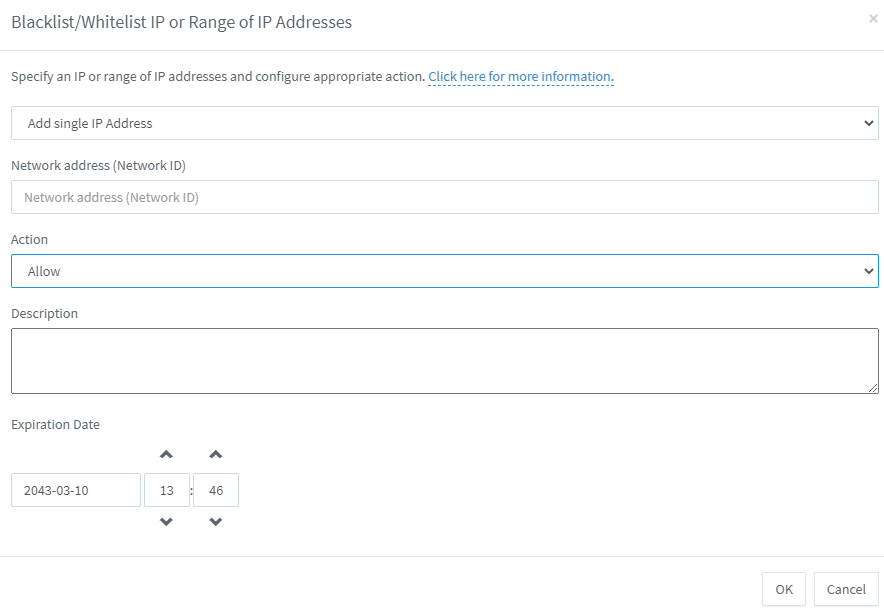
IP Share List
If you are an administrator maintaining the system remotely or from the same network, then you need to make sure that if you try to log in several times and use the wrong password, your IP address will not be blocked. If you have a Static IP address, you can also put it on the share list.
- You want to share an IP address, then add one below and select Allow as the action.
TRUNK Configure
The TRUNK is the actual connection to peoplefone resp. to the SIP line. The connection can be established with the SIP-Credentials be made from the customer account.
Add SIP-TRUNK
- Click Add

- Select Switzerland
- Search peoplefone
- Enter the main TRUNK number
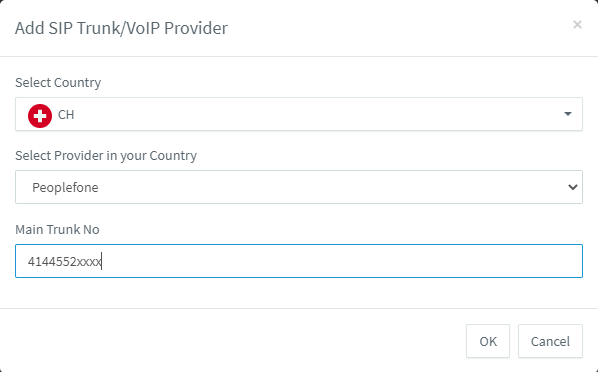
- Bei der Authentifizierung müssen Sie den SIP Usernamen und das Passwort eingeben
The TRUNK should be able to connect immediately and will then be listed in the overview.

Inbound Rules
In order for inbound calls to be routed further, an inbound rule must be created.
- Click Add

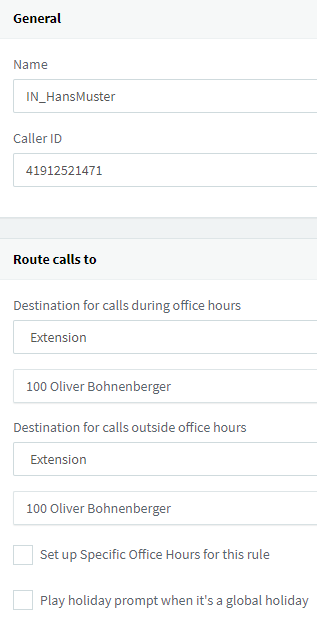
Incoming role for DID / SIP-TRUNK Old
- Give the role a name and select the desired target, it does not necessarily have to be an extension, depending on the requirements, another created object can also be controlled.
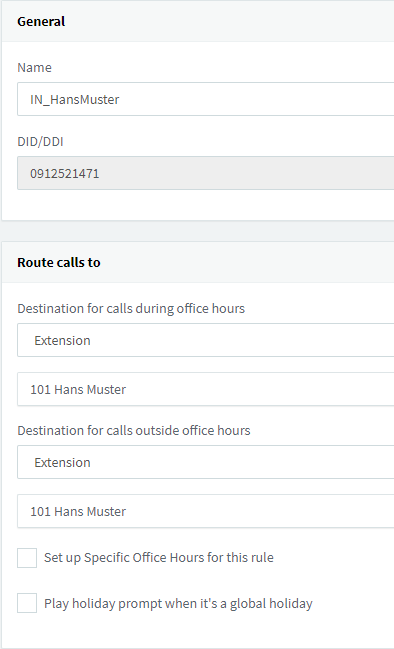
Incoming role for DID / OCS Plattform
- Give the role a name and select the desired target, it does not necessarily have to be an extension, depending on the requirements, another created object can also be controlled.
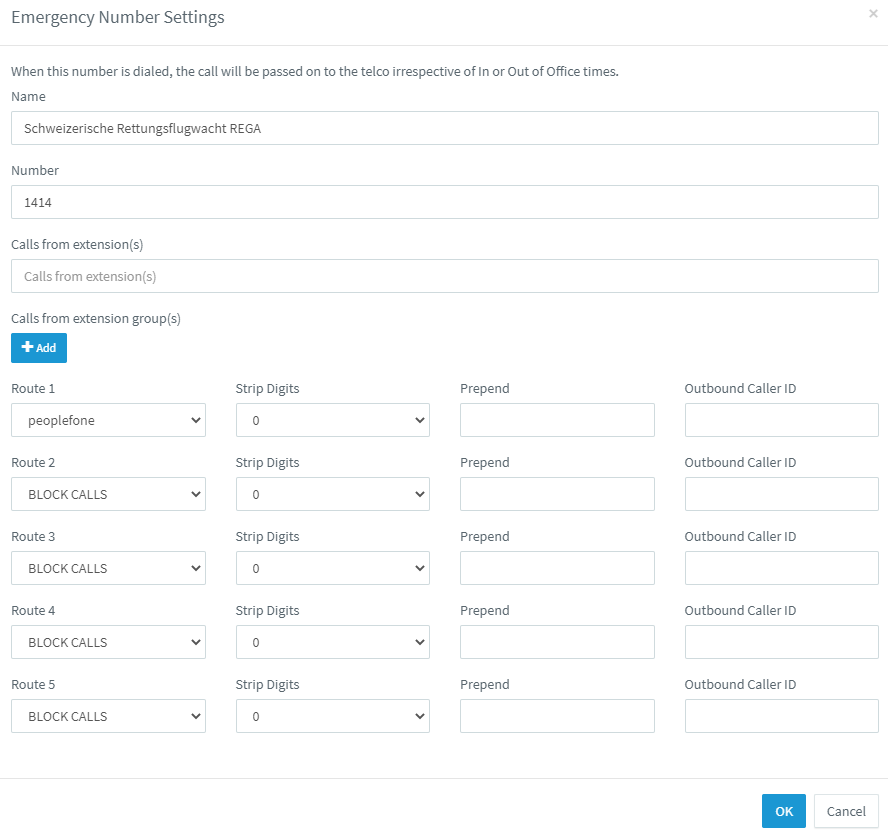
Emergency call
In order for the emergency calls to work properly on the system, you must set it up accordingly. More information for Emergency calls, which must be set up at the SIP-TRUNK and numbers level.
- Click Add
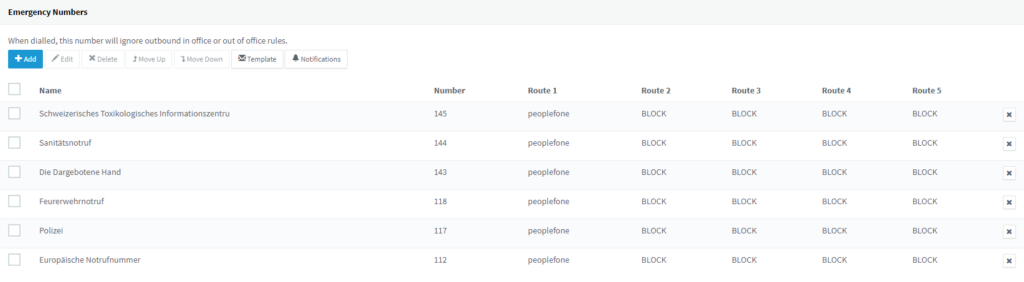
- Give the emergency number a name
- Enter the emergency number and save the settings
Outbound Rules
In order for the system to know which TRUNK to use to make outbound calls, an Outbound Rules must be set up.
- Click Add
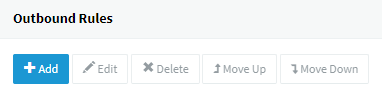
- Give the role a name
- Add the prefix 0
- Select peoplefone in the route and save it
The role should then appear as shown here in the example

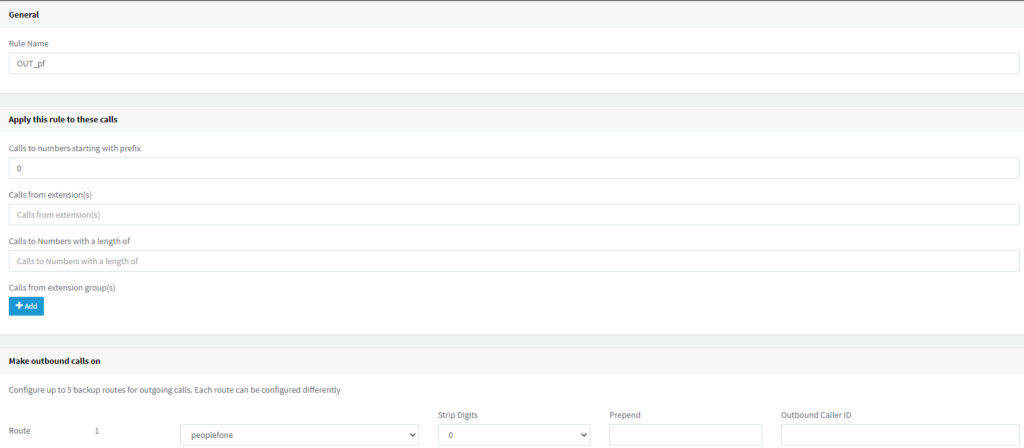
Phone book search local.ch / search.ch
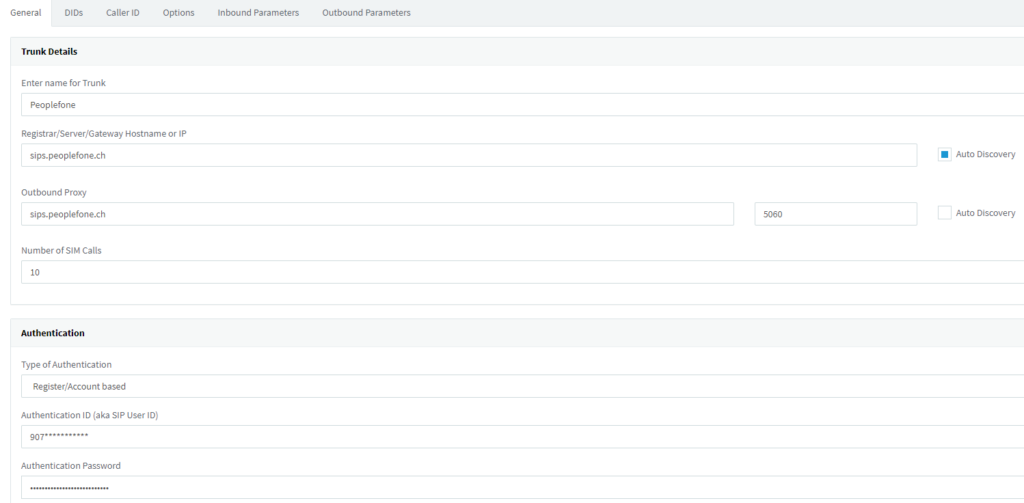
With peoplefone you have the option to look up incoming numbers via local.ch / search.ch. This is done before we deliver the call to the PBX, but it does not work with the default settings of the 3CX system. The information is written on the SIP TRUNK in the incoming “CallerName” caller’s name (default: From->display name)” parameter of the SIP Invite header, but 3CX uses the “From: User Part” parameter by default. This can be easily changed in the trunk options as shown in the screenshot.
Outgoing call as “Unknown
Currently, the default Peoplefone template does not work with the feature where you enter “* 5” as a prefix for a number to dial it with “Anonymous” instead of the regular CLIP.
- The following outgoing parameters must be changed in the trunk settings

- Disable the 3 parameters “RPID – Calling Party” by changing them to “Leave default value”.
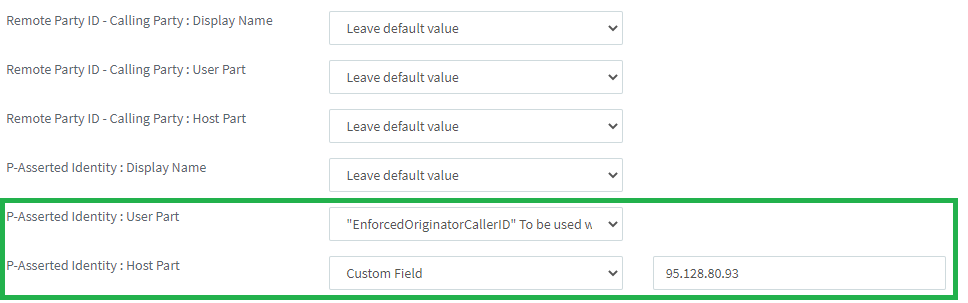
Once the changes are applied, the anonymous prefix * 5 should work as intended.
The 3CX Session Border Controller (3CX SBC)
General Information
The 3CX Session Border Controller (SBC) is installed on the local network to enable easy connection of IP phones to an instance of 3CX Phone System hosted in your private cloud or by 3CX. The 3CX SBC channels all SIP and RTP packets (used to signal or transmit communications data) of a site’s VoIP traffic and transmits them to 3CX Phone System in the cloud. Common connection problems caused by firewalls or special network configurations can be bypassed.
Deployment and resources
The 3CX SBC is primarily used to connect multiple IP phones in one location to a 3CX Phone System hosted in the cloud. It is also used when multiple 3CX instances need to be bridged together. The resource-efficient 3CX SBC needs to be running continuously on your network, a Raspberry Pi or a virtual instance is sufficient. An SBC can be used with 10 or more phones, please refer to the supported devices.
Versions
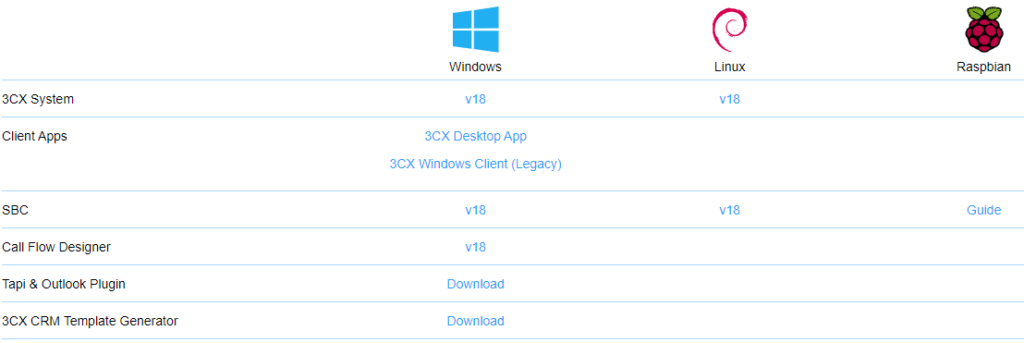
The SBC can run on Windows or Linux based platforms. You can download the installation files and images from the manufacturer in your 3CX account under Download.
3CX Login: https://login.3cx.com/Account/Login
Device compatibility
The devices below are supported, in addition the ones used as (as router phones) can be used as SBC in the network. You can find more information here: https://www.3cx.de/sip-phones
Fanvi
- Fanvil V62, V64, V65 (can be used as router phones)
- Fanvil X- und XU-Serie: X210, X1, X2, X3, X4, X5, X6, X7
- Fanvil Hotel-Serie: H2, H3, H5
snom
- snom D8-Serie: D862, D865 Englisch (can be used as router phones)
- snom D7-Serie: D715, D735, D785 and others
- snom D3-Serie: D315, D385 and others
- snom M300, M400 & M900 (DECT-Telefone)
Yealink
Yealink T5-Serie: T53, T53C, T53W, T54W, T57W (can be used as router phones)
- Yealink T3-Serie: T30P, T31P/G, T33P/G
- Yealink T4-Serie: T42S, T46S/U, T48S/U and others
- Yealink W70, W80, W90 DECT-Telefone Englisch (DECT-Telefone)
Installing 3CX SBC
On a Windows computer
- Download the 3CX SBC for Windows
- Click ‘Next’, read and confirm the license agreement, and click ‘Next’.
- Specify the 3CX SBC installation directory and click ‘Next’.
- Specify the ‘Provisioning URL’ and the ‘Authentication Key ID’ that you copied earlier in step 2.
- Click ‘Next’ > ‘Install’. When the installation is complete, click ‘Finish’ to exit the installer.
On a Debian Linux computer using the 3CX ISO for Debian
- Download the 3CX SBC-ISO
- Select the ‘3CX SBC Version XXX’ option when prompted to select an installation option
- Select ” to view the requirements for installing the 3CX SBC and agree to the terms of the End User License Agreement (EULA)
- Enter the ‘Provisioning URL’ for your 3CX Phone System (Example:https://IhrUnternehmen.3cx.com:5001), und wählen Sie OK
- Enter the ‘Authentication Key ID’ and select ”.
- Select ” again to begin the installation and reboot after it is complete
Install 3CX SBS on a Raspberry Pi
Vorbereiten der Speicherkarte für Raspbian
- Download the compressed Raspberry Pi image file
- Unpack the image file (.img)
- Transfer the image file to the microSDHC memory card using Etcher
- You can find detailed instructions here: SBC Installation – Raspberry Pi 4

Adding the SBC to 3CX
Via management console
- In 3CX Management Console, go to ‘SIP Trunks’.
- Click on ‘+ Add SBC’ and assign a name, e.g. “Berlin Office”.
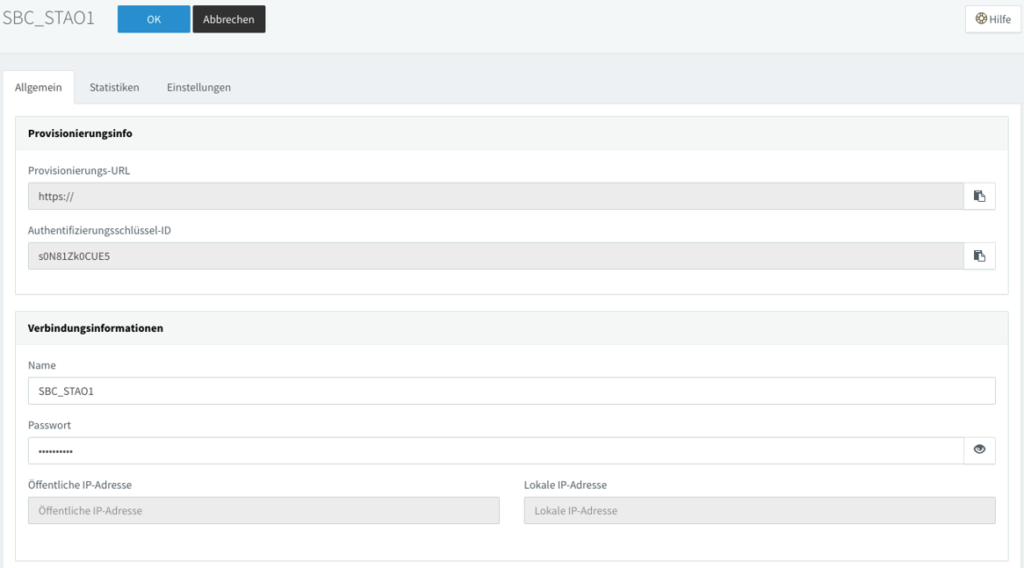
- Ihr SBC wird daraufhin erstellt. Notieren Sie den ‘Authentifizierungsschlüssel’ und die ‘Provisionierungs-URL’. Fahren Sie dann mit Schritt 6 fort.
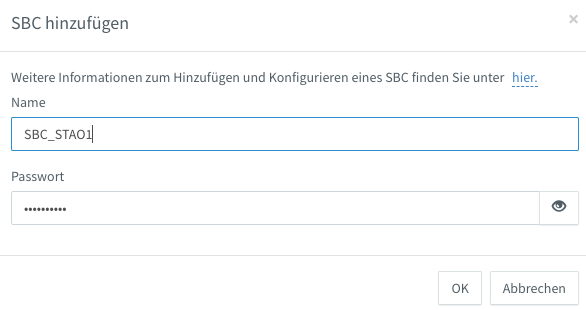
- Click OK
Installing the 3CX SBC
- Log in CLI or SSH based with the username ‘pi’.
- Start the 3CX installation script with the following command: wget http://downloads-global.3cx.com/downloads/sbc/3cxsbc.zip -O- | sudo bash
- Select ” to verify the 3CX prerequisites and accept the license agreement (EULA) to continue
- Enter the ‘Provisioning URL’ for your 3CX Phone System, e.g.B.’https://mein unternehmen.3cx.com:5001’, und wählen Sie ‘<OK>
- Enter the ‘Authentication Key ID’ and select ”
- Select ” to start the installation and perform a subsequent reboot.
Provisioning your IP phones
After the 3CX SBC installation is complete, you can have your IP phones configured with the required settings using PnP provisioning. You can find more information about this in this Instruction.