Supported Telephone System / PBX
All VoIP capable telephone systems (PBX) can be connected to peoplefone’s SIP TRUNK solution.
For example, we support 3CX, Asterisk, Aastra, Opencom, Cisco, etc.
- Instructions how to connect telephone systems to peoplefone TRUNK can be found here: PBX
- Here is a list with Certified Telephone Systems of peoplefone
SIP TRUNK Verbinden
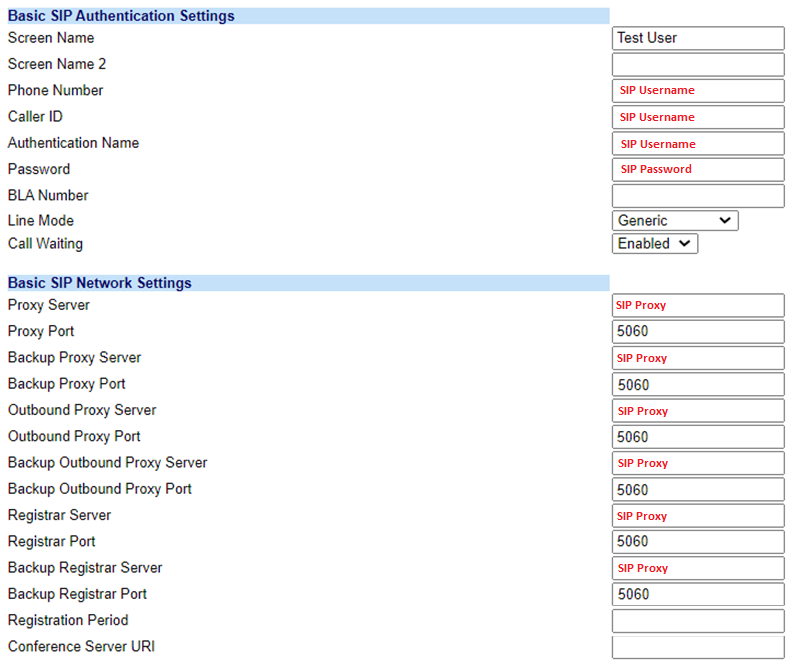
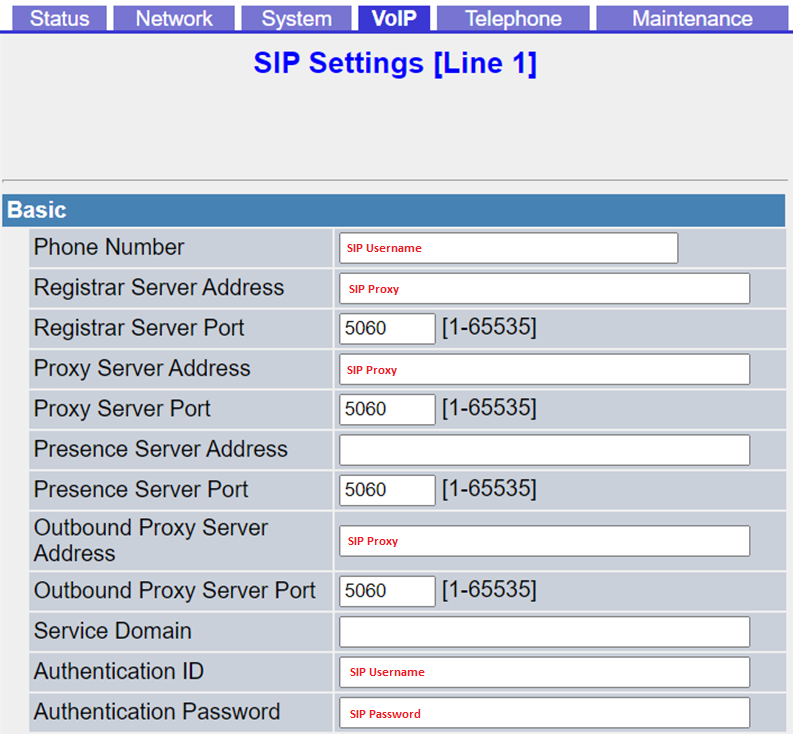
The peoplefone TRUNK can be integrated with only three pieces of information. You need the SIP proxy, the SIP username and the corresponding password. These SIP Setup / SIP Credentials must be entered on your PBX in order for the PBX to connect to peoplefone through the internet.
Important: Each SIP line has its own SIP credentials and do not correspond to the customer account credentials.
Supported codecs
For voice transmission you need codecs. More detailed information which codecs are supported by peoplefone can be found here: Supported Codecs
SIP-TRUNK – Incoming

If you are using a PBX, the SIP line must also have the SIP-TRUNK option enabled so that the correct information can be transmitted in the SIP header, the information is bundled onto the SIP line (TRUNK). This allows your PBX to process incoming calls correctly and send the calls to the correct destinations. This activation is free of charge and must be done by your installation partner or by peoplefone.
peoplefone supports the international number standard E.164 and the national Swiss number format. Example: +41445522000 or 0445522000.
SIP TRUNK – Enable
The SIP TRUNK can be activated on the SIP line by the end customer, partner and peoplefone. In the customer account under SIP Lines / User – Edit SIP Line – Line Type

CLI OPEN – Outgoing

What does CLI Open mean?
First of all, CLIP stands for “Calling Line Identification Presentation”, i.e. the display of the telephone number for outgoing calls. No Screening means “no monitoring”. The compound term CLIP No Screening therefore means that no monitoring of the transmitted call number takes place for an outgoing call. This makes it possible to signal any call number externally.
CLI OPEN – Enable
The activation can only be done by your installation partner or peoplefone. If you are in charge of your installation yourself, please fill out the “CLI Open Form”. You can find this in your customer account under Contracts / Documents – CLI Open Form. Please list all the numbers you wish to signal to the outside world and return the signed form to us by e-mail. By signing the form, you confirm that you are the owner of the number and that you are allowed to signal it. We will check your request and, if necessary, release it and activate CLI Open.
CLI OPEN – Bug fixes
- When CLI Open is switched on, it is mandatory to store a displayed phone number on the SIP line. If this is a test number that has already expired (subscription), CLI Open will no longer be able to take effect and will signal every call to the outside with anonymous. Either the test number block has to be extended or an already ported number has to be stored as displayed number. It is therefore necessary that a displayed phone number is stored in the system for CLI Open to work.
- For security reasons, Swisscom has activated a call protection (filter). If you want to signal a number, which is still hosted by Swisscom, to the outside via peoplefone, you have to allow third party providers in the Swisscom portal. Here you can find Instructions how to make the settings in the Swisscom portal.
- If you connect a SWYX system with the peoplefone TRUNK, then peoplefone must activate a parameter on the SIP line, so that the signaling can work properly. Write an email to [email protected] with the SIP username so that we can activate the parameter on the correct line.
Show Swisscom numbers from third party providers
For security reasons, Swisscom has set up a filter. So if you make outgoing calls with peoplefone and want to show your own non ported phone number, these calls will be signaled as Anonymous or Unknown.
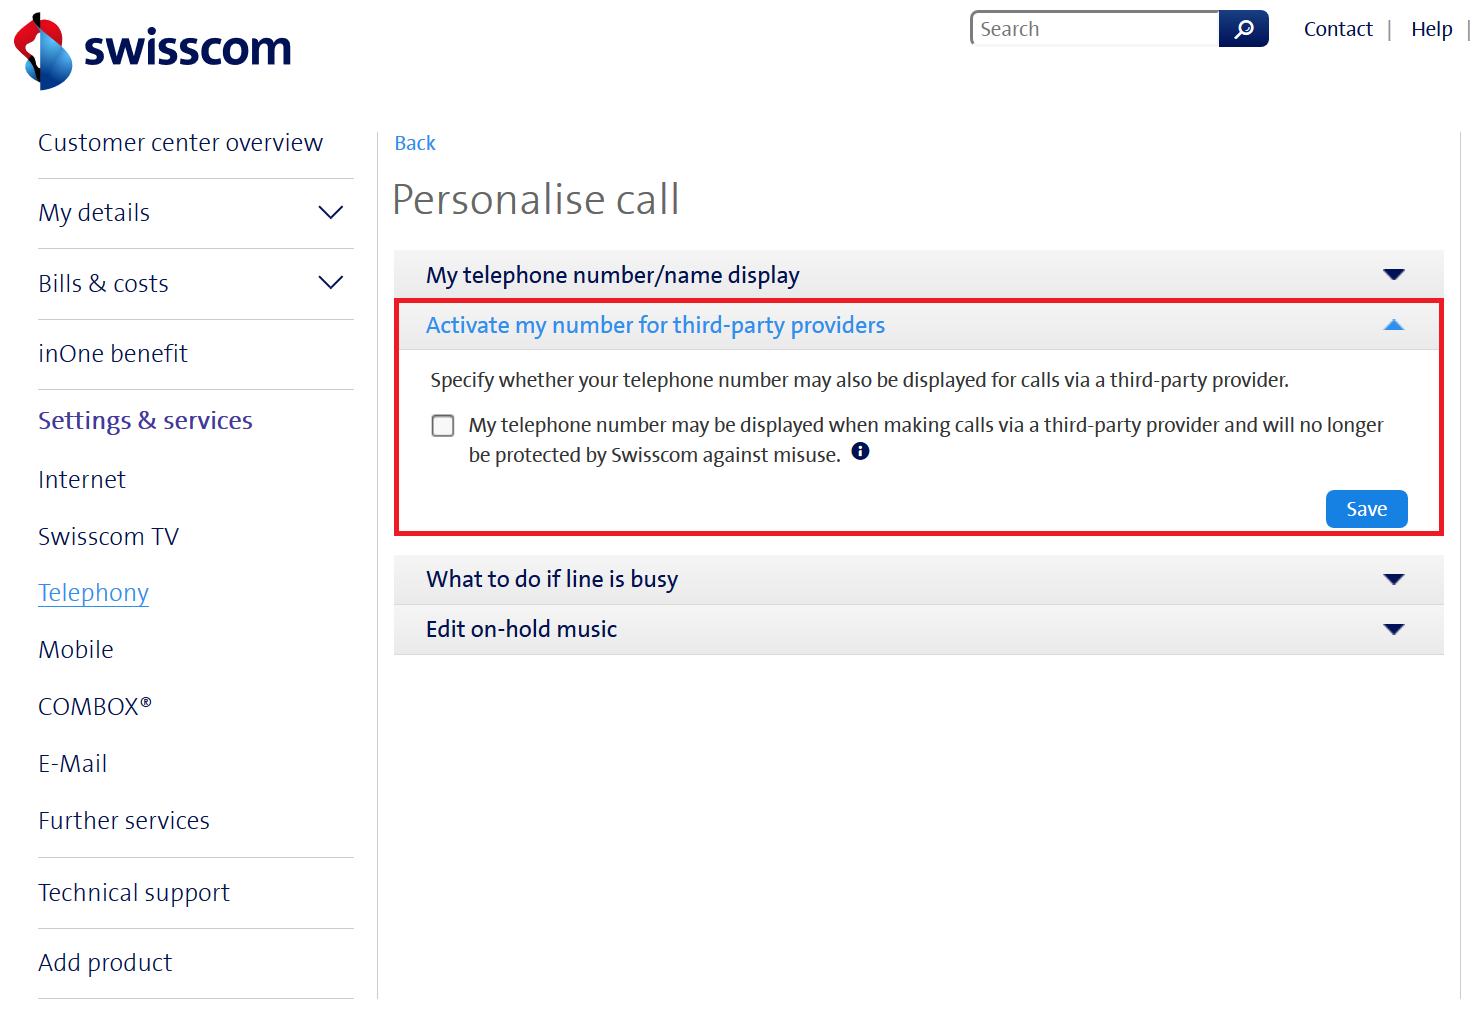
In order for you as peoplefone customer to be able to correctly display your own not ported Swisscom number, you have to Activate my Number for Third Party Provider in your Swissscom customer center.
- Go to Telephony in the Personalize Call section
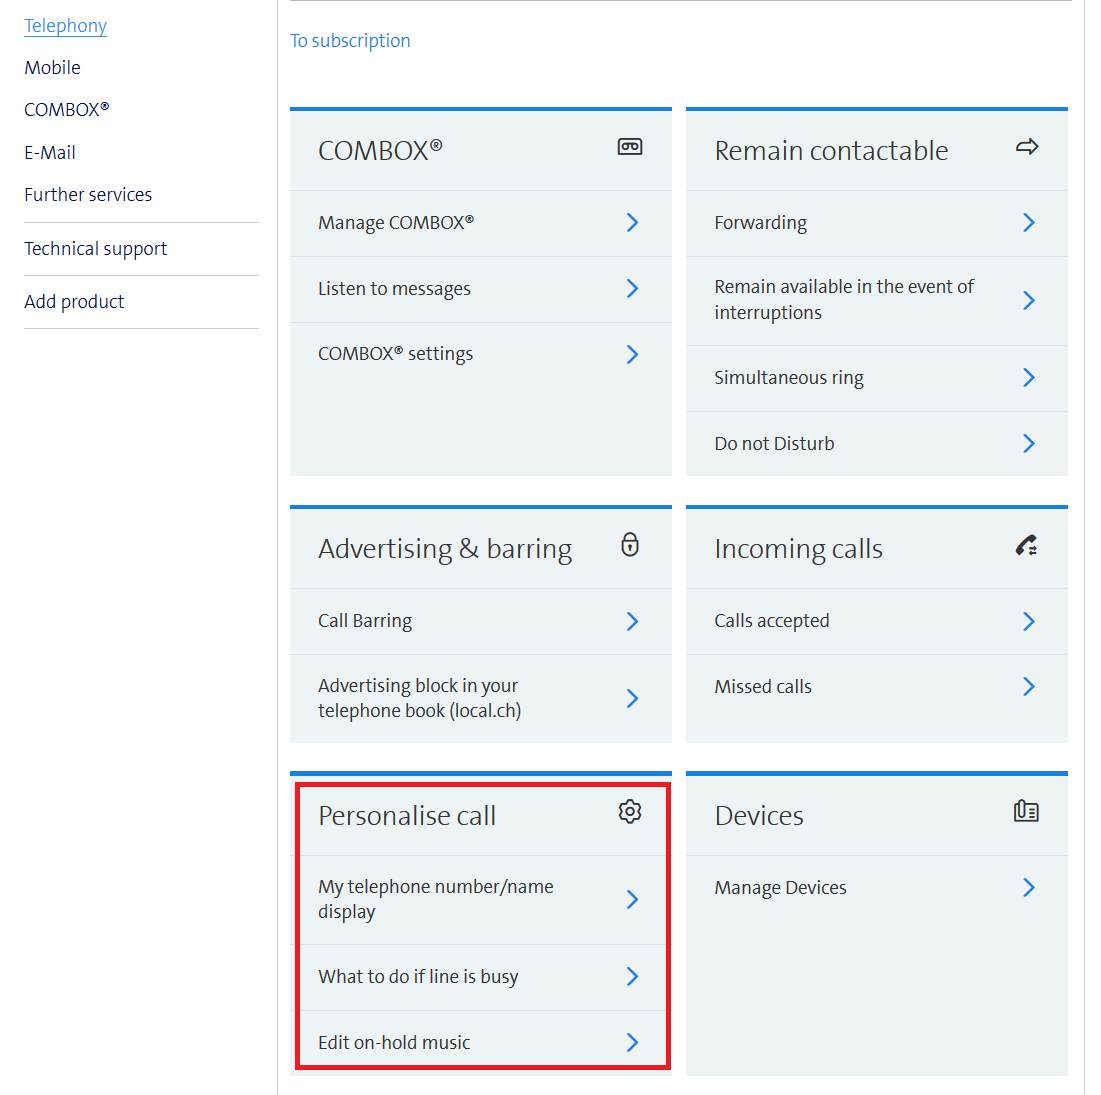
- Go to Personalize call and check the Enable my number for third party checkbox
Phone numbers
Phone number assignment
For incoming calls, the system needs to know where to route the call. You have the option to assign entire blocks of numbers to a SIP line, or you can also assign each number individually to SIP lines in the customer account. Often used when you have multiple locations, then you need to create one SIP line per location. Reason for this is that you can store different addresses in the system for emergency routing. So that when an emergency occurs at a location and an emergency call is made, police, fire department, ambulance, etc., will be dispatched correctly.
IMPORTANT: For more information on emergency calls, click here: Emergency Calls

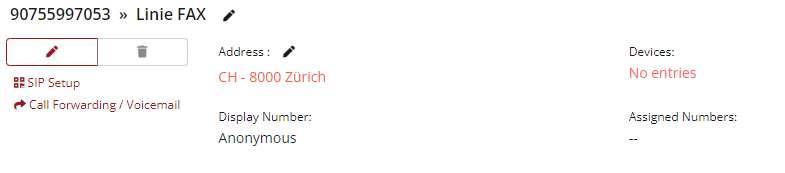
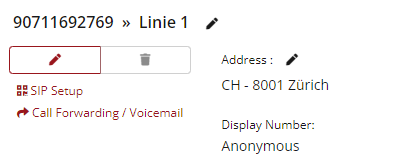
If you click on the pen tool, you can assign each individual phone number, if necessary, to a specific SIP LINE in your customer account. If you click on the chain, then assign the whole block to a single line (picture above). The phone number assignment is for incoming calls, it defines to which SIP line the call should be routed.

Displayed call number / signaling
If you click on the big red pencil tool under SIP Lines / User, you can define the displayed number which should be signaled to the outside.

Emergency calls (144, 118, 117)
In order to forward emergency calls to the correct emergency call center, a verified address must be stored in the system for the respective location. In Switzerland, the addresses are verified using the Swiss Road Directories (CH Post).
ATTENTION: Emergency numbers can only be guaranteed within the respective country.
CH – Konto → Emergency call Schweiz
DE – Konto → Emergency call Deutschland
AT – Konto → Emergency call Österreich
FR – Konto → Notruf Frankreich
What do you need to do?
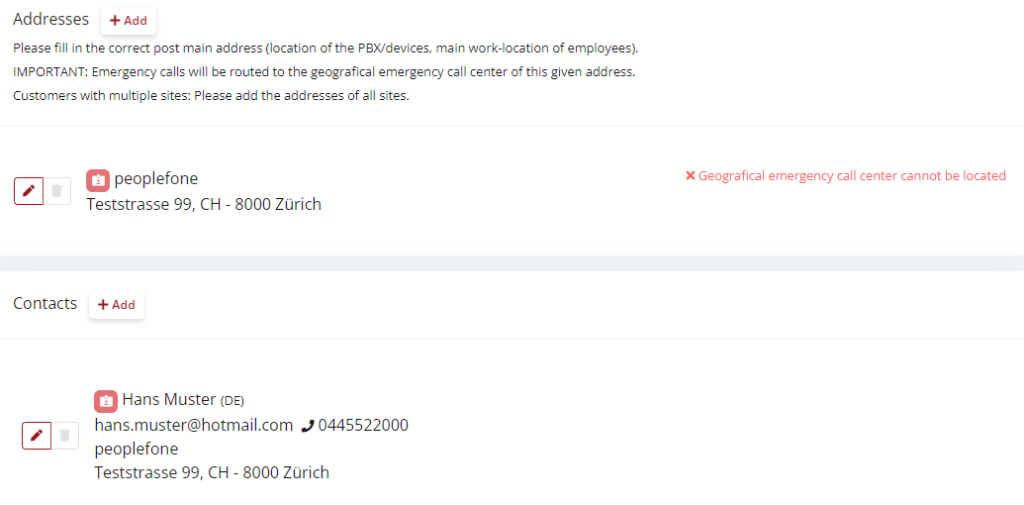
- Create a contact for the respective location (where is the contact, location, person physically)
- The contact must be assigned to the respective SIP line/user
- Assign contact to the number block (identification of the location for the SIP line and display at the emergency call center)
Kontakte – Standorte
If you have multiple locations, create a contact for each location.
- Click add
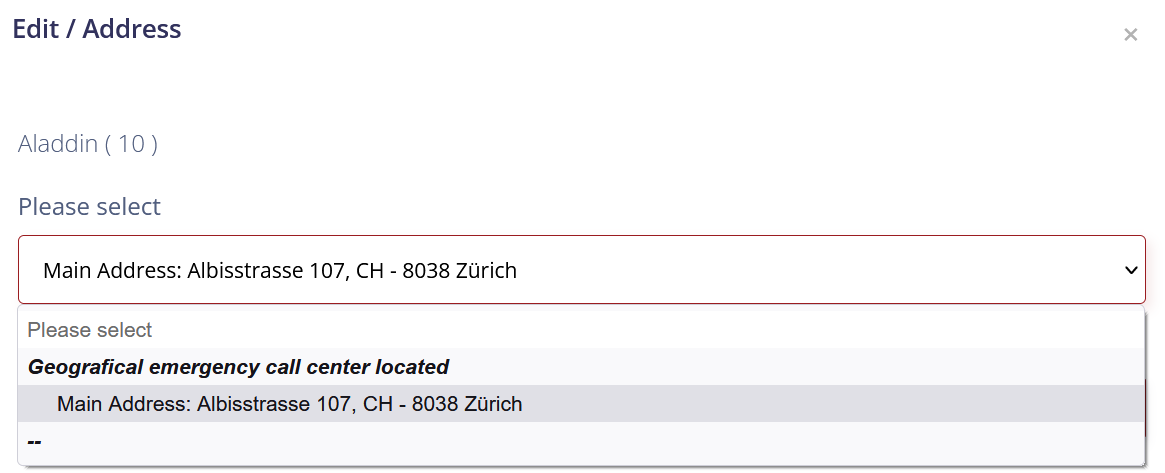
Emergency Call Setup for a SIP Line
In order for the call of an emergency call to be sent to the correct emergency call center, the correct contact of the respective location must be stored on the SIP line.
- Click on the pen tool at Address and select the address to be stored
- Select the address
Identification of the location for the phone numbers
ATTENTION: In order for the emergency calls to be identified at the emergency call center, the emergency call contact must be stored at the call number level.
Assign address to the phone number
- Deposit the correct address on the number, it will be synchronized several times a week with a database of Swisscom. This number will be shown on the display of the emergency call center during emergency calls.

TLS & SRTP

In VoIP we talk about two data streams where data is transmitted. One is there to transport control commands, the other the audio packets. Both streams can be encrypted. For this your PBX or phone must support TLS & SRTP. If you switch the transport protocol from UDP/TCP to TLS on your device, then the phone will connect to peoplefone with TLS (encrypted). This has to be done by partner or end customer on the Device. If additionally the audio should be encrypted, then SRTP must be activated on the device. peoplefone must activate SRTP on the SIP line, please send an email to [email protected] with the information to activate SRTP and the SIP username. We will do the configuration and inform you about it.
NOTICE:
- The encryption is only valid for calls from peoplefone to peoplefone, all calls that leave us are no longer encrypted. Few providers and carriers support encryption, so means calls going from peoplefone to another provider are not encrypted.
- During troubleshooting, the encryption may need to be disabled, as the data being recorded cannot be read.
SIP ALG- Troubleshooting
SIP ALG on firewall or router, sometimes can affect the VoIP communication. The switching on of TLS & SRTP, can therefore contribute to the fact that SIP ALG can do nothing. Basically we recommend to switch off SIP ALG, but in some constellations this is not possible, then this solution would come into play.
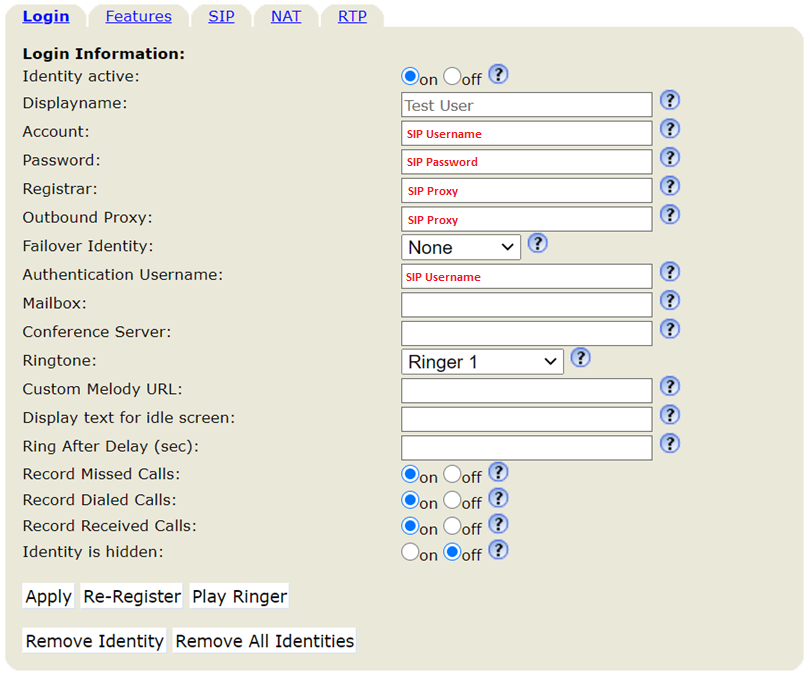
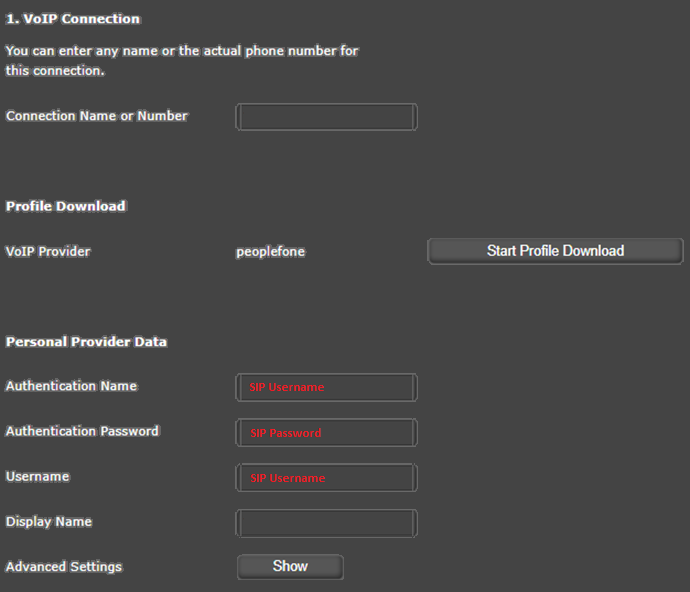
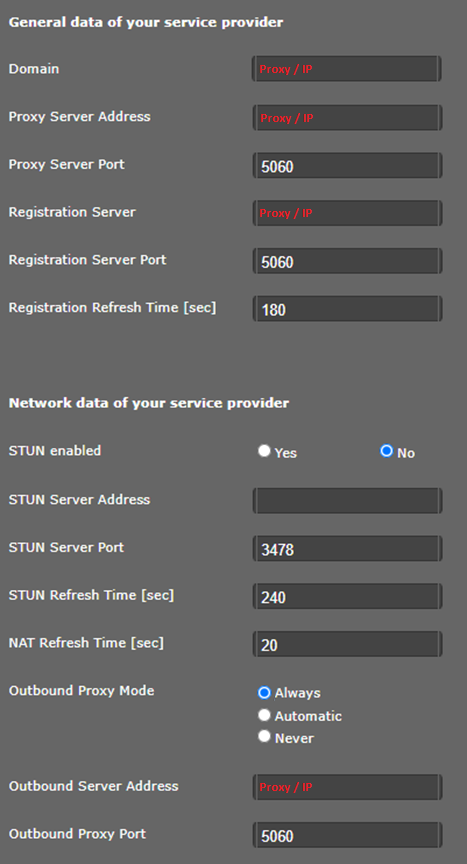
Manual configuration of VoIP devices
You can register up to 5 devices per SIP line. Our recommendation for correct operation is that you only register one device per SIP line. peoplefone does not provide support for manually configured end devices, please contact the manufacturer for troubleshooting.
ATTENTION: Use good and complex passwords, for security reasons never leave the default password.
NOTICE: The SIP data to install your device / PBX (SIP username and SIP password) are NOT the same as the login data for your peoplefone account (login email and personal password).
You can read out the SIP data Login Data / SIP Credentials from your customer account: SIP Setup
If you configure a phone manually, then our recommendation is to update the device to the latest firmware version and then configure the device.
Yealink
If a device has been reset to factory settings, then the login data according to the manufacturer is also adopted.
- Username: admin
- Password: admin

SNOM
If a device has been reset to factory settings, then the login data according to the manufacturer is also adopted.
- Username: admin
- Password: admin
- Password for activating the administrator mode: 0000
Gigaset
If a device has been reset to factory settings, then the login data according to the manufacturer is also adopted.
System Pin: 0000
For the Gigaset DX800 we recommend to enter the IP address instead of the proxy FQDN. For all other Gigaset devices always use the proxy from the customer account (SIP Setup).
Gigaset DX800 Troubleshooting
Proxy IP / peoplefone SIP TRUNK: 95.128.80.3
Mitel
If a device has been reset to factory settings, then the login data according to the manufacturer is also adopted.
- Username: admin
- Password: 22222
Panasonic
If a device has been reset to factory settings, then the login data according to the manufacturer is also adopted.
- Username: admin
- Password: adminpass
SIP Trunk Forwarding
Forwarding standard
Standard forwarding is usually used by end customers who have configured a terminal directly on a SIP line and accordingly want to forward it to a specific destination. You can easily and conveniently activate a standard forwarding on your number in your customer account at any time. A forwarding, for example to a cell phone causes call costs and will be charged at peoplefone’s normal rates per minute. Make sure you have enough credit on your account.
- To configure a default forwarding, click in the customer account on the left site to SIP Line / Users – Call Forwarding / Voicemail
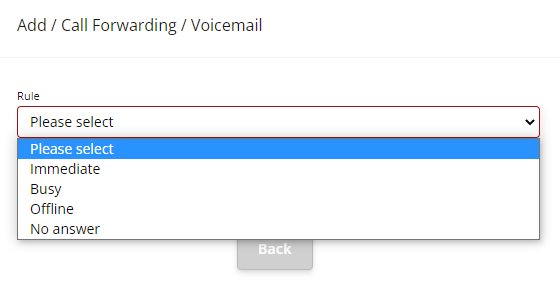
- If no role has been set up yet, add one, otherwise you can edit one.

There are four rollers, which can be used.
- Immediate forwarding
- The call is immediately forwarded to the destination from peoplefone.
- When occupied
- If you are already in a call (you are busy), the calls will be forwarded to the stored destination
- Diese Rolle beginnt zu greifen, wenn der Status der SIP Linie offline ist
- If offline
- This role starts to take effect when the status of the SIP line is offline
- If no answer
- If the call is not answered and after approx. 5-6 rings passed to the defined target
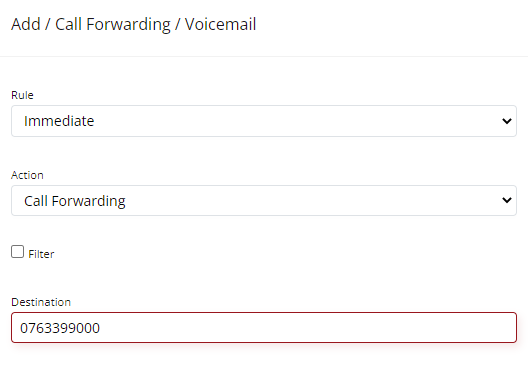
For standard forwarding, we use immediate forwarding to a destination. We can then choose to give the call to a specific destination or to the voicemail box. In this example we will forward calls that land on the SIP line directly from peoplefone to the stored destination.
Forwarding fallback
With a fallback you can set up a failsafe of the telephone system. If for any reason the internet fails at the customer and the system or the phone cannot register at peoplefone anymore, then after the re-register time (recommended 180 seconds) the status on the SIP line will go offline. This is also the trigger that the forwardings stored in the system, when offline, will start to pull. You have the possibility to forward single numbers to different destinations or even whole blocks.
Max. 300 forwardings can be defined per SIP line. peoplefone recommends to set up fallback forwardings according to a concept and to keep the setup as simple and transparent as possible.
Prefix (whole block)
A fallback can also be created via a role at Forwarding / Voicemail. In this example we will forward a whole block of phone numbers to a destination.
- Click on +Add
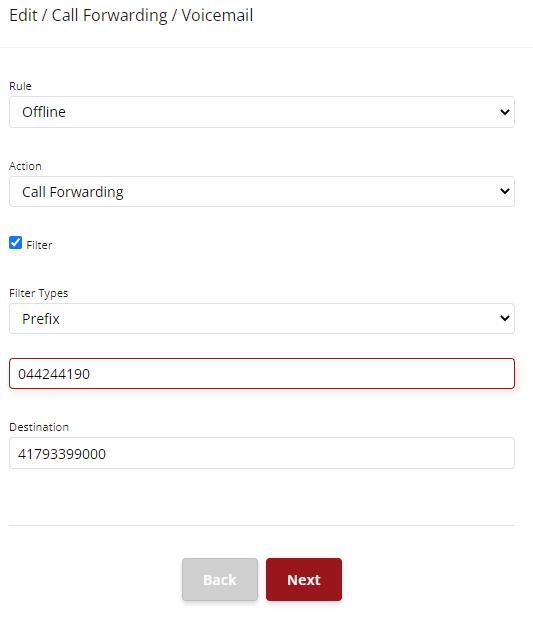
We choose the role offline for the fallback, if the status of the SIP line is offline, this role will take effect. The action we choose is a forwarding. IMPORTANT: The filter must be enabled to select the filter type (prefix). As you can see in this example, the number to be filtered is too short. It doesn’t matter which number is dialed now, all will be filtered and forwarded to the destination.
EXAMPLE:
044 244 19 00 – 09
Exact number
If you want to filter only one phone number, then it can be done as shown here and the filter type «Exact number». As an example, you want to forward number of sale to a mobile when the system or phone is offline in case of failure Status of SIP Line.

SIP-TRUNK Voicemail

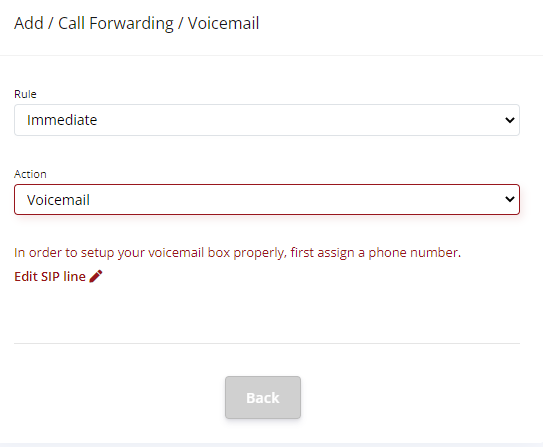
It is possible to add a voicemail box to the SIP line. In the customer account, go to Forwarding / Voicemail in the menu on the left and click on Add for the respective SIP line. Select the desired role and define the option and select Voicemail. If there is no phone number on the SIP line, you have to add it first.
Activate voicemail
- Click on +Add at the desired line or on the eye to display the rolls that have already been added

In order for the call to be routed to the voicemail box immediately, an immediate forwarding must be set. A forwarding after X-Seconds (delayed), will not work.
- Set as role Immediate and the action should be Voicemail
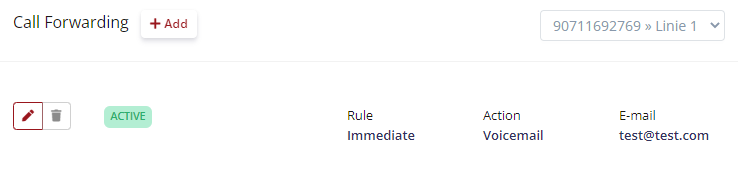
- If the activation is successful, the role will be displayed as here, by clicking ACTIVE with the mouse, you can easily and conveniently activate and deactivate the role.
Manage voicemail
Via an APP, softphone or VoIP phone, you can call up the answering machine functions with «*1»
- * – Help
- # – Verlassen
- 0 – Mailbox Optionen
- 1 Record out of office message
- 2 Occupied
- 3 Name
- 4 Welcome
- 1 – Old news
- 3 Extended
- 5 Repeat
- 7 Delete
- 8 Forward
- 9 Save
- 2 – Change folder
- 0 New news
- 1 Old news
- 2 Work News
- 3 Private Nachrichten
- 4 Completed messages
- 3 – More options
- 1 Answers
- 3 Information
IMPORTANT: The system language Cannot be switched off or overwritten. There is no possibility to upload a voicemail greeting, the greetings have to be recorded.